February 21, 2011
This version uses SpreadsheetGear 2010* (6.0.3.190) and NetAdvantage 2010, Volume 2 (10.2.20102.1004).
*SpreadsheetGear 2010 was upgraded from 6.0.3.158 to 6.0.3.190.
As with all releases, the dodeca-essbase service should be updated.
The release notes for this build contain the following sections:
Comments
dodeca-essbase Service Configuration
Essbase Adhoc View
Grid-based Views (Excel, SQLExcel, and all Essbase View Types)
Metadata Editors
PDF Support
Relational
Selectors
Toolbar Configurations Metadata Editor
Workbook Script Debugger
Workbook Scripting
Comments
- Fixed issue: At the point when a user attempts to rebuild or refresh a view that contains unsaved comment changes, the Save Comments tool prompts the user to determine whether to discard the changes and rebuild/refresh the view OR to save the changes and not rebuild/refresh the view. The issue is that when the user indicates that the view should be rebuilt/refreshed and changes discarded, the tool actually saves the changes. And, when the user indicates changes should be saved, the changes are discarded and the view is rebuilt/refreshed. This issue was introduced in Build 5.0.0.2260, June 17, 2010. (#947)
- Copy Comments (Server-Side) Support — Added the ability to copy comments from one or more intersections to one or more different intersections. (#945)
Note: This is not a client-side capability that allows an end user to copy comments locally. It is a server-side capability that executes SQL statements to copy the comments (as described below.) This functionality can be launched from the client using the CopyComments workbook script method.
The comments copy functionality has been implemented using a combination of a workbook script method and a new server-side module. The workbook script method provides users the ability to pass the appropriate source and target data intersection information to the server for processing. The server-side module is responsible for writing the SQL in the syntax of the Dodeca metadata database.
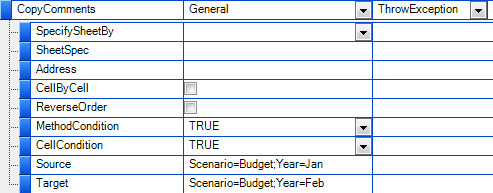
The workbook script CopyComments method contains arguments, Source and Target, which define the data intersections. The Source argument is used as a filter on the data intersections selected during the copy operation. The Target argument is used to define the destination where comments will be copied. Both arguments are expressed using the format key=value;key2=value2 where the key/value pairs are separated by a semicolon. Multiple sets of key/value pairs may be separated by a pipe ("|") character, which allows multiple sets of copy operations to be accomplished in a single server roundtrip.
In the example below, the comments for Budget-Jan will be copied to Budget-Feb.
The server contains three tables related to comments. The COMMENTS table stores the main information about the comment. The COMMENT_KEY_ITEMS table, which has a many-to-one relationship with the COMMENTS table, contains the key/value pairs which identify the data intersections for the comment. The COMMENT_ATTACHMENTS table, which also has a many-to-one relationship with the COMMENTS table, stores file attachments related to the comment. Note: The comment attachments functionality has not yet been exposed in the Dodeca user-interface and is reserved for future use.
Here are some sample records from the COMMENTS table.
Below are the COMMENT_KEY_ITEMS records that relate to the first comment displayed in the COMMENTS table sample.
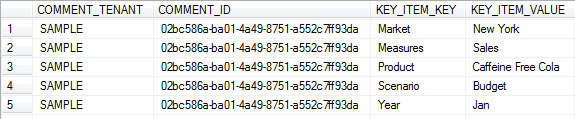
The COMMENT_TENANT and COMMENT_ID columns form the primary key in the COMMENTS table and uniquely identify a record. These fields, along with KEY_ITEM_KEY field, form the primary key in the COMMENT_KEY_ITEMS table. The COMMENT_ID is a GUID ("Guaranteed Unique ID") that is passed from the Dodeca client. The PARENT_ID column is the COMMENT_ID of the parent comment when threaded comments are allowed. The COMMENT_KEY_HASH column is an SHA-1 hash of the related COMMENT_KEY_ITEMS records, sorted, appended together and converted to upper case. This identifier can be computed by the Dodeca client and passed to the server to request the related comment which both reduces the amount of bandwidth used to request the comment from the client and eliminates the need to perform a join between the COMMENTS and COMMENT_KEY_ITEMS tables in the relational query on the server.
The steps performed on the server for each set of source/target pairs include:
- Create a query to return the COMMENT_ID field for every comment that has every key/value pair combination in the COMMENT_KEY_ITEMS table.
- Create a new unique identifier for the new copied comment (using the Java UUID object).
- Create an insert statement to insert a new record with the same field values except the COMMENT_ID, which is updated to the new unique identifier, and the COMMENT_KEY_HASH, which is set to null.
- For each COMMENT_ID field, get the corresponding COMMENT_KEY_ITEMS records. Create an insert statement for each record which is identical to the original COMMENT_KEY_ITEMS record except the COMMENT_ID is updated to the new identifier and the corresponding KEY_ITEM_VALUE field is updated to the target ('copy-to') value.
- For each COMMENT_ID field, get the corresponding COMMENT_ATTACHMENTS records. Create an insert statement for each record which is identical to the original COMMENT_KEY_ITEMS records except the COMMENT_ID is updated to the new identifier.
- Re-compute and update the COMMENT_KEY_HASH field based on the updated set of COMMENT_KEY_HASH fields.
- Find and update the PARENT_ID fields to reflect the updated unique identifiers of the copied parent records.
We have some customers who would like to further customize the comment copy process. For those customers, below are some sample SQL statements that run during the copy comment process.
Select the COMMENT_ID values to copy:
select c.COMMENT_ID
from COMMENTS c
inner join COMMENT_KEY_ITEMS k
on c.COMMENT_TENANT=k.COMMENT_TENANT
and c.COMMENT_ID=k.COMMENT_ID
where c.COMMENT_TENANT='SAMPLE'
and k.KEY_ITEM_KEY='Scenario'
and k.KEY_ITEM_VALUE='Budget'
or k.KEY_ITEM_KEY='Year'
and k.KEY_ITEM_VALUE='Jan'
group by c.COMMENT_ID
having count(c.COMMENT_ID)=2
Select the COMMENT record:
select *
from COMMENTS
where COMMENT_ID='02bc586a-ba01-4a49-8751-a552c7ff93da'
Select the related COMMENT_KEY_ITEM records:
select *
from COMMENT_KEY_ITEMS
where COMMENT_TENANT='SAMPLE'
and COMMENT_ID='02bc586a-ba01-4a49-8751-a552c7ff93da'
Select the related COMMENT_ATTACHMENTS records:
select *
from COMMENT_ATTACHMENTS
where COMMENT_TENANT='SAMPLE'
and COMMENT_ID='02bc586a-ba01-4a49-8751-a552c7ff93da'
For more information, contact us at support@appliedolap.com.
dodeca-essbase Service Configuration
- Support for an essbaseServers parameter in the web.xml has been added to allow for specifying a list of servers from which the applications and databases are obtained when using APS 9.3.0 or higher in embedded mode. This setting is used in conjunction with the new Sign On and Set Active Essbase Connection tool, which allows a user to sign on and be presented with a hierarchical list of the servers/applications/databases to which the user has access. (Refer to the Essbase Adhoc View section for more information about the tool.) (#926)
Here is an example of the web.xml configuration:
<init-param>
<param-name>essbaseServers</param-name>
<param-value>localhost;</param-value>
</init-param>
Essbase Adhoc View
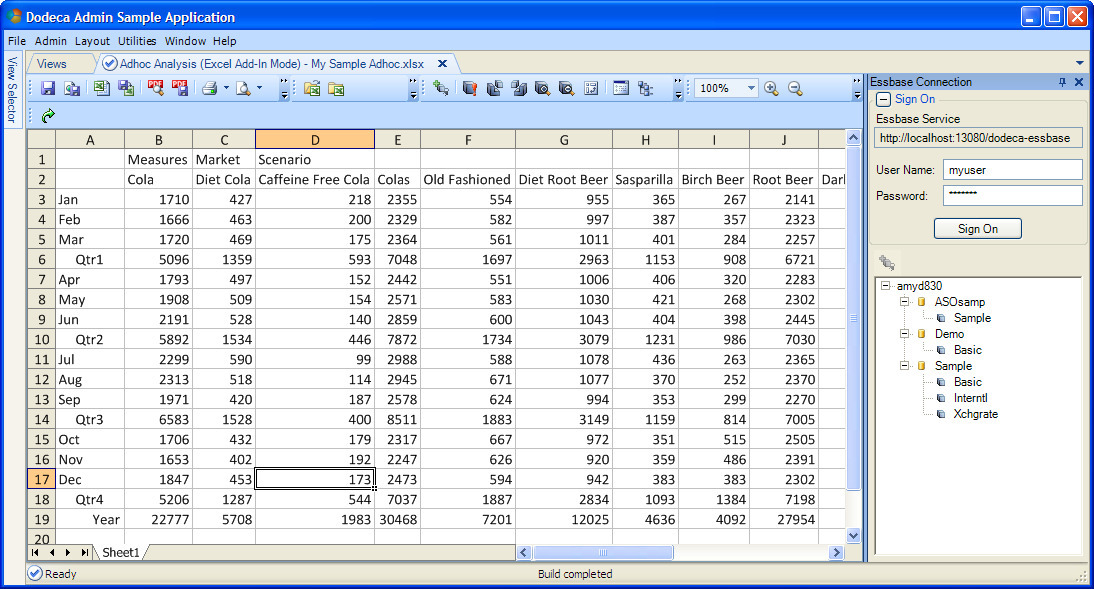
A new setting, ExcelAddInMode, is now supported for the Essbase Adhoc view. When the mode is enabled, the view emulates the behavior of the classic Excel Add-In, which is characterized by the following:
- When data is copied and pasted into the view’s spreadsheet control, the user does not have to perform a retrieve operation before other operations, such as Zoom In, Keep Only, etc., can be performed.
- Essbase operations are performed on the selected range, when the size of the range is at least 2-by-2 cells.
- The Send tool does not track modifications, so the user is not prompted when they initiate an action that will potentially overwrite unsaved changes.
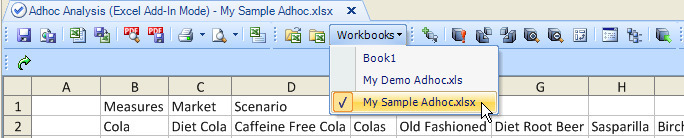
- The user can open a workbook, which is loaded into the view’s spreadsheet control and automatically set as the active workbook. Multiple workbooks can be open within the view at the same time, and the user is able to set the active workbook as well as close the currently active workbook. (#930)
The ability to load a workbook into the view, to set the active workbook, and to close the active workbook are supported by the following tools: The Open Workbook and Close Workbook button tools, and the Active Workbook menu and list tools. (#931) (#937)

The view tab displays the view’s default caption appended with the name of the active workbook. For example, in the screenshot above, the view’s tab contains the view’s name "Adhoc Analysis (Excel Add-In Mode)" appended with currently active workbook, "My Sample Adhoc.xlsx."
The default workbook is Book1, which cannot be closed. When Book1 is the active workbook, the Close Workbook tool is disabled.
image::image387.jpeg[image,width=624,height=90] When multiple workbooks are open, the Workbooks menu can be used to switch to another workbook. The active workbook is the workbook currently displayed within the view’s window.
How to add the Open Workbook, Close Workbook, and Active Workbook tools to a toolbars configuration
To add the workbook-related tools to an existing toolbars configuration, perform the following steps:
- Open the Toolbars Configuration Metadata Editor from the Admin menu.
- Select the toolbars configuration to which you want to add the tool.
- Open the Toolbars Designer.
- Open the Import Standard Tools and Toolbar Wizard.
- Click Next on the Select Toolbars tab.
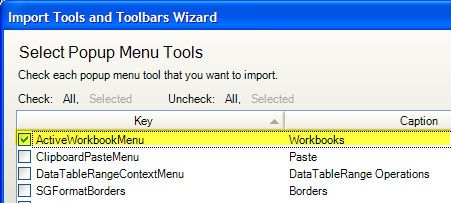
- On the Select Popup Menu Tools tab, check the ActiveWorkbookMenu tool.
- Click next to advance to the Select Tools tab. The ActiveWorkbookList tool is automatically checked, since the tool is contained by the ActiveWorkbookMenu. Scroll down and check the CloseWorkbook tool, and scroll down again and check the OpenWorkbook tool.
- Click Finish to close the wizard.
- In the Toolbars Designer, activate the Toolbar Designer tab. The tools can be added to any existing toolbar, or you may rather create a new toolbar to contain only the workbook-related tools.
- From the dropdown, select the existing or new toolbar to which you want to add the tools, and drag the tools to the appropriate position. To add a separator bar in front of a tool, click the tool to activate, then right click to display the context menu and click Begin a Group.
- Close the Toolbars Designer dialog.
- Commit the changes.
Sign On and Set Active Essbase Connection Tool
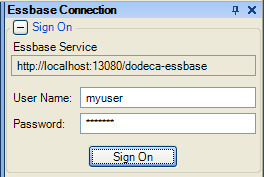
Another tool has been added that can be used with all Adhoc views regardless of whether the ExcelAddInMode setting is True or False. The Sign On and Set Active Essbase Connection tool allows the user to sign on to Analytic Provider Services, as configured by the Dodeca administrator, and then set the active connection used by the view. When the ExcelAddInMode is True, and the user opens a workbook that contains multiple sheets, a connection can be associated with each sheet. (#936)
The tool opens a docked control that allows the user to sign on, and then presents the applications and databases to which the user has access. If the view is configured with an EssbaseConnectionID and one of the server/application/database paths in the hierarchy matches the server/application/database path represented by the Essbase connection with the specified ID, the connection is set as the default active connection.
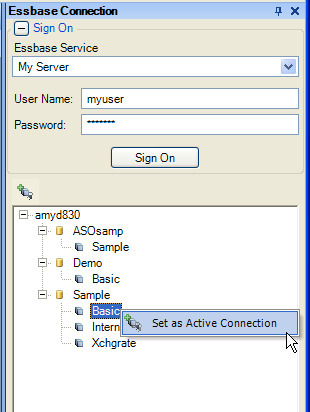
The user sets the active connection by either right clicking on a database and selecting Set Active Connection from the context menu or by clicking the same tool positioned above the application/database window. When the workbook contains multiple sheets, the active connection is associated with the currently active sheet allowing for a different connection to be associated with each sheet.
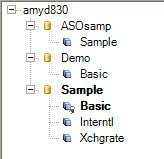
The active connection is bolded and displayed with the active connection icon.
The Sign On and Set Active Essbase Connection tool is a standard tool, but the tool must be configured.
How to add the Sign On and Set Active Essbase Connection tool to a toolbars configuration

To add the Sign On and Set Active Essbase Connection tool to an existing toolbars configuration, perform the following steps:
- Open the Toolbars Configuration Metadata Editor from the Admin menu.
- Select the toolbars configuration to which you want to add the tool.
- Open the Toolbars Designer.
- Open the Import Standard Tools and Toolbar Wizard.
- Click Next on the Select Toolbars tab and again on the Select Popup Menu Tools tab to advance to the Select Tools tab. Scroll down and check the SignOnAndSetActiveEssbaseConnection tool. Then, click Finish to close the wizard.
- In the Toolbars Designer, activate the Toolbar Designer tab.
- From the dropdown, select the toolbar to which you want to add the tool, and drag the tool to the appropriate position. To add a separator bar in front of a tool, click the tool to activate, then right click to display the context menu and click Begin a Group.
- Close the Toolbars Designer dialog.
- Commit the changes.
How to configure the Sign On and Set Active Essbase Connection tool
To configure the Sign On and Set Active Essbase Connection tool, perform the following steps:
- From the Toolbars Configuration Metadata Editor, select the toolbars configuration to which the tool was added.
- Open the Configure Tools dialog.
- Select the CustomToolControllers module.
- Scroll to the bottom in the left pane and select the SignOnAndSetActiveEssbaseConnection tool.
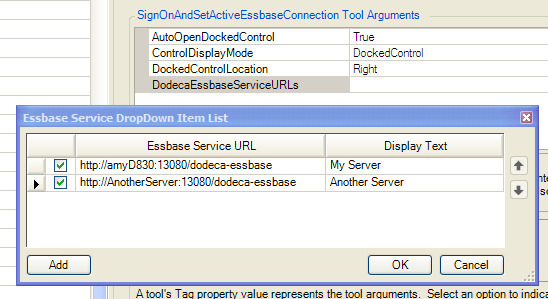
- In the right pane, the tool arguments are displayed. By default, the tool is configured to automatically open the user control as a docked control along the right edge of the view’s window when the view is opened.
The DodecaEssbaseServiceURLs setting controls which Analytic Provider Services the user is allowed to sign on to. The setting contains the URL of the each dodeca-essbase service that is configured with an APS instance that should be available to the user. When a dodeca-essbase service is configured to use embedded mode for APS 9.3.0 or higher, the list of servers is obtained from the essbaseServers parameter in the web.xml. (Refer to the dodeca-essbase Service Configuration section for more information about this new parameter.)
Optionally, the display text presented in the user-interface for the service can be specified. If not specified, the URL is used.
The Essbase Service DropDown Item List dialog is displayed when the open dialog button is clicked for the DodecaEssbaseServiceURLs setting. The list contains any entries that were previously configured along with all the unique service paths that are specified as a ServletPath value in the Essbase connections metadata. An item can also be added using the Add button. The checkboxes at the left of each item are used to indicate whether the service should be available to the user.
When only one service is checked, the control displays the service URL or caption as a read-only value. For this example, the service is configured to display the URL.
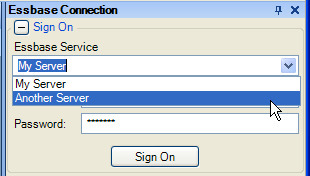
When multiple items are checked, the control presents the items in a dropdown list. For this example, the services are configured with a Display Text value.
When the user signs on, the control displays the hierarchy of servers, applications, and databases the user has access to.
- Close the Configure Tools dialog. When prompted to commit changes, click Yes.
Grid-based Views (Excel, SQLExcel, and all Essbase View Types)
- Fixed Issue: When an entire sheet is copied in Excel and pasted into the grid control, an out of memory exception is thrown. (#923)
Metadata Editors
- Fixed Issue: In metadata editors that support the ability to undo edits, when a previously edited metadata instance is reselected and the Undo Edits button is clicked, the edited values are not restored to the original values. (#950)
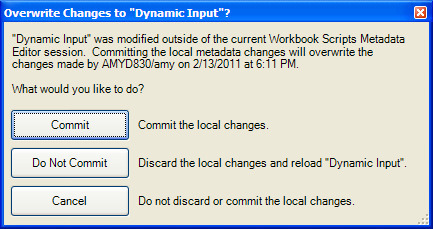
- Several of the metadata editors now perform a pre-commit check to detect whether committing the local changes to a given metadata instance would overwrite changes made outside the local editor session, such as by another developer or, in the case of a Workbook Script, from within the Workbook Script Debugger. (#925)
For example, when two different developers are editing the same metadata instance at the same time on their respective computers and both commit the changes, the last one to commit will overwrite the changes made by the other developer.
With a workbook script, a developer is able to modify and save the script from the Workbook Script Debugger. The developer will typically also have the Workbook Script Metadata Editor open and be editing from within the debugger and then return to the metadata editor to make additional changes when the debug session is complete. In this scenario, it is very easy to overwrite the changes made from the debugger.
To reduce the likelihood of unintentional overwrites to metadata, a check is now performed when a modified metadata instance is being committed to determine whether the persisted metadata is different that the metadata originally loaded into the editor. When a difference is detected, a warning similar to the following is displayed:
The following metadata editors perform the pre-commit check:
Applications
Views
View Property Sets
Selector Lists
Binary Artifacts
Workbook Scripts
Essbase Connections
Modules
The following metadata editors do not currently perform the check:
View Hierarchies
Selectors
Essbase Selectors
Toolbars Configurations
PDF Support
The ability to save the data presented by a view in a grid as a PDF file is now supported. The output PDF file is PDFA-1b compliant. In addition, the data can also be opened as a PDF file either locally in a WebBrowserView or externally in the default PDF viewer. (#932)
Saving a view’s grid data as a PDF is supported by a standard tool and by the workbook script method SaveWorkbookAsPDF. (Refer to the Workbook Scripting section for more information about the method.) Internally, the grid data is saved to a temporary Excel file, then the Excel file is converted to a PDF, and then the temporary Excel file is deleted. The conversion of the Excel file to a PDF is performed using a capability developed by a third-party vendor, Aspose.
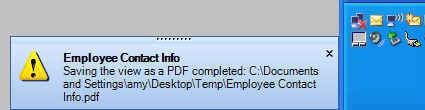
The Save As PDF tool performs the conversion of the Excel file to a PDF asynchonously on a background thread. The view is not disabled during this processing, so the user is able to interact with the view, including initiating another save of the view to a PDF. The user is notified when a save has completed by a desktop alert.
The settings that control the orientation and scaling are taken from the page setup settings defined for the workbook. For the Excel template-based view types, the default settings can be defined in the view’s template, which is recommended, and at runtime by the user through the Page Setup tool.
Opening a view’s grid data in a PDF viewer is supported by two standard tools: Open in (Local) PDF Viewer and Open in (External) PDF Viewer. Internally, the implementation is essentially the same as described above for Save as PDF, except that the PDF file name is not specified by the user, but generated automatically. The PDF file is created in the user’s temp folder.
The Open in (Local) PDF Viewer tool opens a WebBrowser view and presents the PDF using the PDF browser plug-in that is configured on the user’s machine. The caption is the source view’s caption appended with (PDF). The WebBrowser view is created on-the-fly and is not a view defined in the metadata.
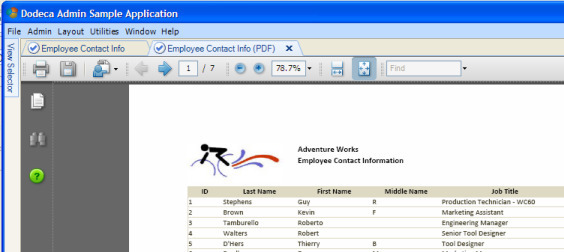
The Open in (External) PDF Viewer tool launches the PDF viewer, such as Acrobar reader, that is registered on the user’s machine.
How to add the Save As PDF tool to a toolbars configuration

To add the Save As PDF tool to an existing toolbars configuration, perform the following steps:
- Open the Toolbars Configuration Metadata Editor from the Admin menu.
- Select the toolbars configuration to which you want to add the tool.
- Open the Toolbars Designer.
- Open the Import Standard Tools and Toolbar Wizard.
- Click Next on the Select Toolbars tab and again on the Select Popup Menu Tools tab to advance to the Select Tools tab. Scroll down and check the SaveAsPdfAsync tool. Then, click Finish to close the wizard.
- In the Toolbars Designer, activate the Toolbar Designer tab.
- From the dropdown, select the toolbar to which you want to add the Save As PDF tool, and drag the tool to the appropriate position. To add a separator bar in front of a tool, click the tool to activate, then right click to display the context menu and click Begin a Group.
- Close the Toolbars Designer dialog.
- Commit the changes.
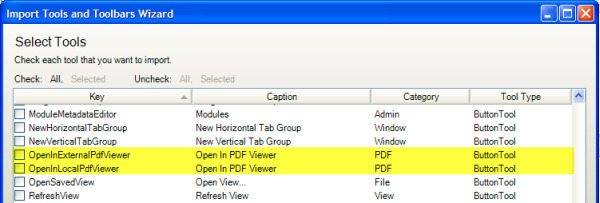
How to add the Open In PDF Viewer tool to a toolbars configuration

The Open in (Local) PDF Viewer and Open in (External) PDF Viewer standard tools have the same image and the same caption, since the intention is for one or the other to appear in the toolbar, but not both. It is possible to include both in a toolbar, but you may want to modify the captions and/or icons to distinguish one from the other.
The steps are the same as described for the Save As PDF tool, except in Step 5, check either the OpenInExternalPdfViewer or OpenInLocalPdfViewer tool.
Relational
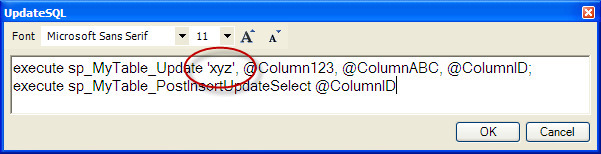
- Issue: A SQLPassthroughDataSet query’s Insert, Update, and Delete statements may perform erroneously when a constant value is specified as a parameter, such as when a token is used for a parameter. This issue occurs either when the statement is defined as the actual relational statement, such as an UPDATE statement, as well as when defined as an execute stored procedure statement, such as in the example below. (#953)
For example, this UpdateSQL statement executes a stored procedure and passes the literal 'xyz' as the first parameter.
When the view is open and the user attempts to save changes, the following error occurs:
Unable to update DataSetRange "DataSetRange1". Unable to update the SQLPassthroughDataSet "MyTable". SQLPassthroughDataSetUpdate service request failed. SOAP Fault (1000001): For input string: "abcdefg"
Note that the string "abcdefg" is actually the value passed for the @ColumnABC parameter value.
Cause: The dodeca service creates a prepared statement, which is passed to the JDBC driver to obtain parameter information, such as the data type for each parameter’s related column. When constants are used, the information returned by the JDBC driver(s) is inconsistent and does not allow the parameter information to be used reliably.
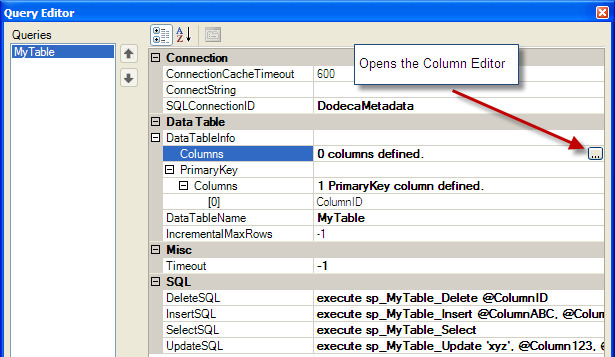
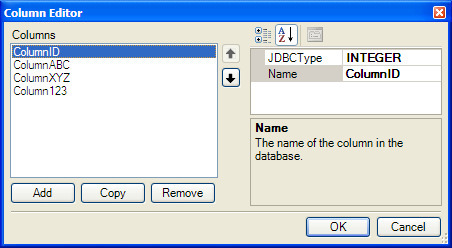
Workaround: The SQLPassthroughDataSet’s Query Editor permits you to specify column names and the related JDBC types. When these mappings are defined, the dodeca service uses the specified information instead of attempting to obtain the information from the JDBC driver.
WARNING
If SQLPassthroughDataSet query’s Insert, Update, or Delete statement contains a constant, you MUST provide the column names and types in the query’s configuration. Failure to do so may result in runtime exceptions or, in certain circumstances, incorrect insert, update or delete operations resulting in inaccurate data.
This issue has been observed solely when using the SQL Server JDBC drivers. The Oracle JDBC driver does not provide parameter metadata; therefore, the column mapping is already mandatory when using the Oracle driver.
- Fixed Issue: When a SQLPassthroughDataSet’s query uses a stored procedure to perform an insert or update, if a null value is sent to the server for a given column, the null value is not being passed to the stored procedure and results in an error similar to the following being displayed for the row: "Procedure or function 'MyProcedure' expects parameter '@MyParameter', which was not supplied." (#941)
- Fixed Issue: In the Column Editor, which is accessed from the SQLPassthroughDataSet’s Query Editor, the following error is displayed when a column is selected and the Copy button is clicked: "Unable to handle cmdCopy.Click event." (#954)
- Fixed Issue: When a primary key is a non-identity column, the primary key value is not returned to the client for a newly inserted row. (#943)
Note: This issue was fixed, but applies only to SQL Server. For information on returning primary key values to the client when using Oracle, refer to the Relational section in the release notes for Build 5.2.2.2515.
- Fixed Issue: When a DataTableRange is configured with more than two levels of grouping with Excel outlining enabled, only the last group at a given level is outlined. (#951)
- Fixed Issue: When a DataTableRange specifies a DataBlockSheetRangeName and the SetDataFlags.InsertCells is not enabled, an error similar to the following is generated when the SQLPassthroughDataSetRange is built and the query returns data:
Unable to copy data to sheet range for Data table 'MyDataTableRange'. WorkbookViewControlImplmentation.AddDefinedRange failed. Specified argument was out of range valid values: Row must be between 0 and >1048575.
And, if no data is returned by the query, the error is similar to the following:
Unable to copy data to sheet range for Data table 'MyDataTableRange'. WorkbookViewControlImplmentation.DeleteCells failed. (#956)
- Auto-filtering is now allowed for the relational data within an Excel Essbase view, but NOT for the Essbase data. Since this restriction is not enforced, care should be taken when designing the view to not allow auto-filtering on a DataTableRange that could potentially impact Essbase data, such as when relational data and Essbase data exist on the same row. An example of using auto-filtering safely in an Essbase Excel view is when the relational data and Essbase data are on separate sheets. (#933)
Refer to the AutoFiltering section for Build 5.1.0.2320.
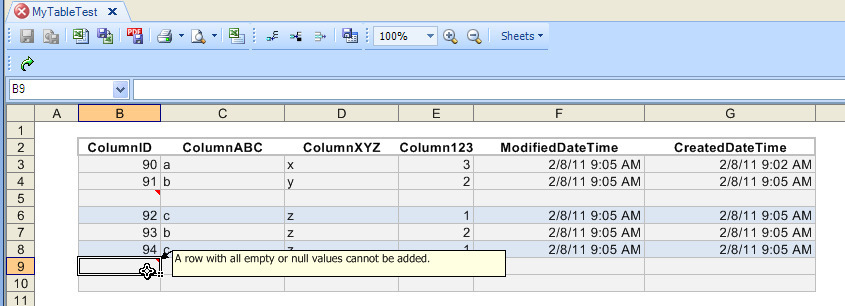
- Error Checking: Attempting to save a new row that contains all null values within the data sheet range is now treated as a client-side error.
Note: When the DataTableRange is configured with RetainEmptyLastDataSheetRangeRow or RetainSingleDataSheetRangeRow set to True, the empty last row is ignored.
- Using Stored Procedures
In a SQLPassthroughDataSet, a query’s select, insert, delete, and update statements can be defined to execute a stored procedure.
The syntax for specifying a stored procedure is
execute <stored procedure name> @argument1,@argument2,--
where the order of the arguments must be the same as defined in the stored procedure.
Whether using a stored procedure or not for the InsertSQL, UpdateSQL, and DeleteSQL, a parameter name must exactly match the related column name as returned by the SelectSQL statement. So, if the Select statement returns the column "AbCdEfG", then any parameter that refers to that column must use the same case. So, for example, the correct parameter should be "@AbCdEfG" and not "@abcdefg". The case-sensitivity is to allow for databases that support case-sensitive column names.
To illustrate the use of stored procedure by way of a simple example, the query’s SQL statements are defined as follows (along with the SQL Server stored procedure definition:
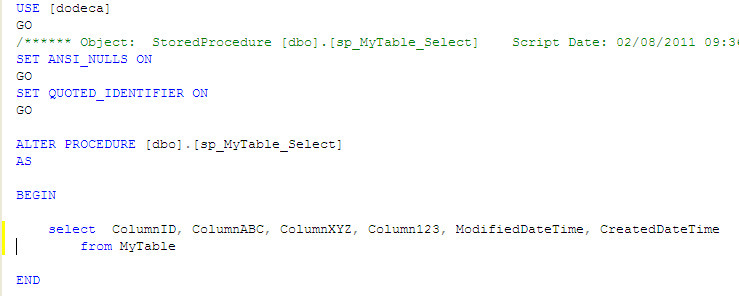
SelectSQL:
execute sp_MyTable_Select
sp_MyTable_Select stored procedure definition:
InsertSQL:
execute sp_MyTable_Insert @ColumnABC, @ColumnXYZ, @Column123;
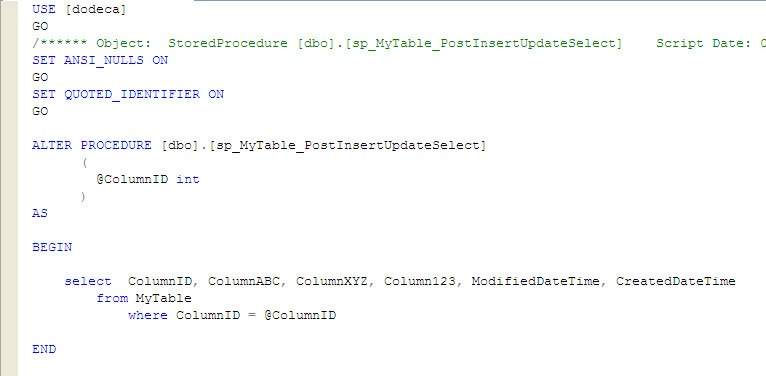
execute sp_MyTable_PostInsertUpdateSelect @ColumnID
In this example, the sp_MyTable_Insert stored procedure responsible sets the default value of Column123 to 1 if the parameter value is null. In order to return the default value to the client, the InsertSQL contains two "execute" statements: The first inserts the row and the second selects the row based on the primary key of the newly inserted row.
The appended statement is also necessary to return any column that is configured in the database with a default value, such as a creation or modified date.
Using the appended statement is NOT required for returning the primary key value. When the InsertSQL is an INSERT statement, the primary key value is returned automatically and no post-insert selection is required. When the InsertSQL executes a stored procedure, a post-insert selection is also not required, but the stored procedure must return the primary key using the SCOPE_IDENTITY function.
Note that the insert and post-insert select statements are delimited by a semi-colon.
sp_MyTable_Insert stored procedure definition:

sp_MyTable_PostInsertUpdateSelect stored procedure definition:
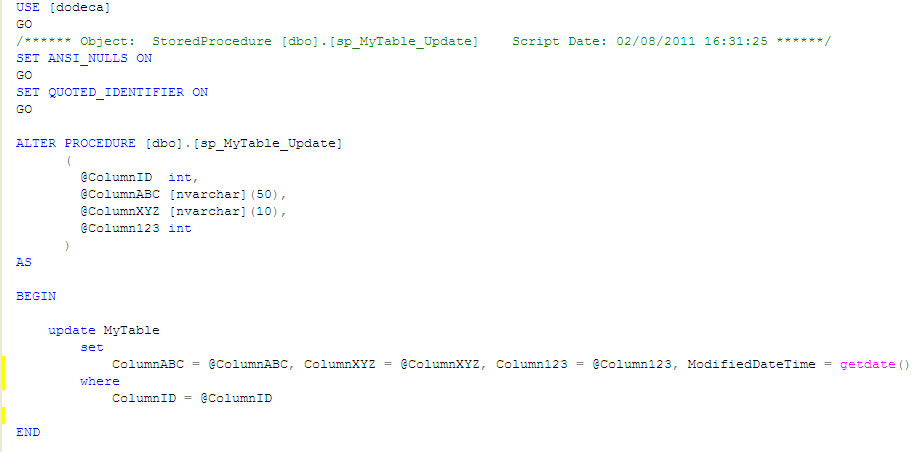
UpdateSQL:
execute sp_MyTable_Update @ColumnID, @ColumnABC, @ColumnXYZ, Column123;
execute sp_MyTable_PostInsertUpdateSelect @ColumnID
sp_MyTable_Update stored procedure definition:
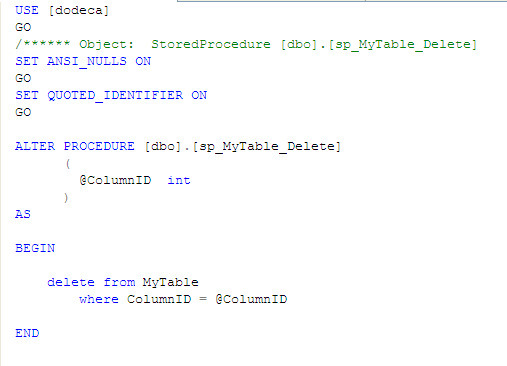
DeleteSQL:
execute sp_MyTable_Delete @ColumnID
Selectors
- Fixed Issue: When a selected item contains an ampersand (&), the selection text displayed in the selector tool in the toolbar does not contain the &. (#921)
Toolbar Configurations Metadata Editor
- Fixed Issue: In the Configure Tool dialog, when a view ID is selected and the view’s token table contains a token for the selected tool controller, the user is prompted to indicate whether or not to save changes upon exiting the dialog even when no changes have been made. (#922)
Workbook Script Debugger
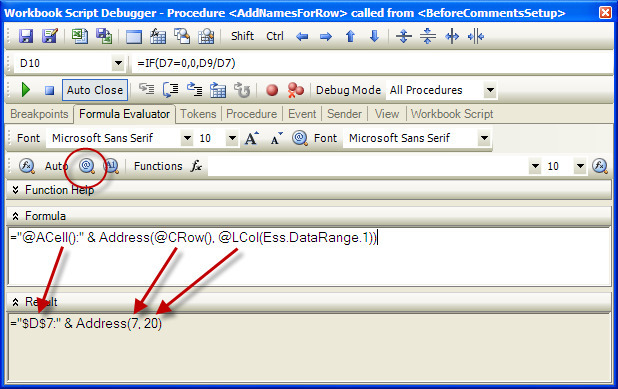
- The Evaluate Expression and Evaluate as Address tools were added to the Formula Evaluator tab. Note that these tools already appear on the Breakpoints tab in the Method Arguments toolbar. (#924)
The Evaluate Expression tool resolves only the workbook script functions in the specified formula, but does not resolve the Excel function. In the following example, the Evaluate Expression tool resolves the @ACell(), @CRow(), and @LCol() workbook script functions, but does not resolve the Excel Address() function or string contatenation.
- Fixed Issue: When the Workbook Script Debugger is opened during the AfterWorkbookOpen event, the "Object reference is not set to an instance of an object" exception is raised by the Select Cell Contents and Range Combo tools. (#946)
Workbook Scripting
- AddProperty Method — The AddProperty method now supports an AppendToValue argument, which controls whether the Value should be appended to the existing value as opposed to replacing the existing value. The AppendToValue argument can be used, for example, create a concatenated string within a ForEach without the likelihood of encountering Excel’s 256 character limitation for a text string in a formula. (#934)
- RequestGridContextMenuID Event Link — The CellAddress event property was added to allow a workbook script to more easily access the address of the cell that was clicked with the right mouse button by using @EPVal(CellAddress). At the point the event is raised, the clicked cell is not necessarily the active cell, so the @ACell() function does not return the address of the clicked cell unless the cell was already activated. The descriptions for the RequestGridContextMenuID event link’s properties are presented in the Help pane of the editor when the event link is selected. (#952)
image::image413.jpeg[image,width=479,height=146].
- SetChart Method — The SeriesProperties overload now adds a new series if the specified series does not exist. This allows series to be added dynamically. (#920)
- SubstitutionVariable Function — Previously, the SubstitutionVariable function only returned the value when the scope of the variable was the database. The function will now return the value of a variable when the scope is the database, the application, or the server. The database is searched first for the variable, and then the application, and then the server. (#948)
- Fixed Issue: The EssbaseReport method does not use the specified ConnectionID argument value, and always uses the EssbaseConnectionID assigned to the view. (#955)
- New Method: CopyComments — Refer to the Comments section for the details.
- New Method: SaveDataTableRangeRow supports saving the changes to a specified row within a DataTableRange. The row can be an added (or inserted) row or a modified existing row. The method has one overload, ByRowAddress. (#939)
The method-specific arguments include the following:
- RowAddress — The address used to identify the row within a DataTableRange’s sheet range. The address of any cell within the data table range row or the address of the sheet row can be used.
- RowErrorClientPropertyName — The name of the workbook script property that receives the value of the error message encountered on the client, such as a data conversion error.
- RowErrorServerPropertyName — The name of the workbook script property that receives the value of the error message encountered on the server, such as a database constraint error.
- New Functions: The DataTableRangeRowHasChanges function returns True or False based whether a row within a DataTableRange contains unsaved changes, which includes a new row and a modified existing row. The DataTableRangeRowState function determines whether a row was Added, Modified, or Unchanged. Either of these functions can be used in conjunction with the SaveDataTableRangeRow method. (#940)
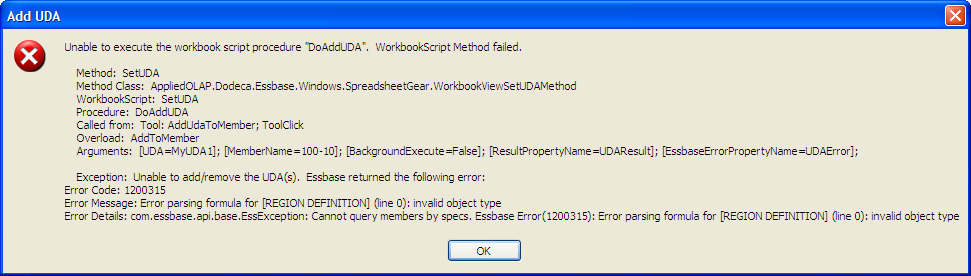
- New Method: SetUDA provides add/remove Essbase UDA support. There are two method overloads: AddToMember and RemoveFromMember. (#927)
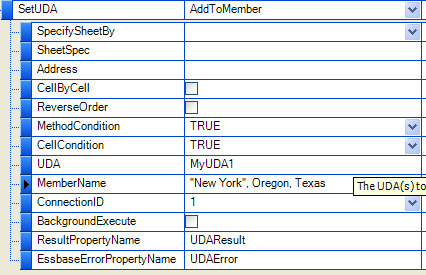
The method-specific arguments for both overloads include the following:
- UDA — A delimited list of UDA(s) to add to or remove from the specified member(s). Multiple UDA’s are delimited using a semi-colon.
- MemberName — The member names for which the UDA(s) is added or removed, which are specified using the Essbase calc member specification formulas. Individual member names and member name ranges are delimited using a comma, and member names with spaces are enclosed in double quotes. A member range represents members at the same level starting from the first member through to the last member of the range in outline order. The first member and the last member in the range are delimited using a colon.
Example of specific members: "New York", Oregon, Texas
Example of a member range: mar:dec
Example of specific members and a member range: Jan, Feb, Jul:Dec
- ConnectionID — (Optional) The ID of the Essbase connection to use for the UDA add/remove operation. If no ConnectionID is specified, the view’s EssbaseConnectionID is used.
- BackgroundExecute — (Default is False) Controls whether the method is executed asynchronous. If True, the processing is performed on a background thread, and the view is disabled during the execution; however, the user is able to interact with the rest of the application.
- ResultPropertyName — (Optional) The name of the workbook script property that receives the result of the UDA operation. The value is either True, which indicates success, or False, which indicates an error occurred.
- EssbaseErrorPropertyName — (Optional) The name of the workbook script property that receives the Essbase error, including the error code, message, and details, if the Essbase add/remove UDA operation fails.
If you encounter the Essbase error 1200315, it is because one or more member names either contain a space, numeric characters (0-9), dashes (minus signs and hyphens), plus signs (+), and/or ampersands (&). These member names must be enclosed in double quotes.
- DataTableRange Operation Events
New event links have been added for before and after a data table range row is added (or inserted) and deleted. (#944)
BeforeDataTableRangeAddRow / AfterDataTableRangeAddRow - Occurs before / after a row (or rows) is added to a DataTableRange either by a user adding/inserting a row(s) or when an empty row is automatically added.
BeforeDataTableRangeDeleteRow / AfterDataTableRangeDeleteRow - Occurs before / after a row (or rows) is deleted from a DataTableRange.
- PDF Support — Includes the SaveWorkbookAsPdf method and the BeforeSaveAsPdf / AfterSaveAsPdf event links. (#932)
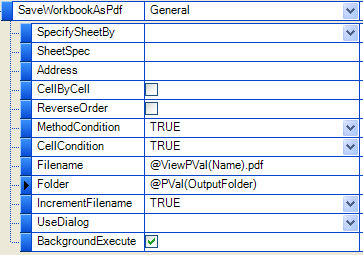
The SaveWorkbookAsPdf method supports a General overload, which requires the output location to be specified as the Folder and Filename arguments, and the Desktop and MyDocuments overloads, which do not require a folder to be specified.
In this example, the view’s name is used as the output file name and a workbook script property is used to define the output folder.
The BeforeSaveAsPdf / AfterSaveAsPdf event links are triggered when the user initiates the save using the Save As PDF or the Open In PDF Viewer tools as well as when a workbook script initiates the save using the SaveWorkbookAsPdf method.