September 19, 2011
This version uses SpreadsheetGear 2010 (6.0.3.190), NetAdvantage 2011, Volume 1 (11.1.20111.1003), and Aspose.Cells 6.0.1.0.
Upgraded from NetAdvantage 2010, Volume 2 (10.2.20102.1004) to NetAdvantage 2011, Volume 1 (11.1.20111.1003)
As indicated in the PDF Support section, there was a critical issue in the previous version of Aspose.Cells, which is the third-party component that is used to generate PDF’s in Dodeca. Specifically, when a spreadsheet contained *custom number formats, instead of built-in number formats, negative numbers were being represented as zero. This would also be reflected in the numbers represented in printed PDF reports. This issue has been resolved in the updated version of the Aspose.Cells component.*
The release notes for this build contain the following sections:
Accelerator Utility
Admin Import/Export Utilities
Application
Dodeca Essbase Server Changes
Dodeca Metadata Server Changes
Dodeca Metadata Server — Relational Outline Caching
Dodeca Metadata Server and dodeca-essbase Server Logging
Essbase Ad hoc View
Essbase Excel View
Essbase Relational Caching
Essbase Selector TreeView
Excel-based Views: Excel, SQL Excel, and All Essbase Views
Relational Support
Selector ComboBox
Selector Lists
SQL Excel View
SQLPassthroughDataSet Metadata Editor
PDF Support
Print and Print Preview Tools
ViewSelectorTreeView
Workbook Script Debugger
Workbook Scripting
Accelerator Utility
_The following is an excerpt from the Dodeca Administrator’s Guide describing how to get started with the Dodeca Accelerator Utility as well as some common installation strategies for production environments. _
Below the excerpt are instructions on how to add and configure the Save Accelerator (Installation) Command File and the Save Accelerator (Uninstallation) Command File tools to an application toolbar.
The Dodeca Framework and Smart Client are shipped with a command line utility, Accelerator.exe, that dramatically reduces Dodeca’s startup time, as well as improving the overall responsiveness of its user interface. The Accelerator is packaged with every ClickOnce deployment of Dodeca and needs to be run one time per Dodeca version installed on the client machine. The Accelerator does not run as a service, but rather, performs a one-time series of environment-specific optimizations, which includes recompiling each Dodeca assembly specifically for the client machine. Our own internal benchmarks have consistently shown 50-75% decreases in application startup time, as well as 30-50% increases in UI operation performance.
As the Accelerator modifies the client machine beyond .NET Isolated Storage, it does require administrative privileges in order to run. We recommend following the steps outlined in the next section in order to familiarize yourself with the basic Accelerator installation and removal features before considering the deployment/installation strategies detailed in the subsequent sections.
Getting Started
The Dodeca Accelerator has two basic requirements that must be satisfied in order to successfully optimize a Dodeca installation. The Accelerator must be run by a user with administrative privileges, and it must have access to the Dodeca assemblies for the version to be optimized.
To run the Accelerator on a development machine where you have administrative privileges, follow these steps:
- Open a command prompt and navigate to the \bin\Dodeca subdirectory of your Dodeca Framework installation.
- Type the following command and then press enter:
Accelerator.exe --ign
![]() *NOTE:*
Depending on the processor speed/cores and the amount of RAM installed
on your system, this process may take up to 20 minutes to complete. The
relatively long completion time of this installation process is due to
the fact that the Accelerator recompiles each Dodeca assembly.
*NOTE:*
Depending on the processor speed/cores and the amount of RAM installed
on your system, this process may take up to 20 minutes to complete. The
relatively long completion time of this installation process is due to
the fact that the Accelerator recompiles each Dodeca assembly.
- Once the process is complete, restart Dodeca.
From this point forward, whenever you launch an instance of the Dodeca Smart Client, your system will preferentially use the natively-compiled assemblies generated by the Accelerator instead of the assemblies shipped with the Dodeca Framework. The Dodeca assemblies have also been installed into the system-wide .NET assembly library, allowing the .NET CLR to bypass hash verification of each assembly at startup. This improves startup time and reduces the amount of CPU the Dodeca Smart Client consumes at launch time.
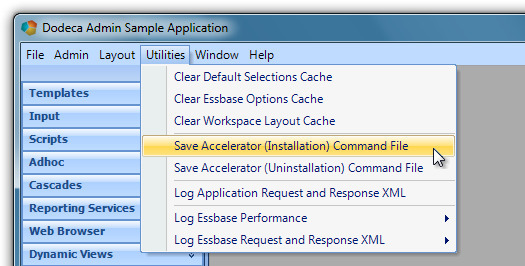
In addition to being located in the \bin\Dodeca subdirectory of the Dodeca Framework installation, the "Accelerator.exe" file is also distributed to client machines during ClickOnce deployment. To run the Accelerator from the ClickOnce deployment directory instead (you will still need administrative privileges), start Dodeca using the ClickOnce URL for a tenant based on the Metadata Starter Kit or the Sample application and then follow these steps:
- From the Dodeca menu, choose "Utilities > Save Accelerator (Installation) Command File".
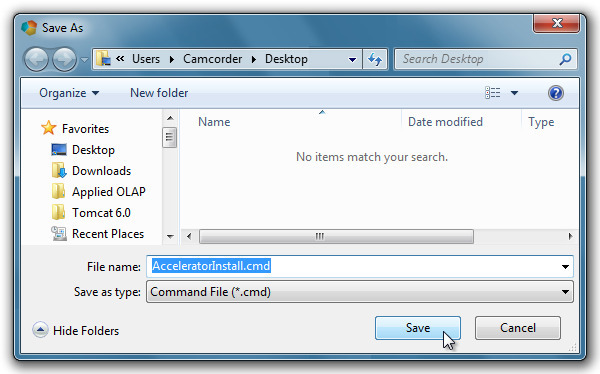
- Press the 'Save' button to save a command file named "AcceleratorInstall.cmd" to the Desktop (or any location you desire).
![]() *NOTE:* If
you examine the .cmd file in a text editor, you will see that the
generated command line string uses the same arguments as before, but
that it reflects the location of the Accelerator utility distributed via
ClickOnce. The contents of the .cmd file will look something like this:
*NOTE:* If
you examine the .cmd file in a text editor, you will see that the
generated command line string uses the same arguments as before, but
that it reflects the location of the Accelerator utility distributed via
ClickOnce. The contents of the .cmd file will look something like this:
"C:\Users\Camcorder\AppData\Local\Apps\2.0\BT0NZ8GP.QOK\ADNAGC56.6MQ\appl…app_f2a3b1b1a674c300_0006.0000_51642a3ef2cd2bce\Accelerator.exe" -ign
- Double-click the "AcceleratorInstall.cmd" to run the Accelerator on the Dodeca assemblies distributed via ClickOnce and wait for it to finish.
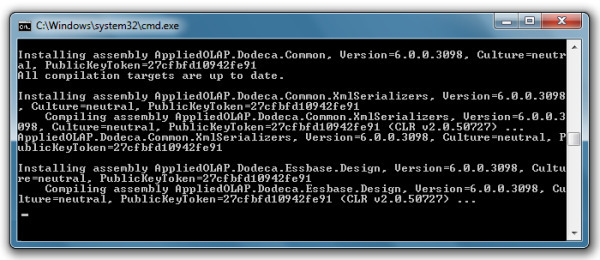
![]() *NOTE:*
Depending on the processor speed/cores and the amount of RAM installed
on your system, this process may take up to 20 minutes to complete. The
relatively long completion time of this installation process is due to
the fact that the Accelerator recompiles each Dodeca assembly.
*NOTE:*
Depending on the processor speed/cores and the amount of RAM installed
on your system, this process may take up to 20 minutes to complete. The
relatively long completion time of this installation process is due to
the fact that the Accelerator recompiles each Dodeca assembly.
- Once the process is complete, restart Dodeca.
To uninstall the recompiled assemblies and reverse the system changes made by the Accelerator on a development machine where you have administrative privileges, follow either set of the following steps:
- Open a command prompt and navigate to the \bin\Dodeca subdirectory of your Dodeca Framework installation.
Type the following command and then press enter:
Accelerator.exe -ugn
![]() *NOTE:*
This command will uninstall only the assemblies of the current Dodeca
version. To uninstall all Dodeca assemblies previously installed by the
Accelerator, regardless of version, use the command line arguments
'-ucgn'.
*NOTE:*
This command will uninstall only the assemblies of the current Dodeca
version. To uninstall all Dodeca assemblies previously installed by the
Accelerator, regardless of version, use the command line arguments
'-ucgn'.
or:
- From the Dodeca menu, choose "Utilities > Save Accelerator (Uninstallation) Command File".
- Press the 'Save' button to save a command file named "AcceleratorUninstall.cmd" to the Desktop (or any location you desire).
![]() *NOTE:* If
you examine the .cmd file in a text editor, you will see that the
generated command line string uses the same arguments as before, but
that it reflects the location of the Accelerator utility distributed via
ClickOnce. The contents of the .cmd file will look something like this:
*NOTE:* If
you examine the .cmd file in a text editor, you will see that the
generated command line string uses the same arguments as before, but
that it reflects the location of the Accelerator utility distributed via
ClickOnce. The contents of the .cmd file will look something like this:
"C:\Users\Camcorder\AppData\Local\Apps\2.0\BT0NZ8GP.QOK\ADNAGC56.6MQ\appl…app_f2a3b1b1a674c300_0006.0000_51642a3ef2cd2bce\Accelerator.exe" -ugn
- Double-click the "AcceleratorUninstall.cmd" to run the Accelerator on the Dodeca assemblies distributed via ClickOnce and wait for it to finish.
![]() *NOTE:* To
modify the .cmd that Dodeca generates so that it uses alternate command
line arguments, see the following section, 'Installation Strategies'.
*NOTE:* To
modify the .cmd that Dodeca generates so that it uses alternate command
line arguments, see the following section, 'Installation Strategies'.
Installation Strategies
Remember that the Dodeca Accelerator has two basic requirements that must be satisfied in order to successfully optimize a Dodeca installation. The Accelerator must be run by a user with administrative privileges, and it must have access to the Dodeca assemblies for the version to be optimized.
In production environments where end-users are not likely to have administrative permissions, system administrators will either have to 1) run the Accelerator utility manually from the command prompt or from a command file generated by the Dodeca Smart Client, or 2) use a Windows administration tool such as a Microsoft Management Console Snap-in to run the Accelerator automatically from a known location on the client machine or from a network location.
Both manual and automated installation procedures are similar to the techniques described in the previous section, but it should be noted that in addition to being run from the local machine, the Accelerator can be run from a network location, provided that the Dodeca assemblies are accessible to it, and that the .NET Code Access Security Policy is configured properly on the client machine. By default, the Accelerator will search for the Dodeca assemblies to optimize in the same directory where it is located. This means that as long as the version numbers of the installed Dodeca assemblies match those of the assemblies stored with the Accelerator, it can be run from any location accessible to the client machine.
![]() *NOTE:* The
Accelerator can be run (both installation and uninstallation) even while
the Dodeca Smart Client is open and running on the client machine. This
means that Dodeca does not have to be closed before performing a manual
or automated installation.
*NOTE:* The
Accelerator can be run (both installation and uninstallation) even while
the Dodeca Smart Client is open and running on the client machine. This
means that Dodeca does not have to be closed before performing a manual
or automated installation.
In order to run the Accelerator from a network share, follow these steps:
- Copy the "Accelerator.exe" and all of the Dodeca assemblies (".dll" files) for the deployed version of Dodeca (i.e., 6.0.0.3106) from the \bin\Dodeca subdirectory of the Dodeca Framework Installation to a known location on the network.
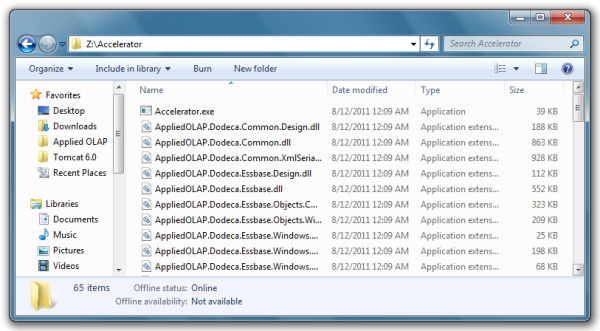
![]() *NOTE:* For
this tutorial, we have mapped the network location of "Accelerator.exe"
and our Dodeca assemblies to "Z:\Accelerator".
*NOTE:* For
this tutorial, we have mapped the network location of "Accelerator.exe"
and our Dodeca assemblies to "Z:\Accelerator".
- If your client desktops are using a Microsoft .NET version lower than 3.5 SP1, you will need to modify the .NET Code Access Security Policy for those machines. If your client desktops are using a Microsoft.Net version 3.5 SP1 or higher, no changes will be necessary. Fortunately, if the .NET Code Access Security Policy must be modified, it can be done from the command line. Use the following command to grant Fully Trusted status to the "Accelerator.exe" binary at our shared location:
C:\WINDOWS\Microsoft.NET\Framework\v2.0.50727\CasPol.exe -pp off -m -ag 1.2 -url file://Z:/Accelerator/Accelerator.exe FullTrust
![]() *NOTE:* The
preceding command-line string must be typed on a single line.
*NOTE:* The
preceding command-line string must be typed on a single line.
![]() *NOTE:* For
more information about "CasPol.exe" and Fully Trusted shares, see the
following articles:
http://msdn.microsoft.com/en-us/library/cb6t8dtz%28v=vs.80%29.aspx and
http://blogs.msdn.com/b/shawnfa/archive/2004/12/30/344554.aspx
*NOTE:* For
more information about "CasPol.exe" and Fully Trusted shares, see the
following articles:
http://msdn.microsoft.com/en-us/library/cb6t8dtz%28v=vs.80%29.aspx and
http://blogs.msdn.com/b/shawnfa/archive/2004/12/30/344554.aspx
- Now, simply use the following command to run the Accelerator from the Fully Trusted network location:
Z:\Accelerator\Accelerator.exe -ign
From this point forward, whenever an end-user launches an instance of the Dodeca Smart Client, their system will preferentially use the natively-compiled assemblies generated by the Accelerator instead of the assemblies deployed during ClickOnce deployment. The Dodeca assemblies have also been installed into the system-wide .NET assembly library, allowing the .NET CLR to bypass hash verification of each assembly at startup.
How to add the Save Accelerator (Installation) Command File and the Save Accelerator (Uninstallation) Command File tools
An Admin application that uses the default Admin toolbars configuration (i.e. the UseDefaultAdminToolbarsConfiguration setting is True) contains the tools in the Utilities menu.
A User application that was created with the metadata_starter_kit.zip installed with this version of the Dodeca Framework contains the tools in the Utilities menu, but the tools are not visible. To make the tools visible, perform the following steps:
- Open the Toolbars Configuration Metadata Editor from the Admin menu.
- Select the toolbars configuration to which you want to add the tools.
- Open the Toolbars Designer.
- Click the Tools tab.
- Select the Save Accelerator (Installation) Command File tool and toggle the Visible property to True. Do the same for the Save Accelerator (Uninstallation) Command File tool.
For an existing application that was created prior to this release, perform the following steps to add the tools to the Utilities menu:
- Open the Toolbars Configuration Metadata Editor from the Admin menu.
- Select the toolbars configuration to which you want to add the tools.
- Open the Toolbars Designer.
- Open the Import Standard Tools and Toolbars Wizard.
- Click next to advance to the Select Popup Menu Tools tab.
- Click Next to advance to the Select Tools tab.
- On the Select Tools tab, click the checkbox by the SaveAcceleratorInstallCommandFile and SaveAcceleratorUninstallCommandFile tools.
- Click Finish to close the wizard.
- Click the Popup Menu Designer tab.
- Select the Utilities popup menu from the Popup Menu Tool dropdown list.
- Drag the Save Accelerator (Installation) Command File and Save Accelerator (Uninstallation) Command File tools from the right pane to the left pane.
- Close the Toolbars Designer dialog.
How to configure the Save Accelerator (Installation) Command File and the Save Accelerator (Uninstallation) Command File tools
By default, the tools are configured to save the command files as AcceleratorInstall.cmd and AcceleratorUninstall.cmd on the desktop, but allow the user to change the file name and location. These settings can be changed using the Configure Tools utility, which is available from the Toolbars Configuration Metadata Editor.
Admin Import/Export Utilities
- The Import Metadata From Server XML Directory and Export Metadata To Server XML Directory utilities are no longer supported. These utilities pre-date and have been superseded by the Import Metadata From Local Zip File and Export Metadata To Local Zip File utilities. (#996)
Application
- Fixed Issue: When the application’s ToolbarsConfigurationID is not the ID of an existing toolbars configuration, an error message is displayed, and the default Admin toolbars configuration is used. This can result in non-admin users having access to the Admin tools.
Resolution: When the ToolbarsConfigurationID is invalid, an error message is displayed and no toolbars configuration is used. (#1015)
- Office 2010 Look and Feel
NetAdvantage 2011, Volume 1, provides partial support for the Microsoft Office 2010 Look and Feel. The support is limited to the style of the toolbars, and does not include other components, such as the components used for the view and metadata editor MDI tabs, the View Selector Explorer Bar, the Selector Trees, etc.
When an application’s ApplicationStyle is set to Office2010, the toolbars reflect the Office 2010 style, but the windows tabs, view selector, etc. appear the same as when the ApplicationStyle is set to Office2007.
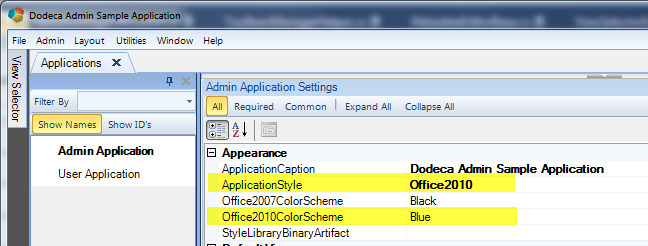
The screenshots below are examples of the Office2010ColorScheme setting options with the ApplicationStyle set to Office2010:
Silver Color Scheme

Blue Color Scheme

Black Color Scheme

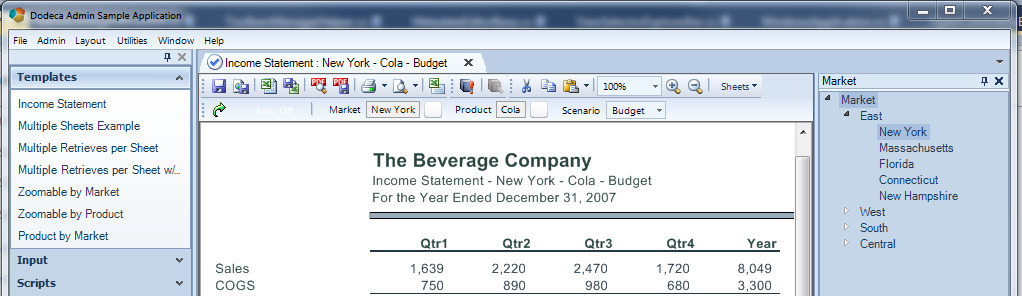
In lieu of complete support for the Office 2010 style, NetAdvantage 2011 provides a style library that emulates the Office 2010 style using the blue color scheme. When the style library is assigned to a Dodeca application, the styles of all the components reflect the Office 2010 look and feel, as shown in the screenshot below:
To use the Office 2010 style library, perform the following steps:
- Click Admin / Import Export Utilities / Import Metadata from Local Zip File to open the Import Metadata dialog.
- Open the metadata_starter_kit.zip file, which is installed in the metadata folder, such as C:\Program Files (x86)\Applied OLAP\Dodeca Framework 6.0.0.xxxx\metadata.
- Click the checkbox next to the Office2010Style_Blue ID.
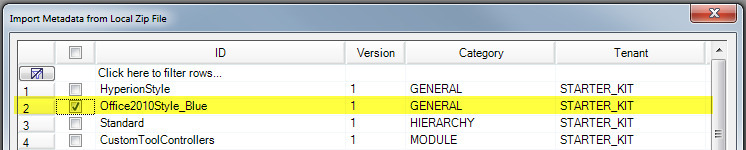
- Click the Import button.
- Click Admin / Applications to open the Applications Metadata Editor.
- Assign the Office2010Style_Blue to the StyleLibraryBinaryArtifact setting.
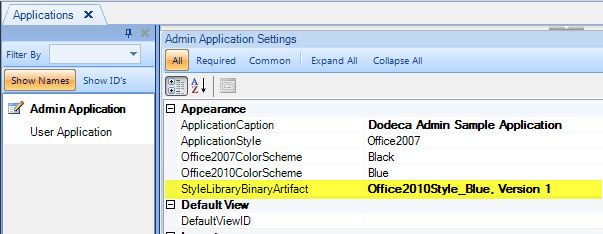
Note that the ApplicationStyle, Office2007ColorScheme, and Office2010ColorScheme settings are not used when a style library is assigned to the StyleLibraryBinaryArtifact setting.
Dodeca Essbase Server Changes
The Dodeca Essbase server has been rewritten to take advantage of xml parsing efficiencies gained through use of the SAX XML parser. The SAX XML parser provides the ability for extremely large xml documents to be efficiently read on the server as it is both faster and uses significantly less memory resources. The effect of using the SAX parser is greatly improved performance, particularly in Essbase retrieval operations of 100,000 cells or more, along with greater scalability.
The server has also been updated to include optional relational caching of Essbase outline information. The benefits of caching outline information relationally include better performance and greater flexibility in creating reports and input templates. The performance gains are due to the fact that the Essbase APIs that get outline information are generally considered one of the slower portions of the Essbase technology stack. Relational technology is generally very fast, so having the most frequently used Essbase outline information available in relational format increases performance in certain situations.
Relationally cached outline information can also be used to create hybrid templates where relational techniques are used to build the structure of the Essbase retrieve range prior to the Essbase retrieve operation. When creating a retrieval range in this manner, it is possible to include additional fields of information outside of the actual range sent to Essbase. The additional fields can be used to create reports and templates in layouts that would be invalid in other Essbase interfaces.
In the example below, the parent member is displayed on the same row as the member. The member alias is also displayed on the same row and is positioned before the member name. The member name column, which is labeled SKU, has member descriptions, as defined in the Essbase outline, displayed as an Excel comment. The Product column has the related attribute dimension values displayed in the member comment (not shown). The input template is filtered by attribute value which, in most Essbase interfaces, would result in the loss of write-back capability. Finally, the template has subtotals based on the product group which are dynamically added by the Dodeca relational technology.
image::image332.jpeg[Description: cid:image001.jpeg@01CC72D3.FEEB2130,width=624,height=406]
Hybrid Input from the Dodeca sample application
Relational caching automatically enables full text search on Essbase members which is not possible using only the Essbase APIs.
Architecturally, the new server implements the same service lookup and instancing technology used in the Dodeca metadata server. This technology, which uses a mapping file to specify the implementation class for a given service, makes it possible for customers to override the behavior of a specific service by specifying their own implementation. For example, if a customer would like to change how the Essbase Update operation behaves, they can write their own implementation for the Update service. Looking forward, this technology makes it much easier for us to implement new Essbase-oriented innovations in the future. The new lookup and instancing technology more easily enables customers to write custom extensions to the Dodeca-Essbase server.
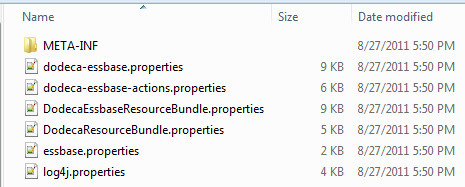
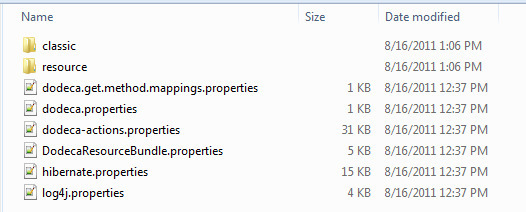
These changes to the server have resulted in the introduction of additional configuration files to the Dodeca-Essbase server. These files, which include the dodeca-essbase.properties, dodeca-essbase-actions.properties, essbase.properties and log4j.properties files, along with 2 resource bundle properties files used for future localization, are located to the WEB-INF\classes subdirectory structure. Here is a screenshot of the WEB-INF\classes subdirectory:
The dodeca-essbase.properties file contains a number of settings that control the behavior of the server. Many of these settings were located in the web.xml file in the classic server. This properties file is self-documenting and contains settings relating to the location of the APS server, connection caching, relational caching, clustering behavior, data audit logging and optimization. Below is a screenshot the dodeca-essbase.properties file.
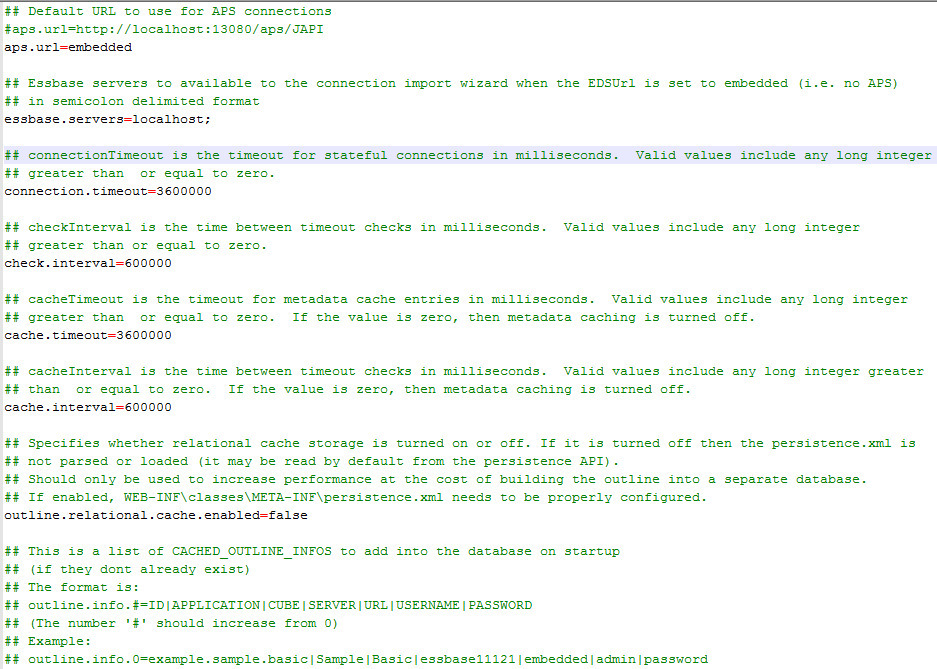
It is typical for dodeca-essbase.properties file entries to be changed for a specific implementation.
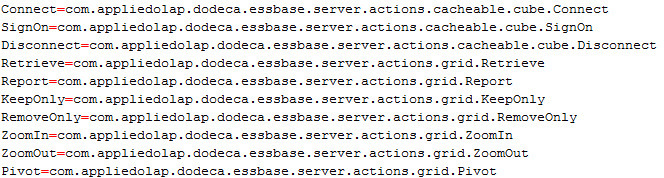
The dodeca-essbase-actions.properties file contains the service mappings which map individual services to their Java implementation classes. These services include all Essbase operations which may occur within Dodeca. Although custom services may be implemented and mapped in this file, most implementations will not change the contents of this file. Here is a screenshot showing some of the contents of the dodeca-essbase-actions.properties file:
The essbase.properties file is used to configure the behavior of the Java API when Dodeca is configured to use embedded mode. When Dodeca uses a URL for Java API access, the essbase.properties in the Dodeca-Essbase service is not used, but rather, the APS server copy of the essbase.properties file is used. Here is a screenshot showing a sample essbase.properties file:
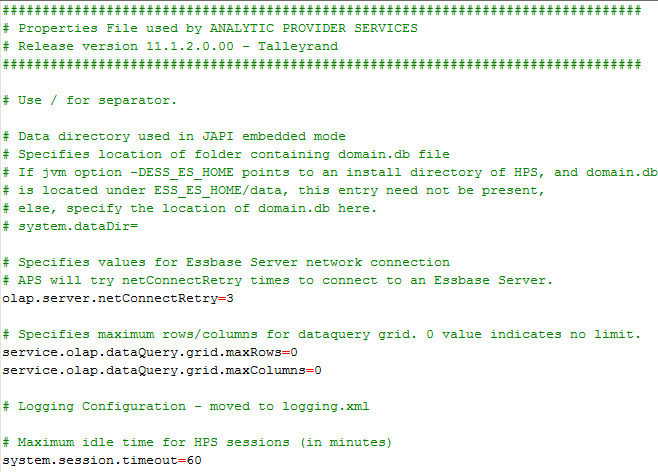
Note: The Dodeca-Essbase services are compiled for each supported version of Essbase. The essbase.properties file included in each Dodeca-Essbase service is specific to the supported Essbase version.
The most common settings modified in the essbase.properties are the service.olap.dataQuery.grid.maxRows and service.olap.dataQuery.grid.maxColumns properties. These settings are used to control the maximum number of rows and columns retrieved by the Essbase Java API. The default setting in Dodeca is 0 which indicates the size of the Essbase grid is not limited by the Essbase Java API.
The new DodecaEssbaseResourceBundle.properties and DodecaResourceBundle.properties files have been added as the first step towards localization of messages from the metadata service.
The log4j.properties file was added to enable configuration of the new logging functionality built into the server.
The META-INF subdirectory contains the persistence.xml file that configures the relational database used for outline caching and is covered in more detail in the discussion on enabling outline caching.
Dodeca Essbase Server — Relational Outline Caching
As mentioned in the previous section, optional outline caching has been implemented in Dodeca 6. The caching requires additional configuration steps and requires the use of an application server that supports the Java Persistence API 2.0, known as JPA2. Due to these requirements, the relational outline caching is disabled by default.
JPA 2.0 is the Java standard for persisting Java objects to a relational database. The JPA2 specification is based, in part, on Hibernate, the object to relational mapping technology used in all versions of Dodeca. The JPA2 specification, however, is a fairly new specification and is not fully implemented in all application servers. Based on our testing, the following application servers work with JPA2:
| Server | Notes |
|---|---|
Oracle WebLogic | Versions shipped with Oracle EPM 11.1.2/11.1.2.1 require a patch from Oracle support for JPA2 support |
IBM Websphere 8 | Does not support embedded mode connections to Essbase |
IBM Websphere 7 | Requires a patch from IBM for JPA2 support |
Apache Tomcat | Tested in version 5.5.17 and higher with Java 1.5 and Java 1.6 |
To enable relational outline caching, follow these steps:
- Rename the WEB-INF\classes\META-INF\persistence.xml_disabled file to persistence.xml.
- Edit the settings in persistence.xml to reflect your relational database.
- Copy the appropriate JDBC driver for your selected relational server, along with any supporting files, into the WEB-INF\lib subdirectory.
As of the release of Version 6.3.0, the outline.relational.cache.enabled and outline.info.n entries have been removed. Steps 4 and 5 are no longer required.
- Enable outline caching in the WEB-INF\classes\dodeca-essbase.properties file by setting the outline.relational.cache.enabled property to true.
Configure the outlines you would like to cache relationally one of two ways.
- Add the outline information to the WEB-INF\classes\dodeca-essbase.properties file by adding an outline.info.n property. These properties must be sequentially numbered starting at zero.
- Insert the outline information into the CACHED_OUTLINE_INFORMATION table that will automatically be created after deployment.
- Configure the tuning options in the WEB-INF\classes\dodeca-essbase.properties file.
The default persistence.xml has a number of settings that need to be adjusted for outline caching to work. Below is screenshot of the default persistence.xml. The properties highlighted in yellow are the properties that need to be adjusted in most implementations. Optionally, the other property nodes may be adjusted to tune the relational caching. The jar-file and class nodes should not be updated as changes to these values may cause significant problems with the outline caching operations.
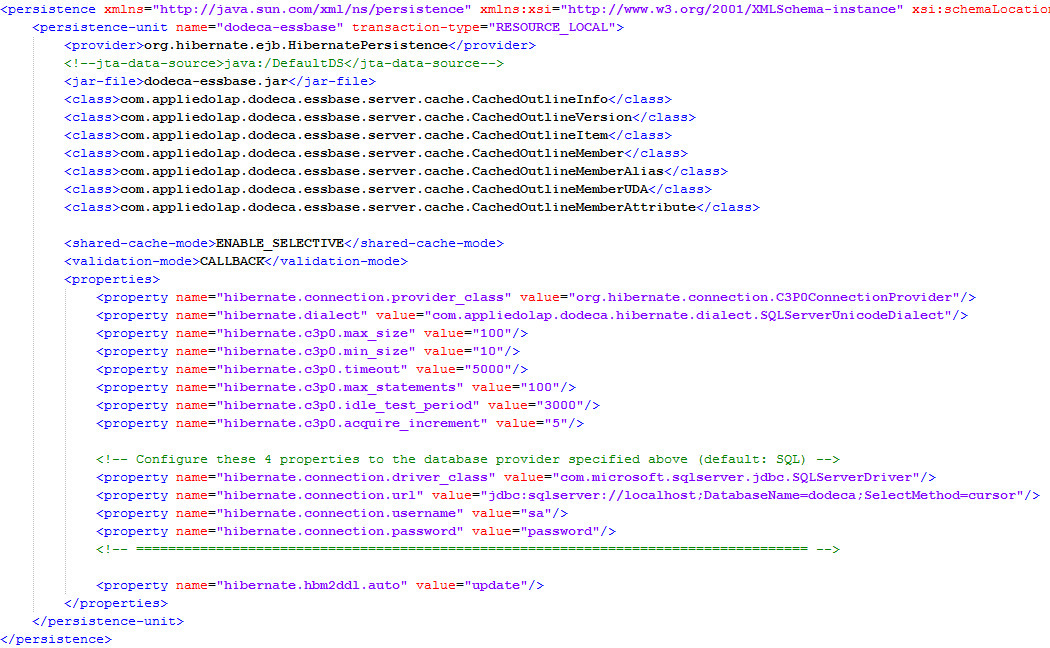
Each of the classes defined in the persistence.xml file defines a piece of outline information stored in the database. The tables created by outline caching, and their purpose, are listed in the table below.
| Table | Description |
|---|---|
CACHED_OUTLINE_INFOS | Contains information about the Essbase database outlines that will be processed including the connection information. The Essbase username and password is automatically encrypted upon first usage. This table has a One-to-Many relationship with the CACHED_OUTLINE_VERSIONS table. |
CACHED_OUTLINE_VERSIONS | Contains information about the versions of the outline contained in the database. A record is inserted into this table for each attempt to update the outline information. Each record contains information about the version including the outline info record it relates to, a checksum of the file timestamp of the outline processed for the version, the build date/time, an active flag indicating the outline build process completed successfully, the connection key part which is used internally in Dodeca to index members to the latest version, and an exception field which provide details in the case the build process does not complete. This table has One-to-Many relationships with the CACHED_OUTLINE_ITEMS and CACHED_OUTLINE_MEMBERS tables and has a Many-to-One relationship with the CACHED_OUTLINE_INFOS table. |
CACHED_OUTLINE_ITEMS | Contains Essbase outline information in the XML format used by Dodeca. This table is intended only for internal usage by Dodeca and will contain 4 records for each alias table for each member for each version. Additionally, it will contain additional records describing the Essbase database itself. Note the xml for a given member may be assembled from multiple records in this table. This has a Many-to-One relationship with the CACHED_OUTLINE_VERSIONS table. |
CACHED_OUTLINE_MEMBERS | Contains basic information about Essbase members including the member name, parent name, level, generation, formula and other information. Aliases, Attributes and UDAs are not in the members table but rather are each stored their own respective tables. This table has One-to-Many relationships with the CACHED_OUTLINE_MEMBER_ALIASES, CACHED_OUTLINE_MEMBER_ATTRIBS and CACHED_OUTLINE_UDAS tables and has a Many-to-One relationship with the CACHED_OUTLINE_VERSIONS table. |
CACHED_OUTLINE_MEMBER_ALIASES | Contains a record for each member for each alias table. This table has a Many-to-One relationship with the CACHED_OUTLINE_MEMBERS table. |
CACHED_OUTLINE_MEMBER_ATTRIBS | Contains a record for each member for each related attribute. This table has a Many-to-One relationship with the CACHED_OUTLINE_MEMBERS table. |
CACHED_OUTLINE_MEMBER_UDAS | Contains a record for each member for each user defined attribute. This table has a Many-to-One relationship with the CACHED_OUTLINE_MEMBERS table. |
Here are the fields in the CACHED_OUTLINE_INFOS, CACHED_OUTLINE_VERSIONS AND CACHED_OUTLINE_ITEMS tables.
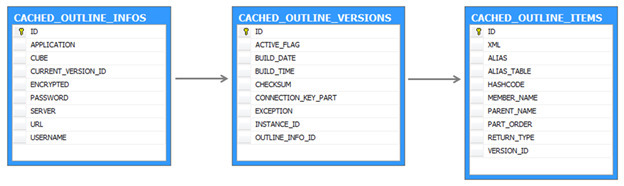
Below are sample records from the CACHED_OUTLINE_INFOS, CACHED_OUTLINE_VERSIONS, and CACHED_OUTLINE_ITEMS tables.
*CACHED_OUTLINE_INFOS*
*CACHED_OUTLINE_VERSIONS*
*CACHED_OUTLINE_ITEMS*

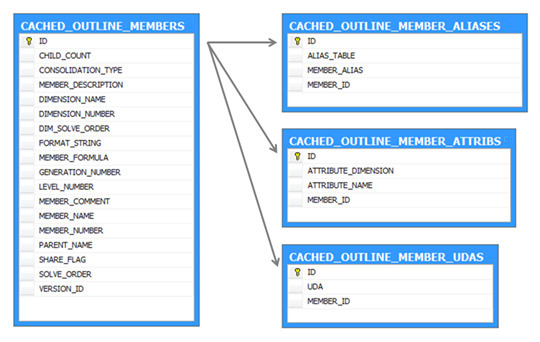
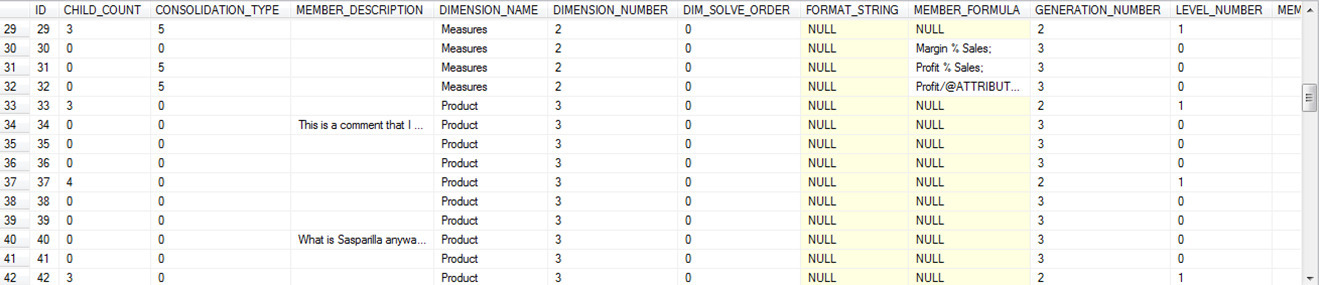
Below are sample records from the CACHED_OUTLINE_MEMBERS, CACHED_OUTLINE_MEMBER_ALIASES, CACHED_OUTLINE_MEMBER_ATTRIBS and CACHED_OUTLINE_MEMBER_UDAS tables.
CACHED_OUTLINE_MEMBERS
| CACHED_OUTLINE_MEMBER_ALIASES image::image344.jpeg[image,width=200,height=104] | CACHED_OUTLINE_MEMBER_ATTRIBS image::image345.jpeg[image,width=241,height=86] | CACHED_OUTLINE_MEMBER_UDAS image::image346.jpeg[image,width=133,height=89] |
|---|---|---|
This set of tables is intended for use in designing Dodeca reports and input templates using hybrid relational/Essbase techniques. The Hybrid Input sample template, as shown above, uses these tables to create the structure for the template. The SQL used to build the above template is shown below:
SELECT 'Product' 'Sort2',
lev1.MEMBER_NUMBER 'Sort1',
lev0.MEMBER_NUMBER 'Sort0',
lev0.MEMBER_DESCRIPTION 'Description',
alias1.MEMBER_ALIAS 'ProdGroup',
SUBSTRING(attr1.ATTRIBUTE_NAME, 12, 10) 'Intro Date',
attr2.ATTRIBUTE_NAME 'Package Type',
attr3.ATTRIBUTE_NAME 'Ounces',
attr4.ATTRIBUTE_NAME 'Caffeinated',
alias0.MEMBER_ALIAS 'Alias',
lev0.MEMBER_NAME 'Member',
lev0.MEMBER_NAME 'Member2'
FROM CACHED_OUTLINE_MEMBERS lev0,
CACHED_OUTLINE_MEMBERS lev1,
CACHED_OUTLINE_MEMBER_ATTRIBS attr1,
CACHED_OUTLINE_MEMBER_ATTRIBS attr2,
CACHED_OUTLINE_MEMBER_ATTRIBS attr3,
CACHED_OUTLINE_MEMBER_ATTRIBS attr4,
CACHED_OUTLINE_MEMBER_ALIASES alias0,
CACHED_OUTLINE_MEMBER_ALIASES alias1,
CACHED_OUTLINE_VERSIONS versions,
CACHED_OUTLINE_INFOS outlines
WHERE lev0.PARENT_NAME = lev1.MEMBER_NAME
AND lev1.ID = alias1.MEMBER_ID
AND lev0.ID = attr1.MEMBER_ID
AND lev0.ID = attr2.MEMBER_ID
AND lev0.ID = attr3.MEMBER_ID
AND lev0.ID = attr4.MEMBER_ID
AND lev0.ID = alias0.MEMBER_ID
AND lev0.VERSION_ID = versions.ID
AND lev1.VERSION_ID = versions.ID
AND versions.OUTLINE_INFO_ID = outlines.ID
AND attr1.ATTRIBUTE_DIMENSION = 'Intro Date'
AND attr2.ATTRIBUTE_DIMENSION = 'Pkg Type'
AND attr3.ATTRIBUTE_DIMENSION = 'Ounces'
AND attr4.ATTRIBUTE_DIMENSION = 'Caffeinated'
AND lev0.DIMENSION_NAME = 'Product'
AND alias1.ALIAS_TABLE = 'Default'
AND alias0.ALIAS_TABLE = 'Default'
AND attr2.ATTRIBUTE_NAME IN ([T.Pkg Type])
AND attr3.ATTRIBUTE_NAME IN ([T.Ounces])
AND attr4.ATTRIBUTE_NAME IN ([T.Caffeinated])
AND outlines.ID = '[T.OutlineInfoID]'
AND versions.ID IN (SELECT MAX(v.ID)
FROM CACHED_OUTLINE_VERSIONS v
WHERE v.OUTLINE_INFO_ID = '[T.OutlineInfoID]'
AND v.ACTIVE_FLAG = 1
)
The behavior of relational caching is controlled via a number of settings in the Dodeca-essbase.properties file. These settings are:
| Setting | Notes |
|---|---|
outline.relational.cache.enabled | This setting specifies whether relational cache storage is turned on or off. If it is turned off then the persistence.xml is not parsed or loaded, although it may be read by default from the persistence API. If this setting is enabled, WEB-INF\classes\META-INF\persistence.xml needs to be properly configured. |
outline.info.n | This is a list of CACHED_OUTLINE_INFOS records to add into the database on startup if they don’t already exist. The format for this setting is: outline.info.#=ID |
APPLICATION | CUBE |
SERVER | URL |
USERNAME | PASSWORD The number '#' should increment starting at 0. Optionally, this setting may remain commented and, in its place, records may be added directly to the CACHED_OUTLINE_INFOS table using any SQL tool. The advantage of adding records is that outline specifications may be added to, or removed from, the cache without redeploying the web application. |
relational.cache.run.interval | This setting is the amount of time the relational cache builder will wait between relational cache build runs on a background thread in the server. The value is stated in milliseconds and the default value, 3600000 milliseconds, means the build process will wait one hour between outline checks. It is recommended that this value not be reduced below 360000 milliseconds due to the amount of traffic it may generate on the server. |
relational.cache.member.delay | This setting is the time the relational cache builder waits between member processing requests. It is used to buffer calls to the server in order to prevent Essbase API failures due to limitations in the Microsoft Windows TCP/IP stack configuration which can cause Essbase API network errors. This value is stated in milliseconds and, if it is recommended that, if it is adjusted, the adjustment should be in increments of 50 milliseconds. The default value is 2500. If a timeout condition is detected, the server will automatically adjust the timeout upwards by a value specified in the relational.cache.member.delay.increment setting each time it times out. This setting may be set to a significantly lower value if you have adjusted the Windows registry settings MaxUserPort (for pre-Windows 2008 operating systems only) and TcpTimedWaitDelay. On Windows 2008 and later operating systems, use the command line 'netsh int ipv4 set dynamic tcp start=5000 num=60536' to increase the ports available. Note: Lower values will cause the relational caching to work faster; however, it increases the risk of TCP/IP port exhaustion. When TCP/IP port exhaustion occurs, the machine running the caching may act erratic until ports become available. We heavily recommend you adjust the number of ports available before making this setting lower. Note 2: If registry values cannot be changed, this setting should be set to at least 2500 on pre-Windows 2008 operating systems. |
relational.cache.member.delay.increment | This setting is the number of milliseconds the relational.cache.member.delay will be increased if an Essbase error indicating TCP/IP port exhaustion is detected during the relational caching process. The default value for this setting is 100; the minimum value is 25. |
relational.cache.tcpip.port.exhaustion.wait.time | This setting is the number of milliseconds the relational caching thread will sleep after a port exhaustion is detected. The wait time is designed to allow ports used by Essbase, but not yet available for reuse, to timeout and be returned to the pool of available ports. The default time for this setting is 240000 (4 minutes); the minimum value is 30000 (30 seconds). It is recommended that this setting be set to the same value, in seconds, as the TcpTimedWaitDelay registry setting (which defaults to 4 minutes). |
relational.cache.batch.size | This setting is the number of members the relational cache builder will hold in memory before committing the records to the relational cache database. A smaller number will use more CPU and less RAM, while a larger number will use up slightly more heap space with the benefit of less constant network traffic. This value cannot be less than 1; the default is 1. |
relational.cache.member.cursor.size | This setting controls the number of members pulled into memory, per query, from the Essbase database. A smaller number will use more CPU and time but less RAM. A higher number is recommended for increased performance at the cost of heap space. This value cannot be below 1. Default is 100 |
relational.cache.history.count | This setting is the number of previous versions of an outline to store in the relational database. This setting is best kept low to minimize database storage but will increase overhead by a little. The default value is 1. |
End of Dodeca Essbase Server — Relational Outline Caching
Dodeca Metadata Server Changes
The Dodeca metadata server has been rewritten to take advantage of xml parsing efficiencies gained through use of the SAX XML parser. In addition, the previous server technology, which used the DOM parser, has been deprecated but is retained in this version. The previous server technology is now referred to as the classic server and will be phased out of the server technology in a future version.
The configuration files formerly located in the \config subdirectory have been moved to enable easier modification. These files, which include the dodeca.properties, hibernate.properties, web.xml and various hibernate xml mapping files, were formerly distributed to various locations within the dodeca-metadata.jar file or to the WEB-INF\lib directory. These files, with the exception of the web.xml file, have been relocated to the WEB-INF\classes subdirectory structure.
Here is a screenshot of the WEB-INF\classes subdirectory:
dodeca.get.method.mappings.properties File
The dodeca.get.method.mappings.properties file contains service mappings that are optionally available for use with the http GET method. These mappings, which include the user audit functionality and the Dodeca metadata database DDL display, are disabled by default for security purposes.
dodeca.properties and dodeca-actions.properties Files
The dodeca.properties file from previous versions has been split into two different files: dodeca.properties and dodeca-actions.properties. The dodeca.properties file contains miscellaneous settings that affect the behavior of the metadata server. The service implementation mappings have been moved to the dodeca-actions.properties file. Additionally, the following properties present in the previous version are now obsolete and have been removed from the dodeca.properties file:
hibernate.properties.file dodeca.metadata.print.xml dodeca.object.xml.export.directory dodeca.object.xml.import.directory
The hibernate.properties.file property formerly was used to identify the file system location of the hibernate.properties file. This functionality is now provided by the configurationDirectory init-param in the web.xml file. The ability to print XML has been replaced by the XMLLogger servlet filter that will automatically print each XML request and response to a specified directory. The XML export and import functionality was removed due to the popularity of the functionality to export XML to, and import XML from, a zip file.
DodecaResourceBundle.properties File
The new DodecaResourceBundle.properties file has been included as the first step towards localization of messages from the metadata service.
log4j.properties File
The log4j.properties file was added to enable configuration of the new logging functionality built into the server.
resource Subdirectory
The resource subdirectory contains the Hibernate xml mapping files used to map Dodeca metadata classes to their underlying metadata store.
Classic Subdirectory
The classic subdirectory contains configuration files for use with the classic server. Though we expect the classic server to be removed in future versions of Dodeca, we recommend you configure the dodeca.properties and hibernate.properties files in the classic subdirectory in order to seamlessly transition to the classic version as necessary.
Dodeca Metadata Server and dodeca-essbase Server Logging
Robust, configurable logging functionality has been added to both the dodeca metadata and the dodeca-essbase servers using the industry standard log4j logging utility. Log4j is configured in the log4j.properties file. Each server has implemented both an untimed and a timed logger. The timed logger can be used to optionally display performance metrics for different segments of the operations within the respective servers. Further, log4j also provides for different levels of logging.
Below is a screenshot of the dodeca-essbase log4j.properties file:
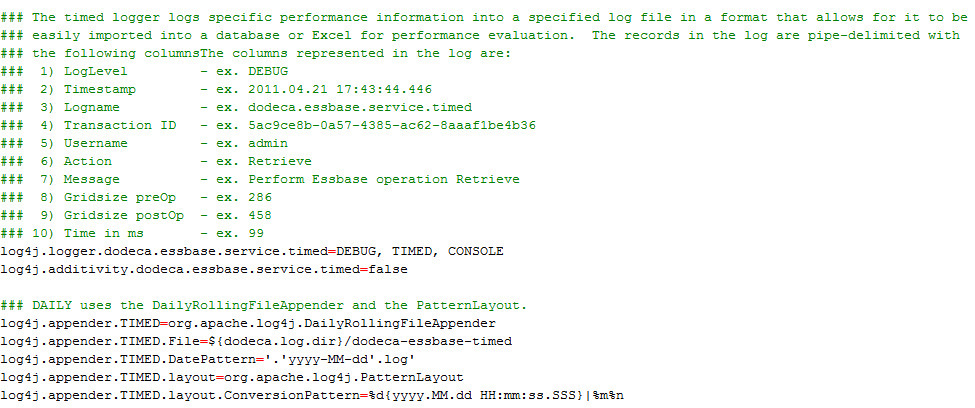
This configures the timed logger service to run at the DEBUG level which gives the most detailed, timed performance information. The INFO level provides summary level performance information. As configured above, the timed logger uses the DailyRollingFileAppender, which creates a new log file every day. The file is placed in the directory location indicated by the dodeca.log.dir Java system property and is prefixed by the name dodeca-essbase-timed. If the dodeca.log.dir system property is not present, Dodeca will attempt to locate the appropriate directory based on application server in which it is installed. For example, if the server is running in Apache Tomcat, the logs will default to the Tomcat logs directory. If the system property is not present, and if Dodeca cannot determine the location where logging should occur, logging is disabled. To configure the dodeca.log.dir system property, add the following JVM argument to your Java application server:
-Ddodeca.log.dir=<absolute path to log file directory>
The timed logger output was designed for ease of analysis. The output is presented in pipe-delimited format, which can easily be imported into a database or into Excel for further analysis. Below is an example of the output for a single transaction:

The log entries in the screenshot above are represented below.
2011.08.27 18:18:15.004|49|1|6712663b-240c-44c9-a453-717327593f56|timt|ZoomIn|Servlet doPost method: pre-invoke action - ZoomIn.|0|0|0|
2011.08.27 18:18:15.005|49|1|6712663b-240c-44c9-a453-717327593f56|timt|ZoomIn|Pre-parse processing|0|0|0|
2011.08.27 18:18:15.018|49|1|6712663b-240c-44c9-a453-717327593f56|timt|ZoomIn|Parse XML|0|0|13|
2011.08.27 18:18:15.026|49|1|6712663b-240c-44c9-a453-717327593f56|timt|ZoomIn|Connect to Essbase and return IEssCubeView object|0|0|22|
2011.08.27 18:18:15.033|49|1|6712663b-240c-44c9-a453-717327593f56|timt|ZoomIn|Fill and return IEssGridView object|10488|0|7|
2011.08.27 18:18:15.284|49|1|6712663b-240c-44c9-a453-717327593f56|timt|ZoomIn|Perform Essbase operation ZoomIn|10488|187040|251|
2011.08.27 18:18:15.837|49|1|6712663b-240c-44c9-a453-717327593f56|timt|ZoomIn|Read results and serialize to output stream|10488|187040|553|
2011.08.27 18:18:16.174|49|1|6712663b-240c-44c9-a453-717327593f56|timt|ZoomIn|Servlet doPost method: post-invoke action - ZoomIn.|10488|187040|1170|
This level of detail is provided by setting the log4j log level to DEBUG. Setting the log level to INFO will print summary information only as represented by the last line in the log above.
Essbase Ad hoc View
Ad hoc Operation Undo/Redo Support
The ability to undo and redo ad hoc operations is now supported for the EssbaseAdhocView type. The capability is only available when the view’s ExcelAddInMode is enabled, but unlike the flashback capability supported by the classic Excel Add In, which allows only a single operation to be undone, the Dodeca capability supports undo (and redo) for multiple operations. A history of ad hoc operations is maintained on a sheet-by-sheet basis for all opened workbooks. (#998)
The undo/redo functionality consists of the following:
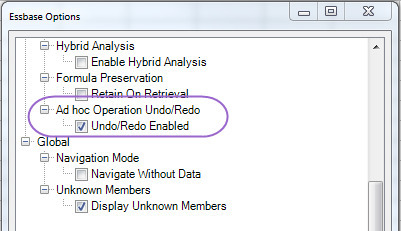
Metadata settings for the EssbaseAdhocView type that allow an administrator to control whether the undo/redo option is enabled by default, as well as control whether the user is allowed to see and change the setting in the Essbase Options dialog.
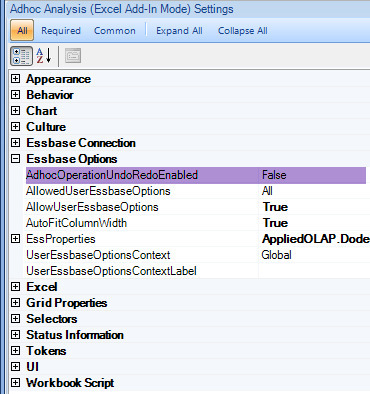
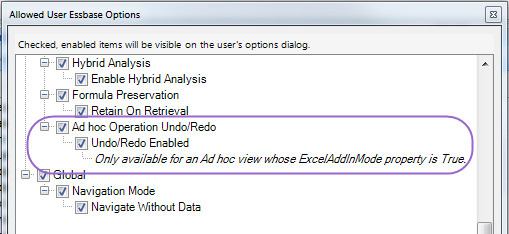
An Undo/Redo Enabled option in the Essbase Options dialog, which allows the user to control whether the undo and redo capability is enabled.
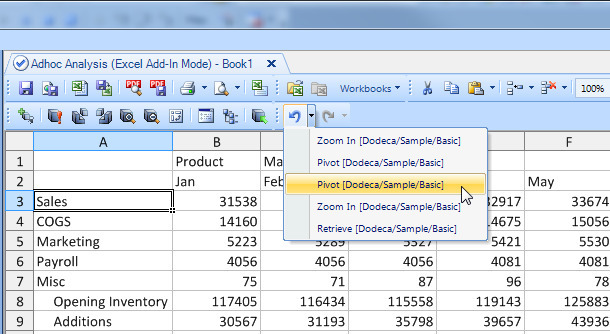
- The Undo and Redo segmented popup menu buttons, which support 1) undoing (or redoing) a single operation at a time by clicking the button, and 2) selecting a specific operation from the menu’s dropdown list of operations.
In this screenshot, the Undo dropdown lists the previous operations, and includes the Essbase Server/Application/Database for each operation.
To include the Undo/Redo toolbar, which contains the Undo and Redo segmented popup menu buttons, in the toolbars configuration used by an Ad hoc view, do one of the following options:
OPTION 1: The easiest way is to import the Essbase View Standard All Excel AddIn toolbars configuration from the metadata_starter_kit.zip, which is installed with the Dodeca Framework in the metadata folder. (This toolbars configuration includes all the tools that are typically used with an Ad hoc view running in the Excel add-in mode.)
OPTION 2: To add the Undo/Redo toolbar to an existing toolbars configuration, perform the following steps:
- Open the Toolbars Configuration Metadata Editor from the Admin menu.
- Select the toolbars configuration to which you want to add the tool.
- Open the Toolbars Designer.
- Open the Import Standard Tools and Toolbars Wizard.
- On the Select Toolbars tab, click the checkbox by the EssbaseAdhoc UndoRedo toolbar.
- Click next to advance to the Select Popup Menu Tools tab.
- On the Select Popup Menu Tools tab, the EssbaseAdhocOperationRedoMenu and EssbaseAdhocOperationUndoMenu tools are automatically checked.
- Click Next to advance to the Select Tools tab.
- On the Select Tools tab, the EssbaseAdhocOperationRedoList and EssbaseAdhocOperationUndoList tools are automatically checked.
- Click Finish to close the wizard.
- Close the Toolbars Designer dialog.
In the Toolbars Preview, the EssbaseAdhoc UndoRedo toolbar is positioned at the bottom. You can move the toolbar by dragging and dropping the toolbar to the appropriate location.

Commit the changes.
Essbase Excel Views
- Fixed Issue: When the SummarySheetAdd setting is True, rows above or within the SummarySheetSummaryRangeAddress were sometimes being inappropriately included or excluded, respectively, from the summary sheet. (#999)
When using the summary sheet capability, the value of numeric cells within the summary range must be set to 0, since the summary sheet only contains formulas for numeric cells. Cells that contain formulas and empty cells are ignored. The description of the SummarySheetSummaryRangeAddress now includes these instructions:

Essbase Selector TreeView
- Fixed Issue: When the selector list associated with the selector is configured to display UDAs, Comment, Formula, Consolidation, and/or Attributes, the member information is not being added to the session cache, but only when the member has associated attributes. This results in an additional roundtrip to the server to obtain the member information each time the member tip is displayed for that member. (#991)
- Fixed Issue: When the selector list is configured with the SelectorControlProperties.BaseMemberAsDescendantNode_RootNodeMemberPolicy set to UseSpecifiedMemberName and the BaseMemberAsDescendantNode_RootNodeMemberValue is a member name, but is not the same case as the actual member name, the following error occurs when the user attempts to open the selector control: Unable to show the selector control. Unable to resolve the BaseMemberAsDescendantNode_RootNodeMemberValue "<member name>". The value "<member name>" is not a valid member name. (#993)
Excel-based Views: Excel, SQL Excel, and All Essbase Views
- Users are now able to resize columns and rows on a protected sheet. (#1012)
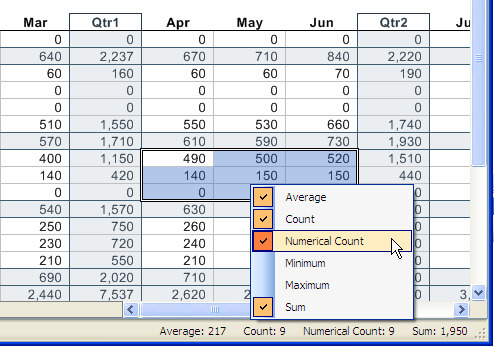
- Excel AutoCalculate Support
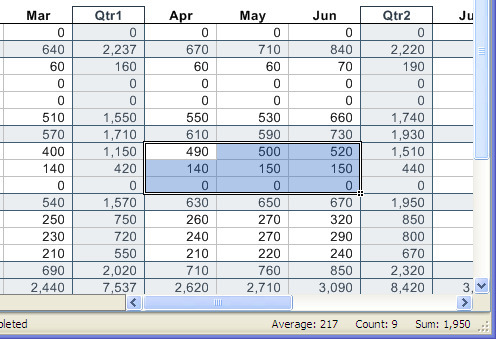
The AutoCalculate feature allows a user to see the results of the following calculation functions as applied to the selected range of cells:
- Average — Finds the average of the numerical values.
- Count — Counts the cells that contain a value.
- Numerical Count — Counts the cells that contain a numerical value.
- Minimum — Finds the smallest numerical value.
- Maximum — Finds the largest numerical value.
- Sum — Adds the numerical values.
The results are displayed in the view’s status bar, and by default, include the Average, Count, and Sum functions. (#977)
The view metadata contains 3 settings related to the auto-calculate feature: AutoCalculateEnabled, which controls whether the auto-calculate function results are displayed in the status bar; AutoCalculateFunctions, which controls which auto-calculate functions are calculated and displayed in the status bar by default; and, AutoCalculateAllowCustomize, which controls whether the user is allowed to choose functions from the AutoCalculate menu.
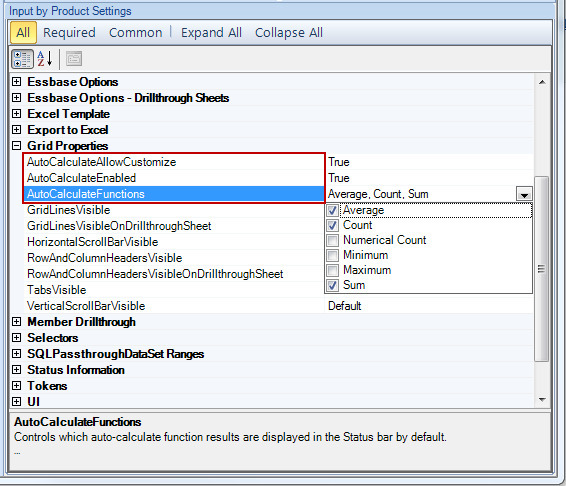
When AutoCalculateAllowCustomize is True, the AutoCalculate menu can be opened by right clicking in the status bar.
When the view is covered, the auto-calculate function results are automatically cleared from the status bar and the context menu is not displayed when the user clicks the right mouse button in the status bar. When the view is uncovered, auto-calculate is automatically re-enabled.
- Insert/Delete Cells, Rows, and Columns Support
The ability of the user to insert and delete cells, rows, and columns into and from the active worksheet is supported by the following standard tools: (#1000)
Insert and Delete Segmented Popup Menu Tools
The Insert and Delete segmented popup menu tools emulate the equivalent Excel tools that are used to insert and delete cells, rows, columns, and sheets.
Note: A segmented popup menu contains both a button and a dropdown menu.
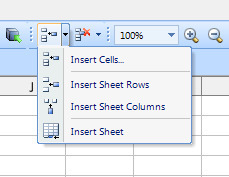
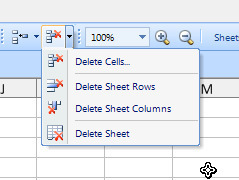
As in Excel, when the Insert or Delete button is clicked, the active selection determines whether cells, rows, or columns are inserted or deleted.
The Insert menu contains the Insert Cells, Insert Sheet Rows, Insert Sheet Columns, and Insert Sheet tools. The Delete menu contains the Delete Cells--, Delete Sheet Rows, Delete Sheet Columns, and Delete Sheet tools.
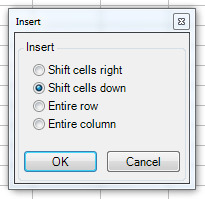
When cells are selected and the Insert Cells or the Delete Cells button is clicked, the related options dialog is displayed.
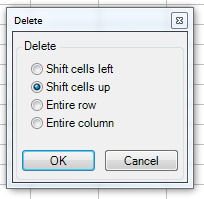
Insert and Delete (Cells, Rows, Columns) Context Menu Tools
As in Excel, the ability to insert and delete cells, rows, and columns is supported by tools available in the context menu that is displayed when cells, rows, or columns are selected and the right mouse button is clicked on a worksheet. The active selection determines the action taken when the Insert or Delete tool is clicked. When cells are selected, the Insert or Delete options dialog is displayed. When entire rows or columns are selected, then rows or columns are inserted or deleted.
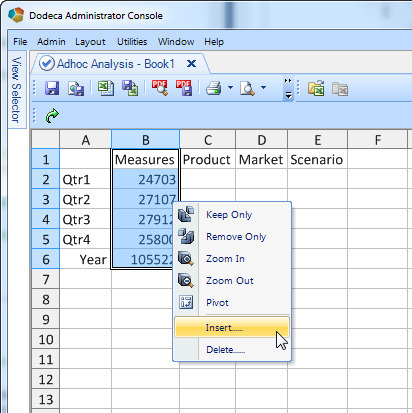
The InsertSheetCellsContextMenuButton and DeleteSheetCellsContextMenuButton can be imported into a toolbars configuration and added to a popup menu tool.
How to add the Insert and Delete segmented popup menu tools to a toolbars configuration and the Insert and Delete tools to a context menu
IMPORTANT — The following guidelines should be reviewed before adding these tools to a view’s toolbars:
- For an Adhoc Essbase view, these tools should only be included when the Excel Add In mode is enabled (i.e. when the view’s ExcelAddInMode property is set to True.)
- Typically, for an Excel Essbase view, these tools should only be included for a drill-through sheet.
- These tools should not be included for a sheet that contains data that is associated with a SQLPassthroughDataSetRange (i.e. a worksheet that contains a DataTableRange.) The tools that support adding, inserting, and deleting rows within a DataTableRange include the AddDataTableRangeRows, InsertDataTableRangeRows, and DeleteDataTableRangeRows tools.
To add the Insert and Delete segmented popup menu tools to an existing toolbars configuration, perform the following steps:
- Open the Toolbars Configuration Metadata Editor from the Admin menu.
- Select the toolbars configuration to which you want to add the tool.
- Open the Toolbars Designer.
- Open the Import Standard Tools and Toolbars Wizard.
The standard tools contain two predefined toolbars that contain these tools:
Grid with Edit Tools toolbar, which also contains the Cut/Copy/Paste, Zoom Factor, Zoom In/Out, and Sheets tools:

Cells toolbar, which contains only the Insert and Delete tools:

To import either of these toolbars, check the toolbar you would like to add to the toolbars configuration. If you only want to import the tools to add to an existing toolbar, do not check any of the toolbars.
- Click Next on the Select Toolbars tab.
- On the Select Popup Menu Tools tab, any popup menu tools that are contained by the toolbar that was checked in Step 5 will be automatically checked. If you did not select a toolbar, but want to import the Insert and Delete segmented popup menu tools, click the checkbox by the DeleteSheetCellsMenu and InsertSheetCellsMenu tools.
- Click next to advance to the Select Tools tab. Any tools that are contained by the toolbar and popup menu tools that were checked in the previous steps will be automatically checked.
- Click Finish to close the wizard.
- If you did not import a toolbar, but imported the Insert and Delete tools, you can activate the Toolbar tab and add the tools to the appropriate toolbar.
- Close the Toolbars Designer dialog.
- If you imported a toolbar, you can position the toolbar by dragging and dropping the toolbar to the appropriate location in the Toolbars Preview area.
- Commit the changes.
To add the Insert and Delete cells tools to a context menu, perform the following steps:
- Open the Toolbars Configuration Metadata Editor from the Admin menu.
- Select the toolbars configuration to which you want to add the tool.
- Open the Toolbars Designer.
- Open the Import Standard Tools and Toolbars Wizard.
- Click Next on the Select Toolbars tab.
- Click next to advance to the Select Tools tab.
- On the Select Tools tab, click the checkbox by the DeleteSheetCellsContextMenuButton and InsertSheetCellsContextMenuButton.
- Click Finish to close the wizard.
- In the Toolbar Designer dialog, activate the Popup Menu Designer tab.
- Select the popup menu tool from the Popup Menu Tool dropdown. Then drag the InsertSheetCellsContextMenuButton and DeleteSheetCellsContextMenuButton tools one-by-one from the list of available tools in the right panel to the list of tools in the left panel.
- Close the Toolbars Designer dialog.
Commit the changes.
- Insert/Delete/Rename Sheet Support
The Insert and Delete segmented popup menu tools described above contain the Insert Sheet and Delete Sheet tools, respectively. The ability to insert, delete, as well as rename a sheet is also supported by the sheet context menu. (#1001)
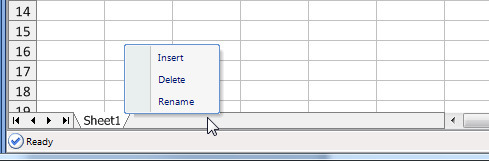
Sheet Context Menu
The sheet context menu is displayed when the tab area of the workbook is clicked with the right mouse button. The menu contains the Insert, Delete, and Rename sheet tools.
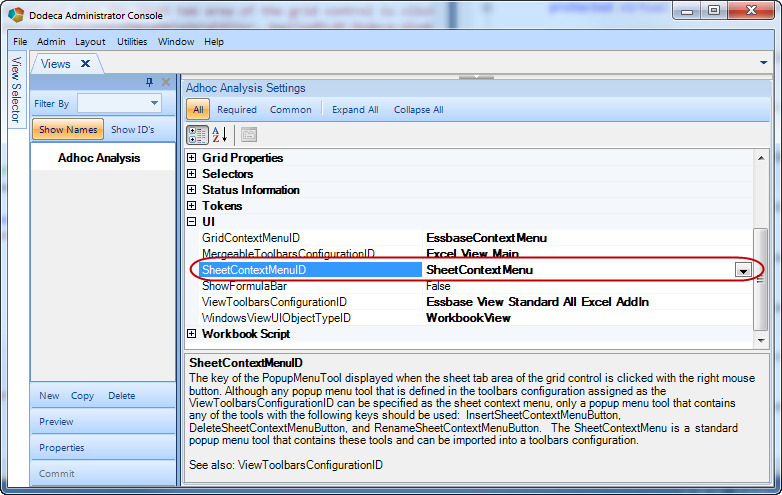
To enable the sheet context menu for a view:
- Import the SheetContextMenu standard popup menu tool into the toolbars configuration that is specified as the view’s ViewToolbarsConfigurationID. See the step-by-step instructions below.
Alternatively, use a toolbars configuration that already contains the SheetContextMenu.
- Set the view’s SheetContextMenuID to the SheetContextMenu or to a popup menu tool that contains one or more of the following standard tools: InsertSheetContextMenuButton, DeleteSheetContextMenuButton, RenameSheetContextMenuButton
To add the sheet context menu and related tools to an existing toolbars configuration, perform the following steps:
- Open the Toolbars Configuration Metadata Editor from the Admin menu.
- Select the toolbars configuration to which you want to add the tool.
- Open the Toolbars Designer.
- Open the Import Standard Tools and Toolbars Wizard.
- Click Next on the Select Toolbars tab.
- On the Select Popup Menu Tools tab, check the SheetContextMenu tool.
- Click next to advance to the Select Tools tab. The DeleteSheetContextMenuButton, InsertSheetContextMenuButton, and RenameSheetContextMenuButton tools are automatically checked.
- Click Finish to close the wizard.
- Close the Toolbars Designer dialog.
Commit the changes.
Fixed "Object reference not set to an instance of an object" error encountered when the active sheet is not a worksheet, such as a chart sheet.
PDF Support
Dodeca uses a component developed by a third-party vendor, Aspose, for the generation of PDF’s. We have upgraded to Aspose.Cells 6.0.1.0 to address the following issues:
- When a spreadsheet contains custom number formats, instead of built-in number formats, negative numbers are represented as zero in the PDF. This will be reflected in the numbers represented in printed PDF reports. In Dodeca 5.3.0 and 5.3.1, the workaround is to not use custom number formats when a number is negative and when it will be printed to PDF. This issue has been resolved with Aspose.Cells 6.0.1.0. (#997)
A known issue described in 5.3.1.2694 release notes related to using a double ampersand (&&) in a section of an Excel header or footer has been resolved. (#960)
Print and Print Preview Tools
- Fixed issue with hidden sheets being included when printing or doing a print preview. (#992)
Relational
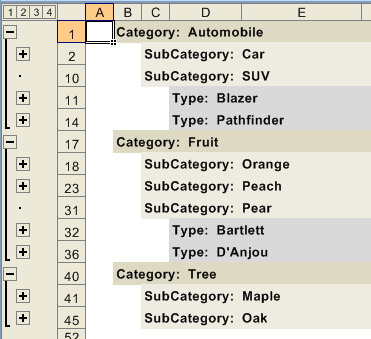
- Fixed Issue: When a DataTableRange is configured with more than two levels of grouping that have Excel outlining enabled, a group that is not at the innermost or outermost level and is the last child group of the parent group, but is not in the parent level’s last group occurrence, is not outlined.
The screenshot below illustrates the issue. Note that the SUV SubCategory is the last child group in the Automobile Category and the Pear SubCategory is the last child group in the Fruit Category, and neither is outlined; however, the Oak SubCategory is the last child group in the Tree Category, which is the last Category, and is outlined.
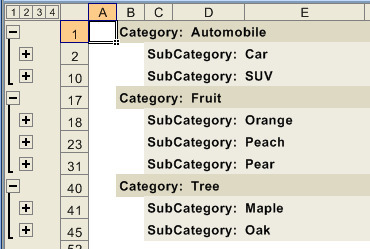
The next screenshot illustrates the resolution:
This issue is related to an issue (#951) that was partially addressed, but not completely resolved, in Version 5.3.0.2646.
- Fixed issue encountered when a data value containing only blanks is saved to the relational database. Although the blanks are saved to the database, the value displayed on the client, after the data is saved, is an empty string. This results in the user being prompted as to whether unsaved changes should be saved when the user attempts to rebuild or close the view. (#971)
- Fixed issue encountered when a SQLPassthroughDataSet’s query defines the DeleteSQL to execute a stored procedure. When there is a discrepancy between the count of deleted rows returned by the server and the number of rows deleted on the client, an exception was being thrown. To allow for this discrepancy, the client now only throws an exception when the server (i.e. the database) returns an error for one or more of the deleted rows. (#975)
Selector ComboBox
Fixed Issue: The Build View button does not become disabled when the user clears the selection by clearing the selection text in the selector combo box. (#987)
Selector Lists
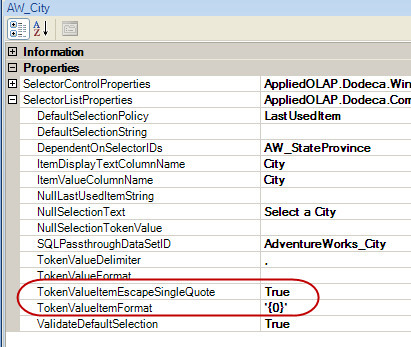
- The SelectorListProperties now includes a TokenValueItemEscapeSingleQuote setting, which controls whether a single quotation mark embedded within the token item value is automatically escaped with another single quotation mark. In other words, when the setting is True, each single quotation mark in a selected item is replaced with a pair of single quotation marks. Since relational databases require a single quote to be escaped with another single quote, this setting should be set to True when a selector’s token is to be used in a relational query. By default, TokenValueItemEscapeSingleQuote is False. (#974)
The following example illustrates how this setting can be used.
The selector list AW_City is configured to escape embedded single quotes. To allow for multiple selections, the TokenValueItemFormat is set to '{0}', which encloses each selected item in single quotes. Note that the TokenValueItemFormat setting is not required when TokenValueItemEscapeSingleQuote is True, but is necessary when multiple selections are allowed and the token is used in the WHERE clause of a relational query.
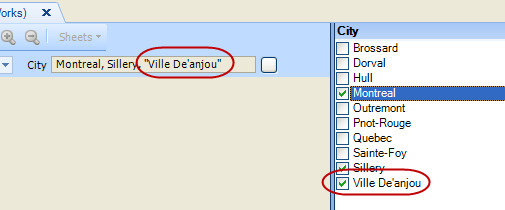
In this view, one of the selected cities, Ville De’anjou, contains an embedded single quote.
The SQL statement used to query the database uses the City selector’s token, [T.City] in an IN clause within the WHERE clause:
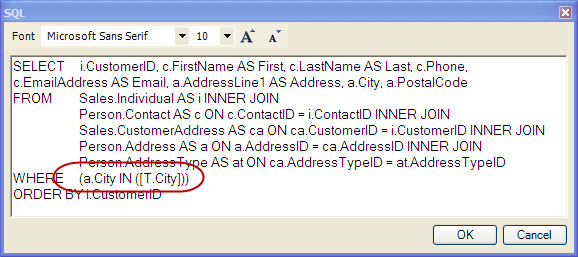
The [T.City] token value is
'Montreal', 'Sillery', 'Ville De''anjou'
where each city is enclosed with single quotes (based on the formatting specified by the TokenValueItemFormat setting) and the embedded single quote in Ville De’anjou is escaped with another single quote (based on the TokenValueItemEscapeSingleQuote setting.)
With the token replaced, the resolved WHERE clause is
WHERE (a.City IN ('Montreal', 'Sillery', 'Ville De''anjou'))
SQLExcelView
- Fixed issue with the following UI — WorkbookView metadata settings not being applied to a SQLExcelView type instance:
AllowChartExplorer
AllowRangeExplorer
AllowShapeExplorer
AllowWorkbookDesigner
AllowWorkbookExplorer
And the following Behavior setting:
BackgroundThreadWorkbookCalculation (#969)
SQLPassthroughDataSet Metadata Editor
Fixed issue introduced in 5.3.1.2694 (#957) that caused the "Fetch Next 25 Records" button to stop working. (#967)
View Selector TreeView
Fixed Issue: The ViewSelectorTreeView generates the following error when using the HierarchyToRoleMapping with multiple hierarchies mapped to the current user and the HierarchyRootNodeDisplayPolicy is set to TopLevelItemsForSingleHierarchy: Unable to cast object of type 'AppliedOLAP.Dodeca.Common.HierarchyMetadata' to type 'AppliedOLAP.Dodeca.Common.HierarchyItemMetadata'. (#984)
Workbook Script Debugger
- Fixed issue encountered when the Workbook Script Debugger is displayed by calling the ShowScriptDebugger, and any tool on the Debug toolbar is clicked, which results in an error. This issue is that the Debug toolbar should not be visible. By design, the ability to step through the methods in the script and set breakpoints is only supported when the Workbook Script Debugger is displayed automatically by setting the workbook script’s DebugMode to AllProcedures. (#972)
- Fixed issue encountered when the Workbook Script Debugger is opened for a procedure that is associated with the AfterConstruct or BeforeInitializeUI event links, which throws the "Object reference not set to an instance of an object" for the following tools: Open Range Explorer, Open Workbook Explorer, and Show Formulas tools, and the Name Box and Formula Bar. (#978)
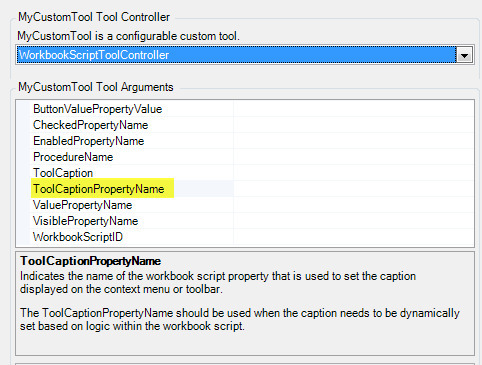
Workbook Script Tool Controller
- Added ToolCaptionPropertyName tool argument, which can be used to dynamically set the caption displayed on the context menu or toolbar. The existing tool argument, ToolCaption, is used when the caption only needs to be set when the tool is initialized. (#994)
Workbook Scripting
- Fixed Issue with the SetRowHeight method: The MaxHeight argument value is not applied. (#976)
- Fixed Issue with the SetExcelComment method: The size of the comment frame is too small for the comment text. (#1002)
Two additional method arguments were added: MaxCharactersPerLine and FontStyle. The MaxCharactersPerLine indicates the maximum number of characters displayed on a comment line, and is used to calculate the size of the comment frame. The default is 40. The FontStyle can be set to Regular or Bold. The default is Regular.
- Fixed Issue with SendEmail method: The Username and Password argument values are not encrypted when a Comment or Bookmark is assigned to the argument. (#1018)
- Fixed Issue related to methods that perform processing on a background thread (i.e. asynchronous processing.) The issue is encountered when an asynchronous method is called by a procedure that is executed by an ExecuteProcedure method, and the executed procedure calls ExitProcedure before calling the asynchronous method.
- Modified the @ValueError(), @ValueFormula(), @ValueLogical(), @ValueNumber() functions to allow for the specified address argument to be the name of a defined range that references a sheet other than the workbook script method’s current worksheet. The @ValueText() function already allows for the address argument to be a named range. (#1003)
- Modified SetEntry Method — Added the following arguments: TargetSpecifySheetBy, TargetSheetSpec, and TargetAddress. (#1004)
These arguments make it much easier to use the SetEntry method in a procedure that is called from within a CellByCell loop. When the SetEntry Address argument is not specified and the "target" arguments are used, the @ACell(), @CRow(), @CCol() functions return the active cell, row, and column based on the CellByCell address.
_Please note that existing workbook scripts that use the SetEntry method will continue to work as before. The "target" arguments are only used if specified, and are not required. _
The following methods support specifying an Essbase connection ID only or along with a Username and Password:
- AddDataCache — All Essbase-related overloads
- AddTokensForSubstVars
- BuildRangeFromScript — EssbaseReportScript and EssbaseMemberQuery overloads
- EssbaseReport
- EssbaseRunCalc
When the method is used by an Essbase view, the Essbase connection ID argument is optional. When no connection ID is specified, the Essbase view’s EssbaseConnectionID is used. For a non-Essbase view, the connection ID must be specified.
When the Essbase connection used by the method is stateful and the Username and Password arguments are also specified, a separate connection is opened on the server, and the connection is closed after the method executes. When the Essbase connection used by the method is stateful and the Username and Password arguments are not specified, a single instance of the connection is created on the server the first time the connection is used by either a view or a workbook script, and the connection is shared by any view and workbook script method that uses the connection. A stateful connection is closed when the Dodeca application is exited.
The Username and Password arguments will continue to be supported for the methods listed above in order to maintain backward compatibility. The recommended approach, when a workbook script method needs to use a connection with specific credentials, is to define a separate Essbase connection metadata instance that specifies the Username and Password settings, and then use this connection for the workbook script method. This approach is enforced for the following methods, which support an Essbase connection ID argument, but do not support Username and Password arguments:
- EssbaseCustomFunction
- EssbaseRetrieve
- EssbaseRunScript
- EssbaseSend
- EssbaseUpdate
- SetUDA
- New Function: The Guid function, @GUID(), returns a string representation of a globally unique identifier, GUID, that can be used wherever a unique identifier is required. (#1014)
- New Function: The PropertyIsNullOrEmpty, @PropertyIsNullOrEmpty(<PropertyName>), Returns True/False indicating whether a Property has a null value or, if the data type is string, whether the value is an empty string. If the property does not exist, returns True. (#1016)
- New Function: The MemberCellDimensionName function, @MemberCellDimensionName([<CellAddress>]) returns the dimension name of the specified member cell. If the cell is not a member cell, an empty string, "", is returned. (#1005)
- New Function: The Subsitute function, @Substitute(<Text>, <OldText>, <NewText>, [<CaseSensitive>], [<InstanceNumber>]), replaces existing text with new text in a text string. Unlike the Excel SUBSTITUTE function, this function does not limit the text argument values to 255 characters, and also allows for specifying whether a match is based on a case-sensitive or a case-insensitive comparison. (#1020)
- New Method/Function: The SetFormulaBar method and @FormulaBarIsVisible() function set and determine whether the Formula Bar is visible, respectively. (#995)
- New Method: The ShowSelectorControlAsDialog method shows the selector control, such as the treeview and listview, as a modal dialog. This method was implemented to address a specific customer’s requirement, which is to allow a user to right-click a member cell for a particular dimension, and provide an option on the context menu, which opens the selector control as a dialog from which the user is able to make a selection and either accept or cancel the selection. The OK button is only enabled when the selection is valid. The workbook script should then be able to determine whether the user clicked OK or Cancel, and based on the result, use the SelectorValue or SelectorDisplayedValue workbook script function to obtain the selection and perform an action, such as copying the selection to the active worksheet.
In this particular customer’s case, the selector list associated with the selector is configured with the ToolVisibleInToolbar property set to False, which is advisable, in order to prevent the user from opening the docked control. The control cannot be displayed both as a docked control and a modal dialog.
The method-specific arguments include SelectorID and DialogResultPropertyName. (#1006)
- New Method: The CallWebService method posts an HTTP web request. Although the request may return content in the response, the intent is for the method to call a web service that performs some processing, but does not return content to be consumed by the client, since workbook scripting is not well suited for processing the response. The response Xml can optionally be assigned to a workbook script property and/or saved to a file on the client. (#1013)
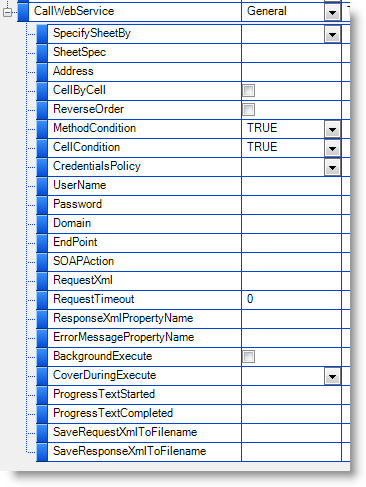
The method supports the following method-specific arguments:
- CredentialsPolicy — Controls the credentials used for authentication:
DefaultNetworkCredentials option - Represents the authentication credentials for the current security context in which the Dodeca application is running, which is usually the Windows credentials (user name, password, and domain) of the user running the application. The DefaultNetworkCredentials is applicable only for NTLM, negotiate, and Kerberos-based authentication.
SpecifiedCredentials option - Uses the specified UserName, Password, and Domain.
- UserName. Password, and Domain — The user name, password, and if needed, domain, associated with the credentials to be used for authentication.
- EndPoint — The URI to which the request is posted.
- SOAPAction — If required by the web service, the SOAPAction HTTP request header field value.
- RequestXml — The XML posted to the web service.
- RequestTimeout — The number of milliseconds allowed to elapse before the request is timed out
- ResponseXmlPropertyName — (Optional) The name of the workbook script property that receives the response XML returned by the web service.
- ErrorMessagePropertyName — (Optional) The name of the workbook script property that receives the error message if the request fails.
- BackgroundExecute — Controls whether the request is executed asynchronous. If set to True, the request is performed on a background thread, and the view is disabled during the execution; however, the user is able to interact with the rest of the application.
- CoverDuringExecute — Controls whether the view is covered while the request is processed. By default, the view is not covered.
- ProgressTextStarted — (Optional) The text string displayed as the progress text in the status bar before the web service is called. If no value is specified, "CallWebService started" is displayed as the progress text.
- ProgressTextCompleted — (Optional) The text string displayed as the progress text in the status bar after the response is received. If no value is specified, "CallWebService completed" is displayed as the progress text.
- SaveRequestXmlToFilename — (Optional) The name of the file, including the path, to which the request XML is saved on the client. The argument is intended for use during development for debugging purposes.
- SaveResponseXmlToFilename — (Optional) The name of the file, including the path, to which the response XML is saved on the client. The argument is intended for use during development for debugging purposes.
- New Method: The EssbaseCustomFunction method supports the ability for a workbook script to execute a custom Java service on the dodeca-essbase server. (#985)
The method supports the following method-specific arguments:
- ServiceName — The name of the custom service. The value must correspond to a custom entry in the dodeca-essbase service’s WEB-INF\classes\dodeca-essbase-actions.properties file, which maps the service name to the fully qualified Java class name that implements the service.
- FunctionArgumentsXml — The XML containing the arguments passed to the service.
- IncludeConnectionXml — Indicates whether the Essbase connection information is included in the Xml passed to the service. If TRUE, the Java class must subclass from EssOperation or one of its subclasses. The EssConnectionManager is automatically instanced and available to the subclass in a protected method overload.
- ConnectionID — The ID of the Essbase connection that contains the credentials to be used by the service. The ConnectionID is only used when IncludeConnectionXml is True. For an Essbase view, the ConnectionID is optional. If not specified, the view’s EssbaseConnectionID is used. For a non-Essbase view, the ConnectionID must be specified.
- IncludeGridXml — Indicates whether the grid data is included in the Xml passed to the service. If TRUE, the Java class must subclass from EssGridOperation. The EssConnectionManager is automatically instanced and available to the subclass in a protected method overload. The EssConnectionManager.getGridView() method also returns an IEssGridView object filled with the grid data passed to the server. By default, the IEssGridView does not contain numbers passed from client. To fill the grid with numeric cells sent from the client, override the protected EssGridOperation.isUpdate() method as follows:
- ResultPropertyName — The name of the workbook script property that receives the value of the result returned by the function. If the property data type is Boolean, the workbook script will attempt to convert the value to True or False; otherwise, the value is treated as a string. If the property does not exist, it is created.
- ResultsDataCacheName — The name of the DataCache that the result values can be written to when the result string represents tabular data where rows are newline delimited and columns are tab delimited. The first column value of each row is used as the row index.
- BackgroundExecute — Controls whether the function is executed asynchronous.
- Timeout — The numbers of seconds allowed to elapse before the execution of the function is timed out on the server. The default value of 0 indicates that no timeout is enforced.
- CoverDuringExecute — Controls whether the view is covered while the custom function is executing.
- ProgressTextServiceStarted — The text string displayed as the progress text in the status bar before the service is started. If no value is specified, "Custom service started" is displayed as the progress text.
ProgressTextServiceCompleted — The text string displayed as the progress text in the status bar after the service completes. If no value is specified, "Custom service completed" is displayed as the progress text.
In this example, the method is configured to pass the connection information to the MessageLoggerWithStringReturn service, and store the result string returned by the function in the Result property. The method also overrides the default progress text displayed when the custom function is started and completed.
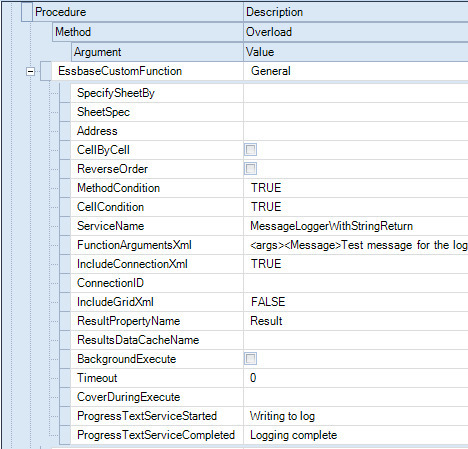
This is the request XML:
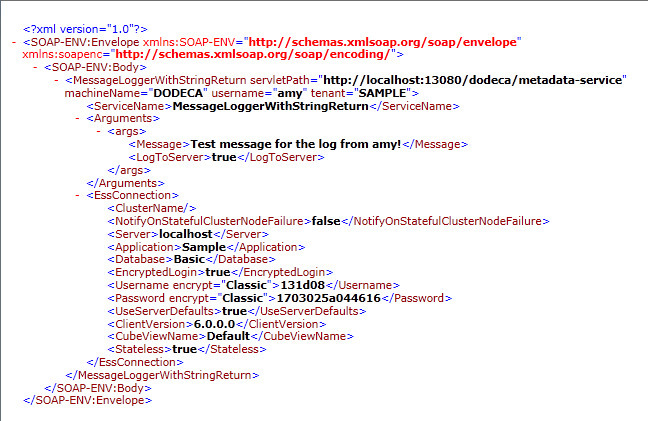
And, this is the response XML:
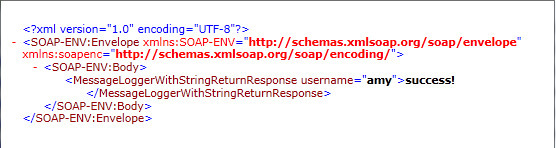
The Result property will be assigned the value "success!"
If you have the need to implement a custom Essbase service, contact us at support@appliedolap.com for more information.
`
- New Method: The SQLPassthroughExecute method supports the ability to execute a delimited list of SQL statements within a single server request. (#1011)
The method supports the following method-specific arguments:
- SQLConnectionID — The SQL connection ID used by the operation.
- Statements — The SQL statements delimited by the StatementDelimiter.
- StatementDelimiter — The character used to delimit the statements. The recommended delimiters include the pipe "|" and the semi-colon ";". It is possible that another character may be used, but these are the only characters that have been tested. If none is specified, a semi-colon is assumed to be the delimiter
- Transaction (True/False) — Controls whether the statements are executed within a transaction. By default, a transaction is not opened.
- ContinueOnError — If the Transaction argument is FALSE, ContinueOnError controls whether the remaining statements are executed when a given statement generates an error. By default, execution of the remaining statements is not continued when an error is encountered.
- BackgroundExecute (On/Off) — Controls whether the operation is executed asynchronous.
- CoverDuringExecute (True/False) — Controls whether the view is covered while the statements are executed. By default, the view is not covered.
- ProgressTextStarted - (Optional) The text string displayed as the progress text in the status bar before the statements are executed. If no value is specified, "SQLPassthroughExecute started" is displayed as the progress text.
- ProgressTextCompleted — (Optional) The text string displayed as the progress text in the status bar after the statements are executed. If no value is specified, "SQLPassthroughExecute completed" is displayed as the progress text.
- ResultPropertyName — (Optional) The name of the workbook script property that receives the value of the result, which is a string containing the result of each statement delimited by the StatementDelimiter.
- ErrorPropertyName — (Optional) The name of the workbook script property that receives the error message if the service returns an exception.
- New Method: The ShowFileDialog method prompts the user to select a file to open (OpenFile overload) or select a location for saving a file (SaveFile overload). (#1017)
Modified @SubstVar Function: The SubstitutionVariable function now supports a Scope parameter: @SubstVar(<SubstitutionVariableName>, [<connection-ID>], [<scope>])
The valid values include: Any, Server, Application, and Cube. The Any scope returns the most locally scoped substitution variables. If not specified, the Any scope is applied. (#1007)
- Modified AddTokensForSubstVars Method: The AddTokensForSubstVars method now supports a Scope argument, which specifies the scope of the substitution variables returned. The options include: Any, Server, Application, and Cube. The Any scope returns the most locally scoped substitution variables. The value may also be specified as a formula that resolves to one of the valid options. If no option is specified, the Any scope is applied. (#1008)
- New EventLink: The RequestSheetContextMenuID event occurs when the user right clicks in the sheet tab area of a worksheet or anywhere on a chart sheet and before the sheet context menu is displayed. (#1009)
This event link can be used to dynamically set the context menu based on the active sheet. For example, let’s say that an Excel Essbase view is configured to open a drill-through sheet in response to the user double clicking an Essbase data cell. If we want the sheet context menu to display only for a drill-through sheet, we can create a workbook script that sets or clears the view’s SheetContextMenuID based on whether or not the active sheet is a drill-through sheet.
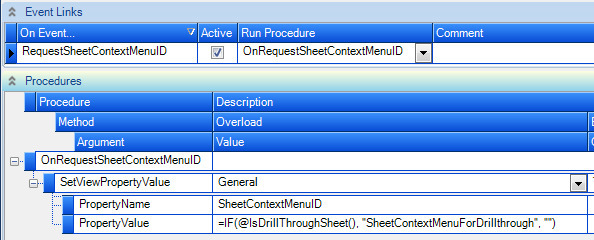
- New Function: The SpecialFolder function, @SpecialFolder(<FolderID>), returns the directory path to a system special folder on the client. The specified folder ID is a constant that identifies the folder, such as ApplicationData, DesktopDirectory, Favorites, Personal, and MyDocuments. (#1010)
- New Function: The TempFolder function, @TempFolder(), returns the directory path to the client system’s temporary folder. (#1010)