Dodeca Version 7.5.0
June 19, 2018 - Build 6430
This version of the Dodeca Framework uses the .NET Framework, version 2.0, Service Pack 1 and higher on the desktop. The components used in this version of Dodeca are SpreadsheetGear 2017 (8.0.67.102), NetAdvantage 2011, Volume 1 (11.1.20111.2042), Aspose.Cells 17.1.0.0, Syncfusion Essential Studio 13.4.0.63, and GdPicture.NET 11.0.6.
This version of Dodeca has two server-side services that run inside a Java Application Server. The Dodeca service is supported and tested on Java 1.6. The Dodeca-Essbase service for all Essbase versions prior to, and including, Essbase 11.1.1.3 are supported and tested on Java 1.5. The Dodeca-Essbase service for all Essbase versions 11.1.1.4 and higher are supported and tested on Java 1.6. Both services are known to run on Java 1.7, 1.8, 1.9, and 1.10.
The release notes for this version contain the following sections:
Cache Viewer
-
Enhancement: Add support for common keyboard shortcuts. The
Ctrl+Akeyboard shortcut can now be used to select all listed cache items, and theDeletekey can be used to delete all selected items. #1972
Client Startup
-
Fixed Issue: In previous versions, when a Dodeca application attempted to launch for the first time on a system, the system culture was used to perform the startup request processing. When launching the application under a culture with different casing rules than the invariant culture, an error similar to the following could occur: The Dodeca license could not be validated. Unable to deserialize LicenseInfo response. Index was outside the bounds of the array. #1918
Commentary
-
Fixed Issue: Comments fail to be saved automatically when the view’s workbook script uses the EditCellChanged event to change the active sheet. #1971
Dodeca Application Styling
The ability to change the styling of a Dodeca application has long been supported through the various application Appearance settings, including the ApplicationStyle and StyleLibraryBinaryArtifact properties. The ApplicationStyle can be set to one of several built-in style options. The StyleLibaryBinaryArtifact can be used in lieu of the ApplicationStyle property, and provides a more customized approach to controlling the appearance.
In version 6.0.0.3106, a style library was included with and used by the ADMIN and USER applications in the metadata STARTER_KIT, which is installed with the Dodeca Framework. It emulates the Color Scheme of Blue supported by Office 2010. By way of the starter kit, this style library has become the default styling used by customers, and is consequently the styling most commonly associated with a Dodeca application:

For the 7.5.0 version, a new style library has been created to provide a more updated look. It emulates the Office Theme of White supported by Office 2013 and Office 2016:
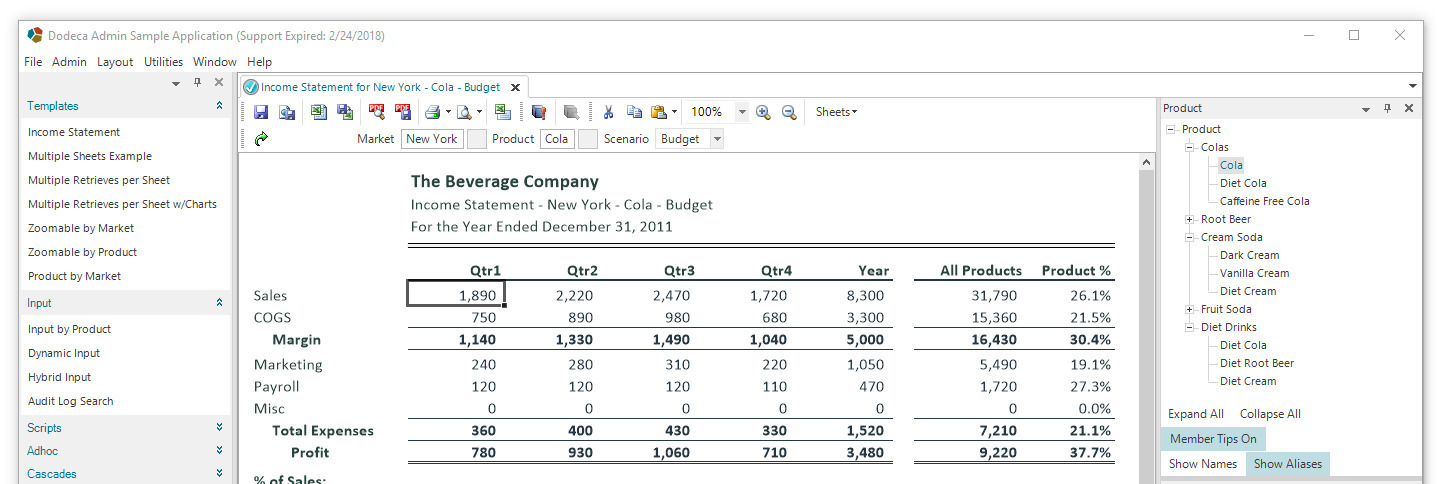
The new Dodeca style uses a primary accent color, which is the teal from the Dodeca logo, along with two tints of the same color. This approach is consistent with the Office applications. The tints are primarily used for hot tracking and highlighting.


To use the new style library in an existing application, the following steps are required:
-
Import the DodecaTeal_OfficeWhite_Style style library from the starter kit metadata into an existing tenant.
-
From an Admin application, click Admin / Import Export Utilities / Import Metadata from Local Zip File to open the Import Metadata dialog.
-
Open the metadata_starter_kit.zip file, which is installed in the metadata folder, such as
C:\Program Files\Applied OLAP\Dodeca Framework 8.2.0\metadata. -
Click the checkbox next to the DodecaTeal_OfficeWhite_Style ID.
-
Click the Import button.
-
-
Configure an application to use the imported style library:
-
Click Admin / Applications to open the Applications Metadata Editor.
-
Select the application.
-
Assign the DodecaTeal_OfficeWhite_Style to the StyleLibraryBinaryArtifact setting.
-
Click the Commit button.
-
-
If the application is the current application, exit and restart the application.
How to customize the style library by changing the primary accent color
The DodecaTeal_OfficeWhite_Style style library can be used as the template for creating another style library with a different primary accent color and associated tints. The color can be taken from a company’s logo to create a more branded or customized look.
The steps necessary for achieving this effect will be demonstrated by way of an example: The rusty red from the Dodeca logo will be used as the primary accent color for a new style library. Starting with the RGB value for your primary accent color, calculate the associated tints.
One tool for calculating the tints can be found online at
http://www.brandwares.com/RGBTintCalculator.php.
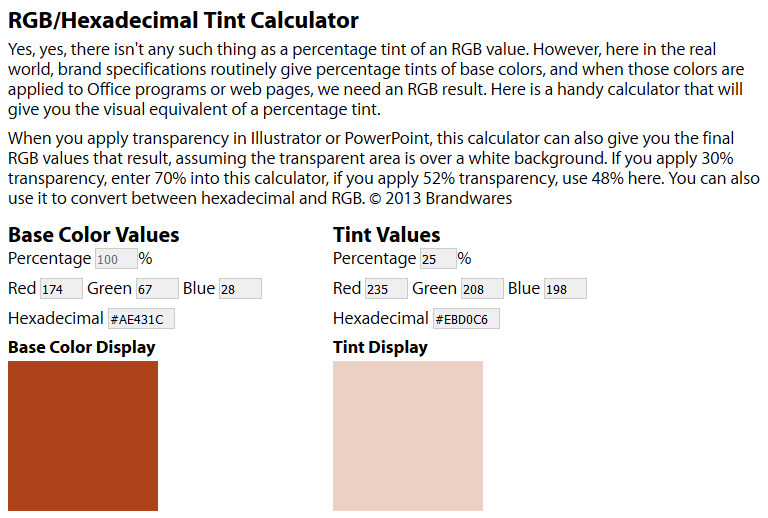
The RGB values for the rusty red:

Next, the following steps are performed to create the new style library.
-
Extract the .isl (Infragistics Style Library) native XML from the DodecaTeal_OfficeWhite_Style style library binary artifact.
-
From an Admin application, click Admin / Binary Artifacts from the main menu to open the Binary Artifact Editor.
-
Click DodecaTeal_OfficeWhite_Style, which was imported from the starter kit metdata in the previous steps.
-
Click the Export button on the toolbar below the list of binary artifacts.
-
Save the DodecaTeal_OfficeWhite_Style_Segoi_UI.isl (Infragistics Style Library) to the file system.
-
Rename the file appropriately. For this example, the file is renamed to DodecaRustyRed_OfficeWhite_Style_Segoi_UI.isl.
-
-
Modify the RBG values of the primary accent color and tints in the ISL xml file.
-
Open the newly copied file in an XML or text editor.
-
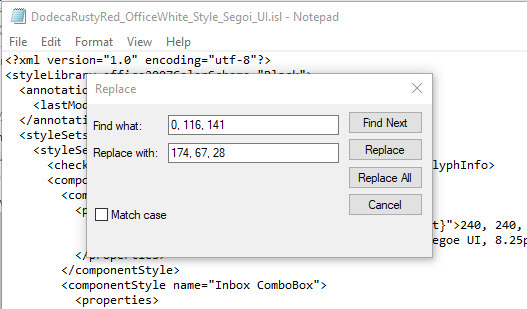
The file associates the RGB values for the teal (and tints) with various user-interface controls. These occurrences will be replaced with the corresponding color and tints for the new style library. For this example, we will replace the teal/tints with the rusty red/tints:
-
Replace 0, 116, 141 with 174, 67, 28 (or your primary accent color)
-
Replace 191, 220, 227 with 235, 208, 198 (or the 25% tint of your color)
-
Replace 230, 241, 244 with 247, 236, 232 (or the 10% tint of your color)
-
-
-
Create a new style library.
-
In the Binary Artifact Editor, click the Copy button. For this example, the ID and Name are set to DodecaRustyRed_OfficeWhite_Style.
-
Import the DodecaRustyRed_OfficeWhite_Style_Segoi_UI.isl by clicking the Import button and selecting the file from the file system.
-
Click the Commit button.
-
-
Configure an application to use the new style library.
-
To change the style library used by the active or any other application, open the Application Editor by clicking Admin / Applications from the main menu.
-
Select an application.
-
In the Appearance category, click the StyleLibraryBinaryArtifact setting.
-
Click the "…" button to the right, and select the new style library from the list of style libraries.
-
Click the Commit button.
-
If the selected application is the current application, exit the application and restart to see the effect of the new style library.

-
Essbase Excel Views
-
Fixed Issue: The regional options settings for a view are determined based on the CulturePolicy and CultureName property values. When the settings define the List Separator as a non-comma character, the Excel auto-calculate functionality does not display the computed values in the status bar. #1525
-
Fixed Issue: When a cascaded Excel Essbase view template contains a non-cascade sheet, which contains a data set range (as configured with the SQL Passthrough DataSet functionality), the relational retrieve is not executed when the cascade configuration is specified using the CascadeSheetConfig property. #1950
Essbase MDX Views
-
The default value of the NeedCellStatus property has been changed to False. It was determined that setting the property to True can cause an extreme performance degradation. #1931
-
Fixed Issue: In the View Editor, when the value of several of the Essbase MDX view properties was changed, the Commit button is not enabled. #1930
Essbase Report Script
-
Fixed Issue: When a report script is run from the Dodeca client to obtain members and contains the <QUOTEMBRNAMES command, all the members may not be returned. #1969
Essbase Scripts Metadata Editor
-
Fixed Issue: Some Report Script format and calculation commands, e.g.,
{ BEFORE,{ CALCULATE, could freeze the editor when generating code completion hints, due to invalid syntax definitions. The issue has been addressed, both by correcting the syntax definitions and by handling invalid syntax definitions gracefully. #1948 -
Enhancement: Introduce support for context-sensitive completion hints when editing Calc Scripts. #1976

Essbase Selectors
-
Fixed Issue: When an Essbase selector uses an EssbaseReportScript selector list and the selector list does not specify a ReportSpec value, the following error occurs when a view (which uses the selector) is opened: Unable to show the selector control. Unable to get the selector list items. The "<selector list ID>" selector list’s SelectorListProperties.ReportSpec setting is not specified. #1941
Essbase Send and Date Measures
-
Fixed Issue: When attempting to send a date value to Essbase, the following error occurs: Unable to perform Essbase update operation. An error [37] occurred in Spreadsheet Extractor." The error has been addressed, and the handling of dates now allows for use of the Excel date formatting on the client and automatic conversion of the dates to and from the Essbase date format on the server. #1936
Essbase Server Scripts Editor
In version 7.3.0.6125, released October 3, 2017, the Essbase Scripts Metadata Editor was introduced to support the creation, development, and testing of Essbase Scripts stored as metadata objects. The Essbase Server Scripts Editor takes this functionality and extends it to
the Essbase Server, allowing Essbase administrators and developers with sufficient permissions to create, develop, and test Essbase scripts and queries stored directly on the Essbase server. #1955
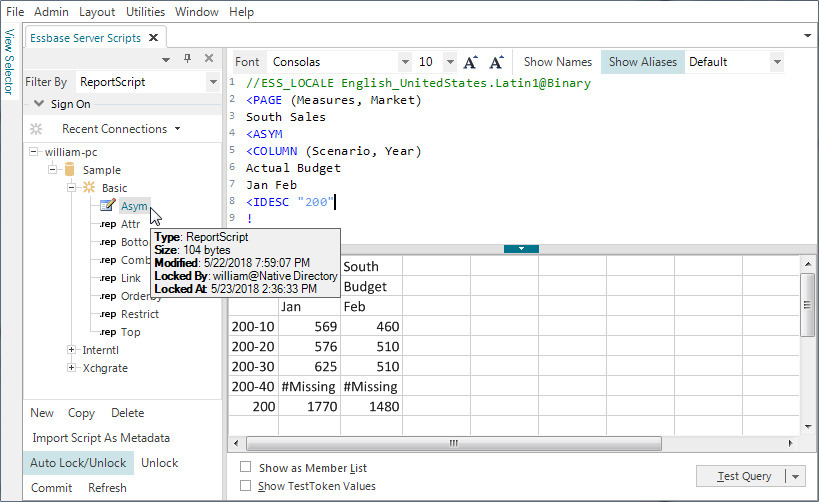
See also: Essbase Scripts Metadata Editor.
Export Metadata to Local Zip
-
Enhancement: When exporting metadata to a local zip file, add a hyperlink to the task pane to support opening Windows Explorer and highlighting the exported file. #1965

LDAP Authentication Services
-
Enhancement: Add support for connecting via SSL and using a custom login attribute with OpenLDAP. These features correspond to two new properties under the LDAPConnection, UseSSL and LoginAttribute. #1980
JNDI Connections for Essbase
-
In version 7.3.0.6125, released October 3, 2017, support for JNDI connections for Essbase was introduced. In the initial release, an Essbase connection defined with a DataSource could be used for an operation requiring elevated credentials, but did not behave as expected when the Essbase connection was associated with a view or used by a workbook script. In these instances, the user would be prompted for credentials. With the current release, the behavior has been revised such that when a JNDI-enabled Essbase connection is associated with a view or workbook script, the user is not prompted for credentials and the credentials defined for the JNDI data source are used. #1932
-
When the value specified as the DataSource for an Essbase connection (by using the Essbase Connection Editor on the client) is not properly defined in the JNDI data source configuration, the following error occurs when the client attempts to connect to Essbase using the Essbase connection: JNDI Data Source <data source> not found. #1949
| The JNDI data source is case-sensitive, so when specifying a data source for an Essbase connection, the case should match the intended data source configuration on the server. |
Metadata Dependency Explorer
The Metadata Dependency Explorer provides an interface for viewing interdependencies between the various metadata instances. The interdependencies can be thought of in terms of a hierarchy, which represents the relationships between the instances. For example, a given view may depend on a selector, which may depend on the selector’s default selector list, which may depend on an Essbase script.
A dependency relationship between two given metadata instances can be characterized as Instance A depends on Instance B and in turn, Instance B is depended on by Instance A. The utility supports exploring both types of dependencies. So, for example, you may want to find all the metadata instances that a given view depends on directly or indirectly, and then find all other views that also depend on or share the same toolbars configuration.
The utility also supports the following:
-
Filtering the metadata types displayed in the results. For instance, you may only be interested in seeing the selector lists that a view depends on without also seeing the selectors, workbook scripts, toolbars configurations, etc.
-
Export all (or selected) instances contained within the dependency results. This can be especially helpful when you need to export a view and all of its dependencies.
-
Delete all (or selected) instances contained within the dependency results.
-
Launch the appropriate metadata editor for a given instance contained in the dependency results.
-
Open another Metadata Dependency Explorer for a specific metadata instance represented in the current dependencies.
How to Access the Metadata Dependency Explorer
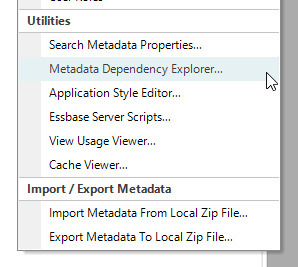
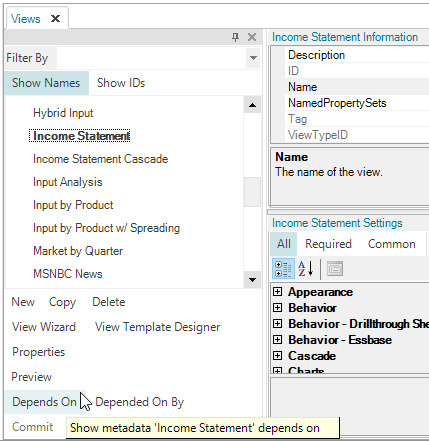
The Metadata Dependency Explorer can be accessed from the Admin menu, from the various Metadata Editors, and from the context menu within the Explorer dialog for a given metadata instance contained in the dependency results.
From the Admin menu:
From a Metadata Editor:
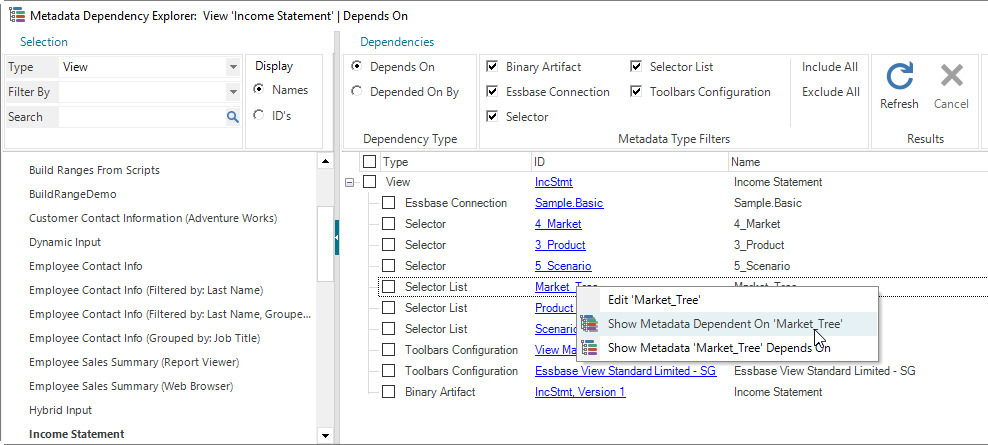
From the Metadata Dependency Explorer:
Using the Metadata Dependency Explorer
Multiple instances of the Metadata Dependency Explorer dialog can be open and interacted with simultaneously, and the application may be interacted with while the Explorer dialogs are open. The search for dependencies is performed on the server, and the request from the client is processed in the background, which allows you to continue to interact with the application while the client is waiting for the dependency search results.
When the Metadata Dependency Explorer is accessed from the Admin menu, you must select the metadata type of interest and also verify that the Dependency Type is set as desired. By default, the dependency search will look for metadata that the selected metadata instance depends on.

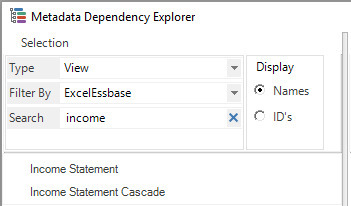
The ability to search the list of metadata instances is supported for all metadata types. When appropriate for the selected metadata type, the "Filter By" control allows for selecting the metadata instance type. This is similar to the various metadata editors. In the screenshot below, only ExcelEssbase view instances whose name contains the string income are displayed in the list.
When a metadata instance from the list is then selected, the dependency search is automatically performed.
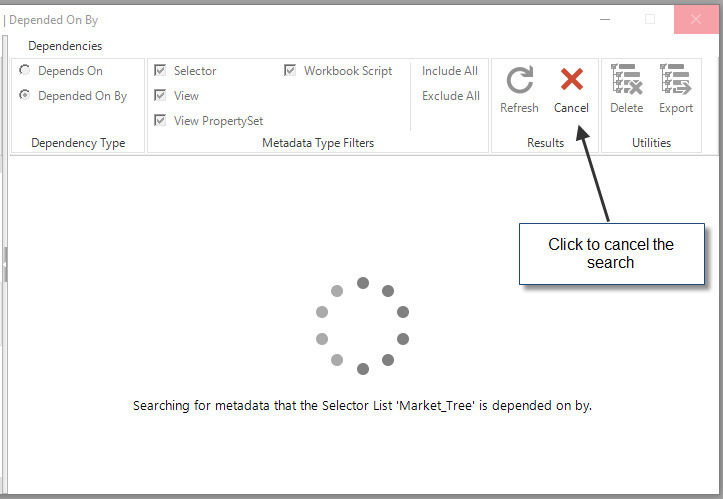
You may cancel a search by clicking the Cancel button when the dialog is inactive and waiting. In this screenshot, all metadata that directly depends on the Market_Tree selector list is being searched.
The screenshot below shows the results of the search for the metadata that the Income Statement (from the Sample application) depends on.
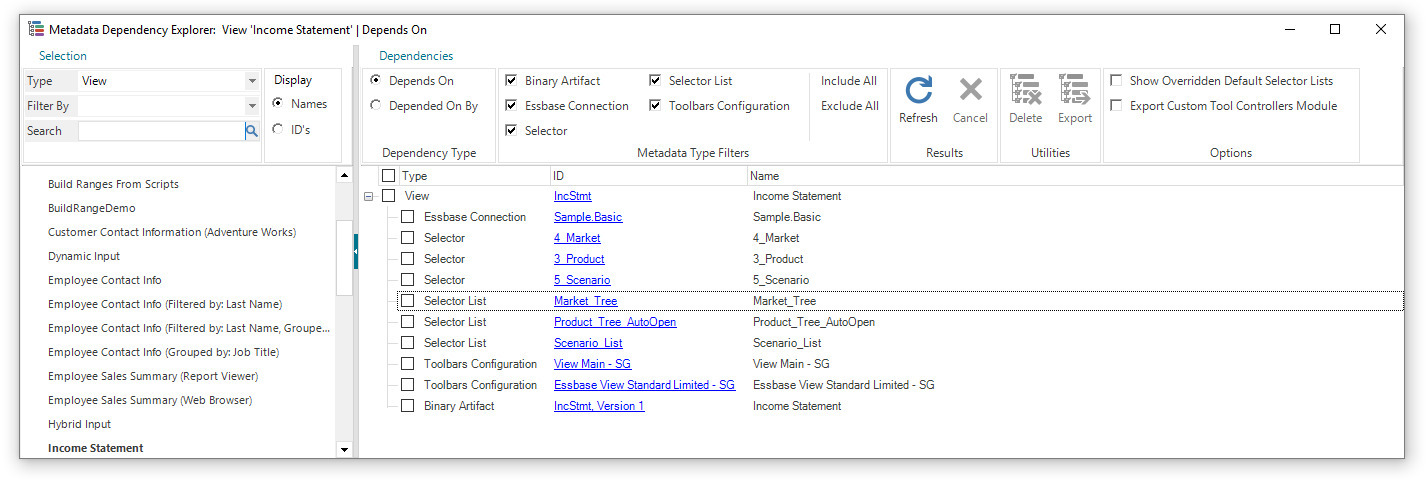
You may use the Metadata Type Filters to control which of metadata types represented in the results are actually displayed. For example, in the screenshot above, all of the metadata types represented in the metadata depended on by the Income Statement are displayed. In the screenshot below, only the selector lists are displayed.

Clicking on the ID of any instance in the results opens the appropriate metadata editor and navigates to the metadata instance’s properties.
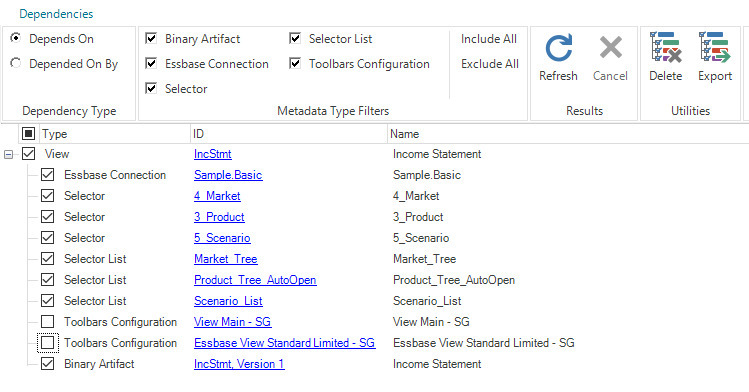
The check boxes in the left column of the results can be used to select which instances to export or delete. When one or more instances are checked, the Delete and Export utility buttons are enabled.
In the screenshot below, all of the metadata instances, except for the toolbars configurations, have been checked.
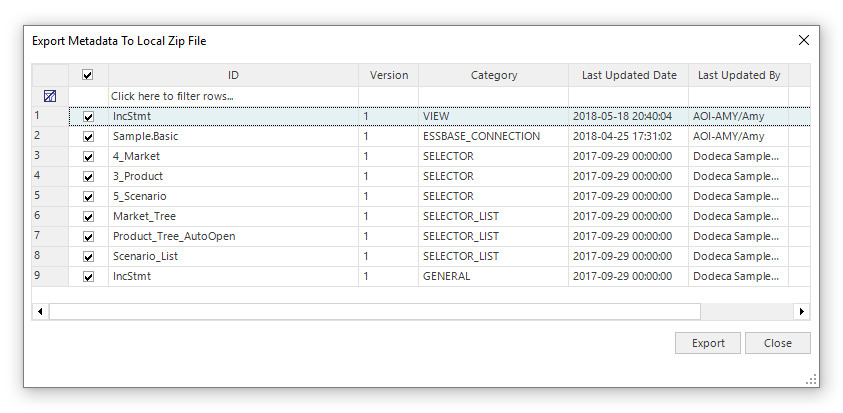
Clicking on the Export button displays the Export Metadata to Local Zip File dialog.
As indicated above, the Metadata Dependency Explorer can be accessed from a metadata editor or from the context menu within the Metadata Dependency Explorer for a given metadata instance contained in the dependency search results, as shown below.

Using this example, clicking Show Metadata Dependent On 'Scenario_Combo' opens a new Metadata Dependency Explorer window, which displays only the Scenario_Combo in the list of metadata instances. You have the option to display all selector list instances by clicking "Show All Selector Lists".

The Options ribbon group contain the Show Overridden Default Selector Lists and the Export Custom Tool Controllers Module options.
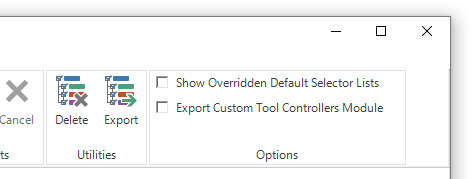
The Show Overridden Default Selector Lists option is applied to the dependency search results when the selected metadata type is View. It is used to control whether a given selector’s default selector list is included in the results when the selected view overrides the default. The default can be overridden in the view’s SelectorConfiguration.
The Export Custom Tool Controllers Module option is used to allow the Custom Tool Controllers module to be exported along with the selected metadata instances in the dependency search results.
SQL Selector Tree
-
Performance Enhancement: In previous releases, when the selector list associated with a SQL Selector Tree generated a large number of items to be added as root nodes, such as in the neighborhood of 30,000, the initial population of the tree was slow. #1937
View Metadata Editor
-
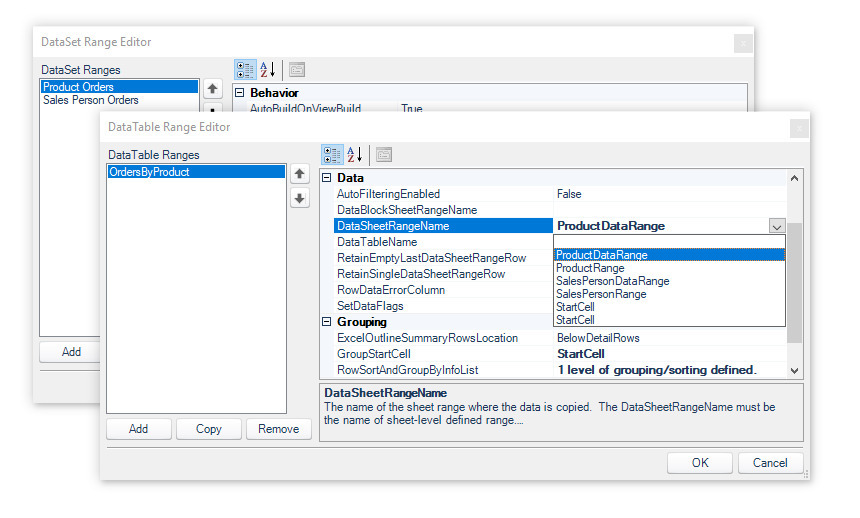
Added an enhancement to the Data Table Range Editor for SQL View and Essbase Excel View Types: The DataTable Range Editor now supports the ability to select the value of the DataSheetRangeName and DataBlockSheetRangeName property values from a dropdown list of all sheet-level defined names in the view’s associated Excel template. (The same capability is also supported for the GroupTemplateSheetRangeName property value in the RowSortAndGroupByInfo Editor.)
In addition, the DataTableName property value may be selected from a dropdown list of all the DataTable values defined for the queries in the SQLPassthroughDataSet associated with the DataTable Range. #1557, #1524
-
Fixed Issue: When a view is copied and a space is inadvertently included at the end of the view ID, the following error occurs when the user attempts to edit the value of any view property: Unable to process encoded artifact property changed event. Object reference not set to an instance of an object. To address this potential issue, any leading or trailing blanks are automatically trimmed from the ID, Name, and Description values specified in the Copy View dialog. This approach is consistent with the creation of a new view. #1945
View Selectors
-
Enhancement: Added a SharedViewPolicy property to the SavedViewListHierarchyItem in order to allow administrators to configure whether a saved view list will contain only saved views, only shared views only, or both, where both is the default option. This is useful for separating a user’s saved views from shared views in the View Selector. Provided options are: SharedViewsOnly, SavedViewsOnly, and Both. #1923
View Status Bar
-
Fixed Issue: Status details, such as is displayed in the status bar when unknown members are detected in an Essbase view, were previously cleared when any other tool was clicked. For certain tools, the clearing of existing status details is unnecessary, such as the Save As Excel tool. The following tools no longer clear the status details when clicked: Save As Excel, Open In Excel, Save As PDF, the various iterations of Print and Print Preview, Save View, and Save View As. #1978
Workbook Script Editor Enhancements
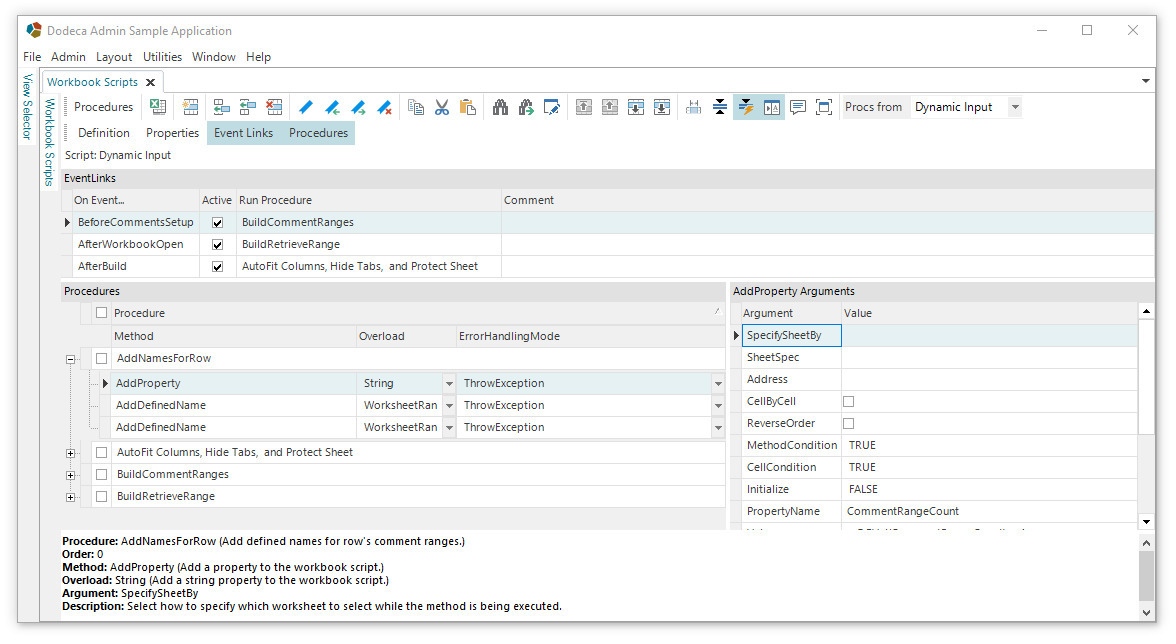
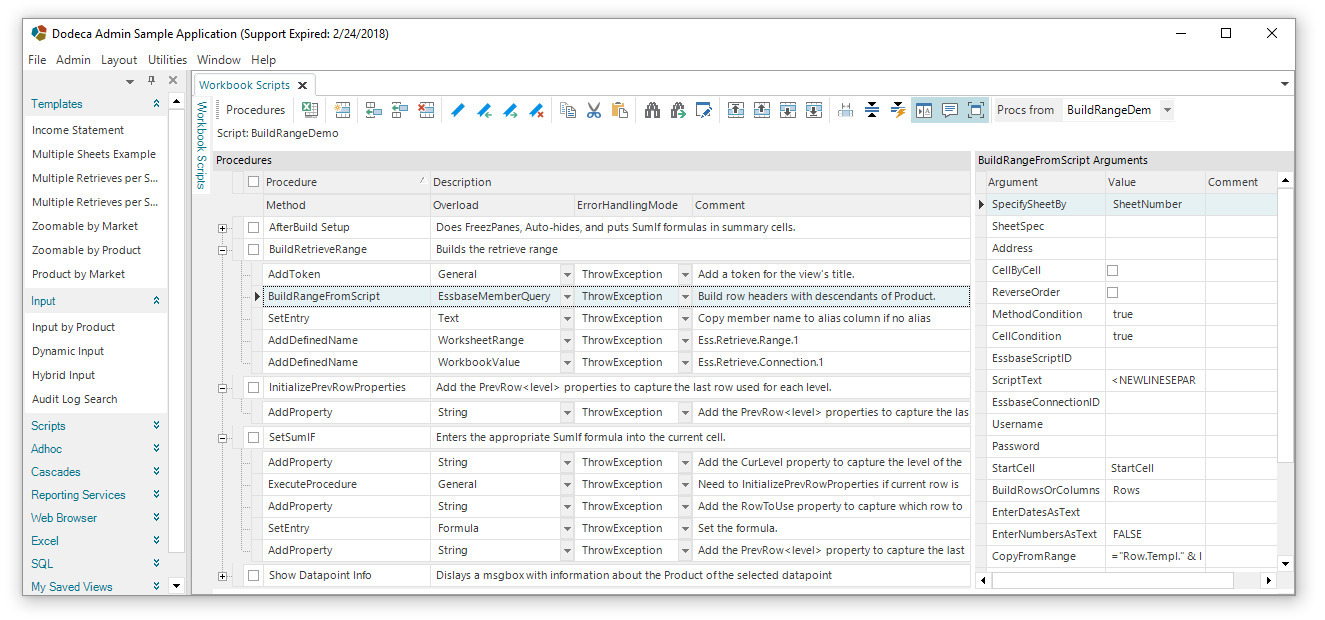
The Workbook Script Editor has undergone several enhancements to optimize the creation and editing of workbook scripts, such as allowing the workbook script developer more control over the layout of the various components to provide better utilization of the editor real estate.
-
New toolbar tools, which include several state buttons (or toggles) to control the following:
-
The automatic expansion of the active procedure’s methods and corresponding collapse of the other procedures.
-
The display or hiding of comments and descriptions.
-
Maximizing the Procedures window.
-
Selection of which workbook script is used to obtain the list of procedures included in the dropdown list for an argument that takes a Procedure name as a value. #1569
-
The display or hiding of the Help pane.
-
-
Support for keyboard navigation.
In this screenshot, the method arguments are displayed on the side, and the comments and descriptions are not displayed in the Procedures grid.
In this screenshot, the Procedures grid is maximized, method arguments are displayed on the side, and descriptions and comments are displayed.
New Workbook Script Editor Toolbar Buttons
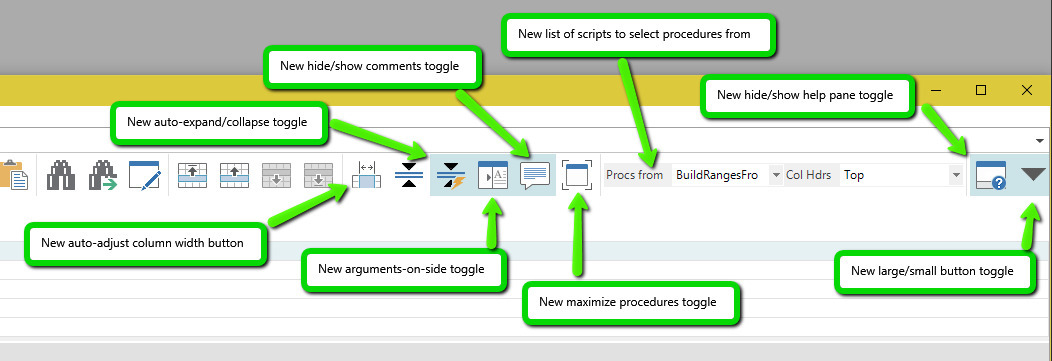
Auto-Adjust Column Width (All Grids)
(Ctl-J) |
Automatically sets the column width of the active column based on the contents of the column. |
Auto-Expand/Collapse Methods/Procedures Toggle (Procedures Grid)
(Ctl-Alt-X) |
When selected, the methods of the active procedure are automatically expanded and all other procedures are collapsed. |
Hide/Show Comments Toggle (Procedures Grid)
(Ctl-Alt-C) |
When selected, all comment and description columns are hidden. |
Display Arguments On Side Toggle (Procedures Grid)
(Ctl-Alt-A) |
When selected, arguments are listed in a separate grid on the right. |
Maximize Procedures Grid Toggle (Procedures Grid)
(Ctl-Alt-M) |
When selected, the script selector is unpinned, the Definition, Properties, and Event Links grids are hidden, the Help pane is hidden, and the procedures grid is maximized. |
Select the Script to Use When Listing Procedures for Arguments (Procedures Grid)
This dropdown can be used to select which script is used when listing values for arguments that take a procedure name as the value. The selected script is the default, but any script can be selected. |
| The motivation for this tool was to avoid the potentially significant delay when the dropdown list is used to select a Procedure argument value. Previously, since a local procedure (from the current workbook script) or an external procedure (from another workbook script) can be specified, the population of the dropdown list required that all procedures across all workbook scripts be scanned. With the introduction of this tool, the procedures presented in the dropdown list can be sourced from a single workbook script, thus eliminating the overhead. |
Hide/Show Help Pane (All Grids)
(Ctl-H) |
Toggles the display of the help pane. |
Button Size Toggle (All Grids)
(Ctl-Alt-B) |
Toggles the size of toolbar buttons between large and small. |
New Workbook Script Editor Keyboard Navigation Hotkeys
-
Ctl-U: Uppercase TextUppercase the selected text. If no text is selected then the character following the cursor is uppercased.
-
Ctl-Shift-U: Lowercase TextLowercase the selected text. If no text is selected then the character following the cursor is lowercased.
-
Left Arrow (Enhanced): Move to Previous Character/CellIf the active cell is not in edit mode, the focus will move to the previous cell.
If the active cell is in edit mode and the cursor is in the first position of the text, then the cursor will move to the previous cell.
If the active cell is in edit mode and the cursor is not in the first position of the text, then the cursor will move one character to the left.
-
Right Arrow (Enhanced): Move to Next Character/CellIf the active cell is not in edit mode, the focus will move to the next cell.
If the active cell is in edit mode and the cursor is at the end of the text, then the cursor will move to the next cell.
If the active cell is in edit mode and the cursor is not at the end of the text, then the cursor will move one character to the right.
-
Ctl-Shift-Home: Select Rows AboveSelects active row and all previous sibling rows.
-
Ctl-Shift-End: Select Rows DownSelects active row and all subsequent sibling rows.
-
Ctl-A: Select AllSelects active row and all sibling rows.
-
F6: Move to Next GridMoves the focus to the next visible grid (Definition, Properties, Event Links, Procedures, and Arguments).
-
Shift-F6:Move to Previous GridMoves the focus to the previous visible grid (Definition, Properties, Event Links, Procedures, and Arguments).
-
Ctl-Shift-Down Arrow: Expand RowsExpands the children, if any, of the selected row(s).
-
Ctl-Shift-Up Arrow: Collapse RowsCollapses the children, if any, of the selected row(s).
-
Home (Enhanced): Move to BeginningIf the active cell is not in edit mode, the focus will move to the first cell in the active row.
If the active cell is in edit mode and the cursor is in the first position of the text, then the cursor will move to the first cell in the active row.
If the active cell is in edit mode and the cursor is not in the first position of the text, then the cursor will move to the beginning of the text in the active cell.
-
Ctl-Home: Move to First RowMove the focus to the first row of the active grid.
-
End (Enhanced): Move to EndIf the active cell is not in edit mode, the focus will move to the last cell in the active row.
If the active cell is in edit mode and the cursor is at the end of the text, then the cursor will move to the last cell in the active row.
If the active cell is in edit mode and the cursor is not at the end of the text, then the cursor will move to the end of the text in the active cell.
Workbook Script Editor Fixes
-
Fixed Issue: When an Editor grid cell is in edit mode and the Refresh button is clicked, the following error is encountered: Unable to process encoded artifact property changed event. Object reference not set to an instance of an object. #1970
-
Fixed Issue: When pasting multiple lines of text into the Formula Editor, the pasted lines were mixed into the existing lines. #1974
Workbook Script Functions and Methods
-
New Function – The ResolveAliasTable function can be used to ensure that an existing alias table is used within the context of a workbook script method. The function returns the specified alias table if the table exists for the connection. If the alias table does not exist, the alias table associated with the view is returned, which will be either a non-default alias table or the Default alias table. #1926
Function Usage:@ResolveAliasTable(<AliasTableName>, [<ConnectionID>], [<PreferViewDefault>]) -
New Function – The AliasTableExists function is used to determine whether the specified alias table exists for a connection. #1926
Function Usage:@AliasTableExists(<AliasTable>, [<ConnectionID>]) -
New Function – The DimensionUDA function returns a semicolon delimited list of UDA’s for the specified dimension. The returned UDAs may optionally be filtered based on a specified wildcard string. #1924
Function Usage:@DimUDAs(<DimensionName>, [<ConnectionID>], [<DefaultValue>], [<Matching>]) -
New Method Argument – The SaveWorkbookAsCsv method’s new Delimiter argument can be used to specify a non-comma delimiter to be used for separated values. #1925
-
New Method – The SetCameraFrame method works similarly to Excel when Insert/Picture or Insert/Screenshot is used and the formula of the picture frame is set to a range on a worksheet. The range specified in the formula will be rendered as an image within the picture frame. The image is automatically updated with the contents of the rendered range whenever that range changes. The camera-frame is created if it doesn’t already exist. To have the camera image appear exactly like the camera range, the Height, Width, EndColumn, or EndRow argument values should not be specified. #1951
-
Enhanced Method – [InsertRange and DeleteRange Methods] – When the ShiftDirection is set to ShiftEntireRow or ShiftEntireColumn, only the cells represented by the InsertAddress argument are shifted. For this to work as expected, the specified address must represent a row. To avoid any potential unintended consequences that may occur if the issue was addressed by changing the behavior of the method, two additional ShiftDirection values have been added: ShiftEntireRowExcel and ShiftEntireColumnExcel. When the ShiftDirection is set to either of these values, the InsertAddress may represent a cell or cell range. #1927
-
New Method Overload – The SetSelectorConfiguration now supports an AddSelector overload, which supports the ability to reinitialize existing selector controls, such as by changing the ConnectionID and AliasTableName for an existing selector. #1968
-
Enhanced Method – Prior to this release, the EssbaseRunCalc method [ServerBased overload] always downloaded the script to the client. To avoid the overhead of an unnecessary download and potentially address a file permission issue encountered in some environments, the client only downloads the script when the DoTokenReplacement argument resolves to True. #1984