Dodeca Installation Guide
Introduction
Dodeca is an application development and deployment platform that can be used to create robust desktop applications that are deployed as simply as web applications. This guide will give you detailed information on the three tiers involved in the software installation process, along with step-by-step instructions for completing your installation.
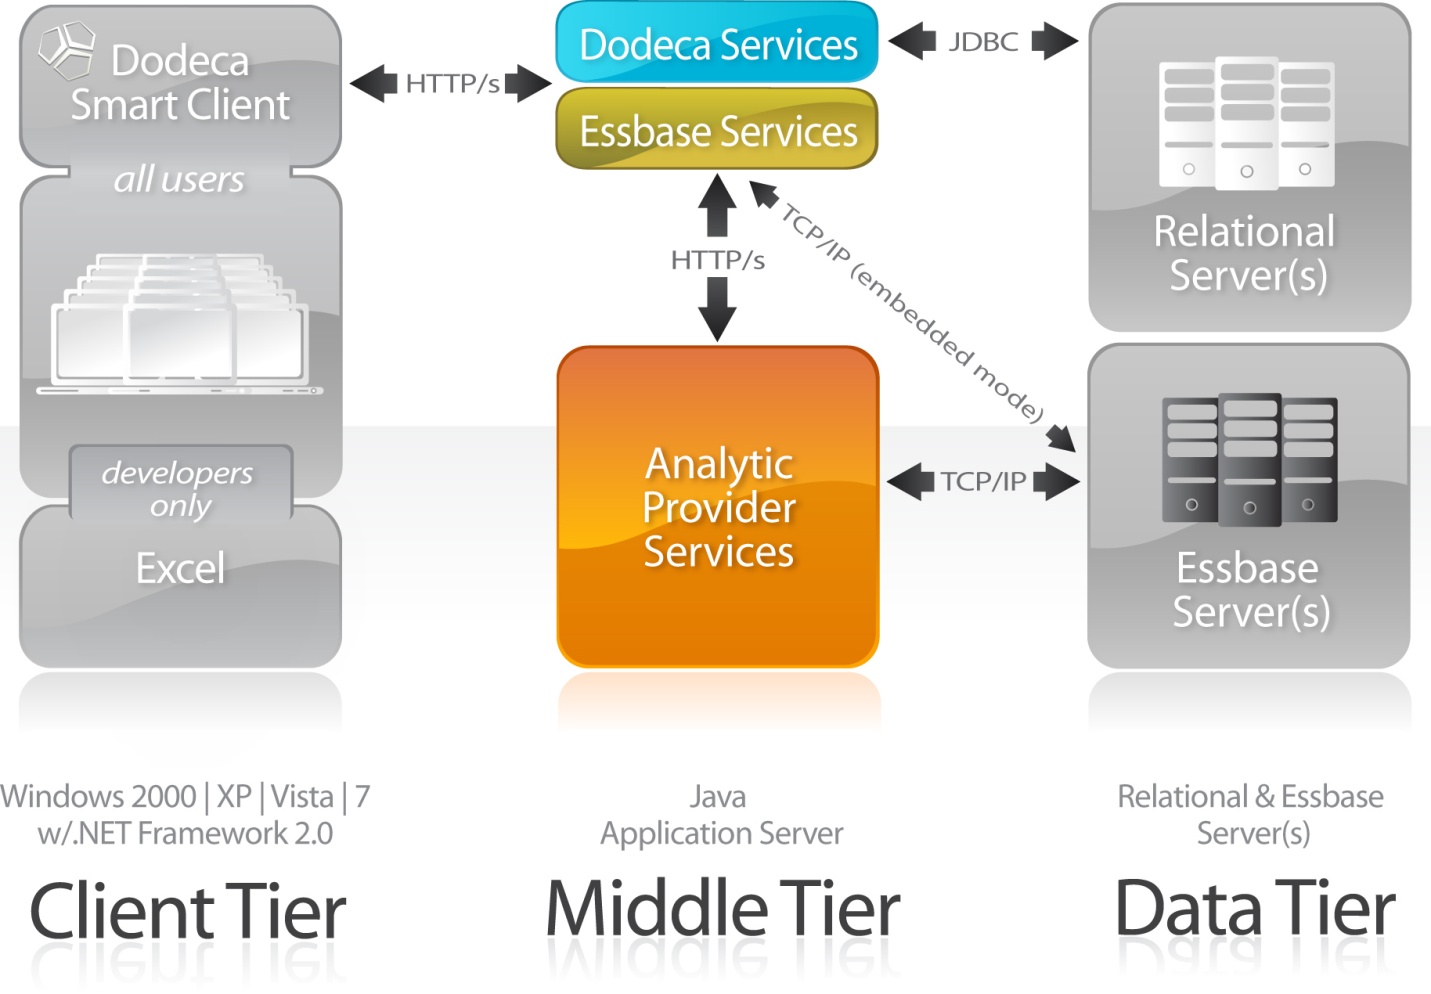
Dodeca is architected to use three separate tiers:
-
Smart Client tier
-
Application Server tier
-
Database tier
The Smart Client tier is architected as a .NET Smart Client that communicates with all external data and metadata providers using a web service paradigm. In other words, all communication between the Smart Client and the Application Server is performed via XML packets transmitted via HTTP/S. The Smart Client architecture provides for a very rich user experience, while avoiding the most common problem that occurs with traditional rich client applications. Installation has long been a significant issue for desktop applications. With the introduction of the Microsoft .NET Framework and its ClickOnce deployment paradigm, Smart Client applications can now be deployed as easily as any web-based application.
The Application Server tier serves as the endpoint for all data and metadata requests made by the Smart Client tier. The Application Server is responsible for unpacking the XML request, calling the appropriate service based on the arguments passed with the request, and then packaging and returning an XML response. The Application Server tier is architected to use Java 2 Enterprise Edition (J2EE) servlets to provide additional functionality. The servlets, one for Dodeca metadata services and one for Essbase services, are packaged in standard J2EE WAR (Web ARchive) files. J2EE Application Servers use WAR files as a standard deployment mechanism. This guide provides step-by-step instructions for creating the WAR file for your deployment along with instructions for the actual deployment in several leading application servers.
The Application Server tier also serves as the deployment mechanism for the Smart Client deployment using ClickOnce. ClickOnce deployments are accomplished using a URL to start the installation process. Dodeca is packaged with some innovative tools that automate the process of creating and digitally signing the ClickOnce deployment files, including any extensions you create for the Dodeca product. The tools also embed the ClickOnce deployment inside your WAR file.
Finally, the Application Server tier uses Hibernate Object-Relational Mapping (ORM) software to persist the Java metadata objects to a relational data source. The persistence engine creates SQL statements for your selected relational database engine and communicates with the relational database using Java DataBase Connectivity (JDBC).
The Database tier is responsible for data storage and retrieval. The Database tier consists of one or more relational databases and, optionally, one or more Essbase databases. These databases may reside on any number of physical machines in your computing environment. Typically, communication from the Application Server tier to a relational database is via standard JDBC methods. Communication from the Application Server tier to an Essbase database is via the Hyperion Essbase Java API.
The following is a graphical representation of the architecture, showing the three tiers and a typical component configuration:
System Requirements
Hardware
| Middle Tier Server | User/Client Tier | Deployment Workstation1 | |
|---|---|---|---|
Processor |
2 GHz or faster with 4 cores or more |
2 GHz or faster with 2 or more cores recommended |
2 GHz or faster with 2 or more cores recommended |
Memory |
16 GB or higher |
8 GB or higher; 16 GB recommended |
8 GB or higher; 16 GB recommended |
Disk Space |
250 MB for deployed Java services |
300 MB |
2 GB |
Software
| Middle Tier Server | User/Client Tier | Deployment Workstation1 | |
|---|---|---|---|
Operating System |
Windows Server, Linux, Solaris, AIX |
Windows 11, Windows 10, Windows 7, Mac OS |
Windows 11, Windows 10, Windows 7, Windows Server 2016, Windows Server 2012, Windows Server 2008 |
Java |
JRE version 1.8, 11, or 17 recommended |
JRE version 1.8, 11, or 17 recommended |
|
Microsoft .NET |
.NET 4.7.2 or higher |
||
Oracle, Microsoft SQL Server, IBM DB2, MySQL, Other |
|||
Application Servers |
Oracle Weblogic, IBM Websphere, Apache Tomcat |
||
Microsoft Excel |
MS Excel 2010, 2013, 2016, 2019, Office 365 installed locally |
||
Essbase Server3 |
9.3.1 or higher |
1 Needed to create .war files for deployment only, can use client machine.
2 Oracle Database, Microsoft SQL Server, IBM DB2, and MySQL are the most common relational database technologies used for the Dodeca repository. In addition, any JDBC-compliant data source, including but not limited to the products named previously, may be used to build Dodeca workbooks.
3 May be on standalone servers.
Dodeca Deployment Steps
There are several steps required to deploy Dodeca in your environment. The remainder of this document contains detailed instructions for the installation. Those instructions pertain to the following steps:
-
Install the Dodeca Framework which is used to create the WAR file.
-
Configure the relational server and database where Dodeca metadata will be stored.
-
Prepare the Dodeca WAR file. The preparation includes these steps:
-
Complete installation prerequisites, which may include the installation of software necessary to create the Dodeca WAR file for deployment.
-
Modify the hibernate.properties file used by the Dodeca server to connect to the relational database repository.
-
Optionally, modify other configuration files.
-
Run the ClickOnce Prep Utility to generate the Dodeca WAR file for deployment.
-
-
Deploy the Dodeca WAR file to the Java Application Server of your choice.
-
Run the dshell and create the necessary tables in the relational database repository, seed the metadata repository, and create the client installation URL.
-
Test the client installation.
|
A video tutorial series covering the basic procedure for deploying Dodeca can be found at the following location: http://www.youtube.com/playlist?list=PL0686C273FAA441D8 |
Dodeca Framework Installation
The Dodeca Framework installation installs the files and utilities needed to create a Dodeca WAR file for deployment. The installation also includes files that developers may use, optionally, to write extensions for Dodeca. This installation must be performed on a Windows desktop. Each client company must have at least one desktop with the Dodeca Framework installed (at least temporarily).
The Dodeca Framework installation is contained in an executable installation file. To install the Dodeca framework, double-click on the Dodeca Framework executable. You will see the following installation screen:
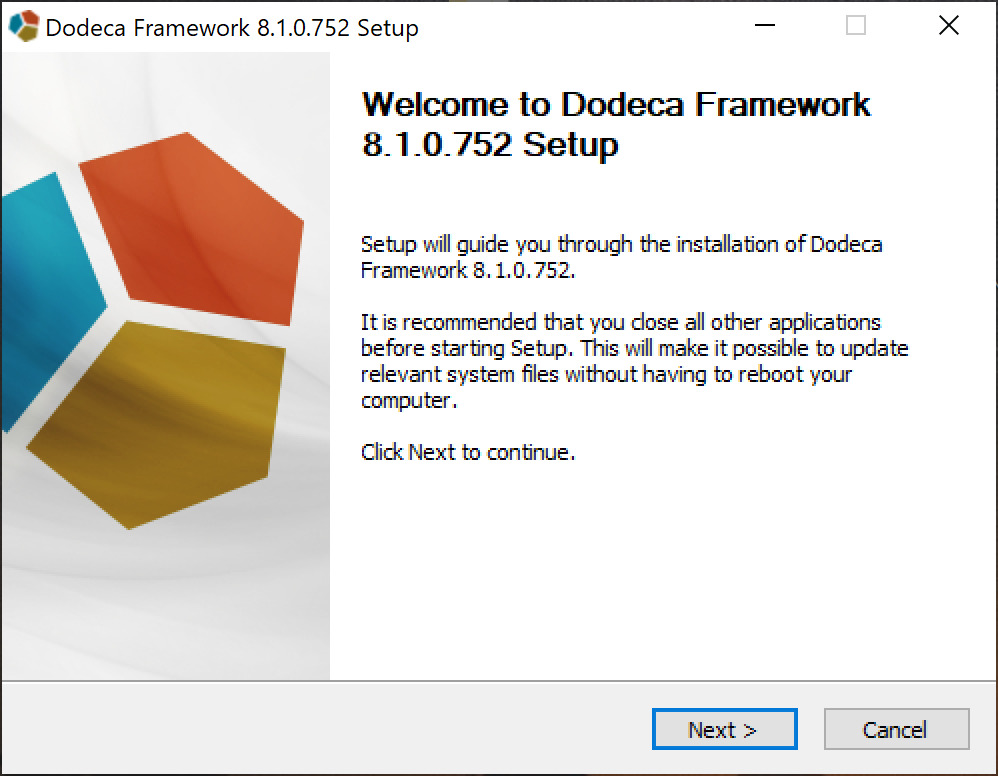
Press the Next button to proceed and show the license agreement dialog. You must agree to the license agreement in order to proceed with the installation.
Press the I Agree button to proceed.

Choose the folder where you would like to install the Dodeca Framework and press Install to proceed with the installation.
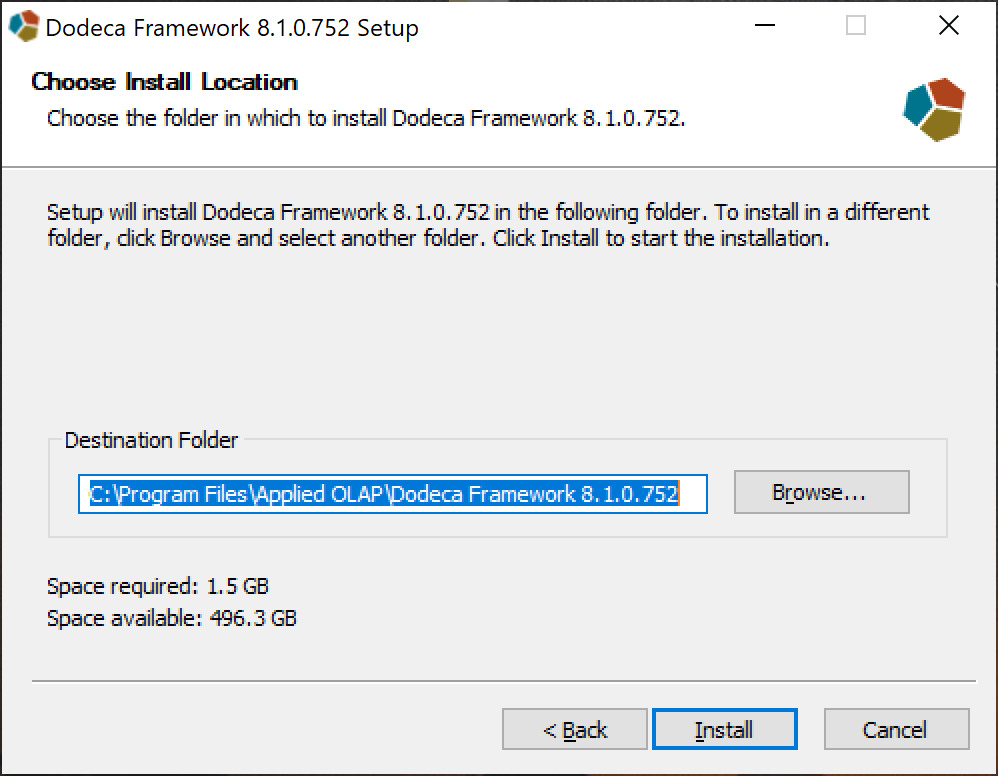
| If the directory already exists or the installer detects a previous installation, you will be asked how you would like to proceed to prevent unintentional overwrites of previous installations. |
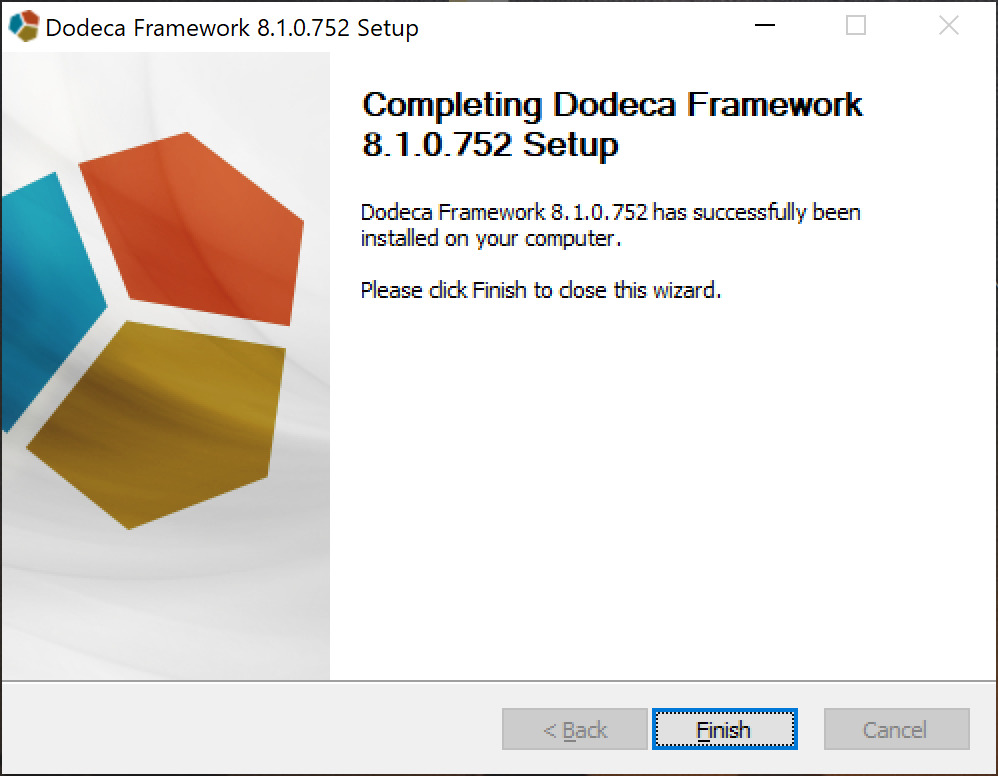
Press the Install button to initiate the installation process. Once the install is complete, you will see a confirmation that the installation has completed successfully.
Once the install is complete, your computer will have the following directory structure installed at the location you specified.
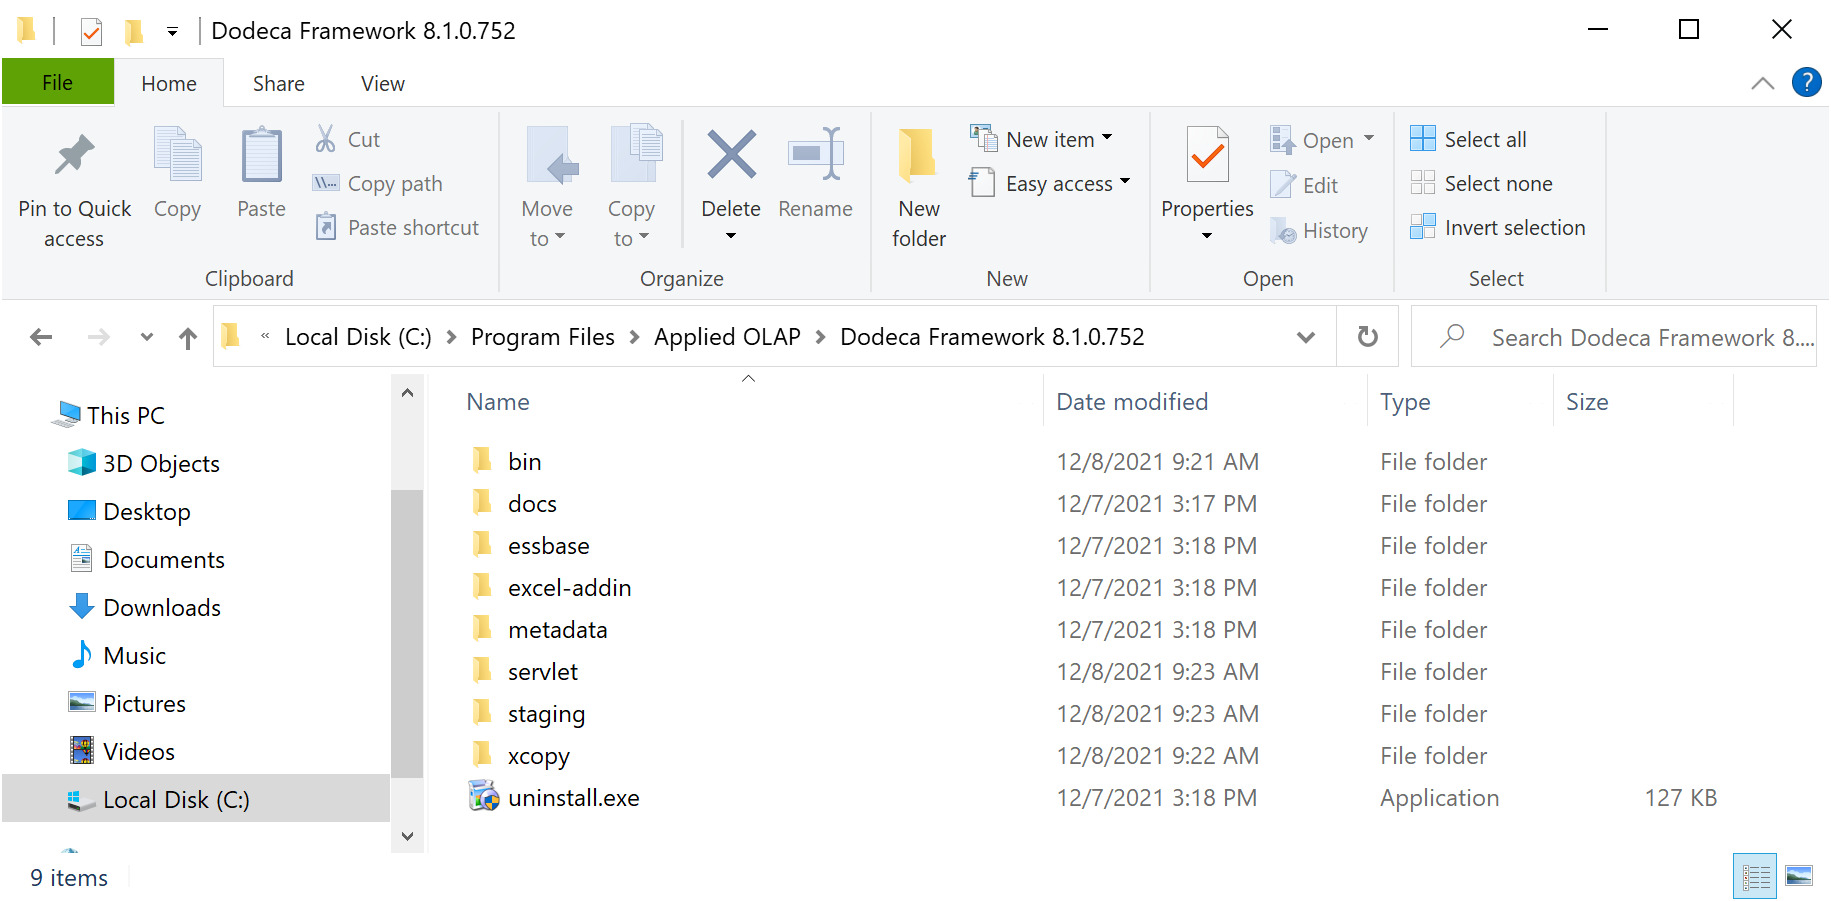
*The directories installed include:
- \bin\Dodeca
-
Dodeca client intended for usage by application developers.
- \bin\Bootstrapper
-
.NET Runtime installation components.
- \docs
-
Developer documentation.
- \essbase
-
The Dodeca-Essbase servlets that provide Essbase Connectivity in Dodeca.
- \excel-addin
-
The files needed for running VBA with the excel-addin.
- \metadata
-
Sample application metadata.
- \servlet
-
The original servlet compiled by Applied OLAP that can be used to refresh your staging directory to its original, as-shipped, state.
- \staging
-
The contents of the dodeca.war file distributed into its component directory structures. You will use this directory to modify and 'stage' your WAR file.
- \xcopy
-
The files needed to run an xcopy deployment of Dodeca.
Dodeca WAR File Preparation
Prerequisites
Below is a list of the tasks that must be performed, files that must be obtained, and information that must be gathered before you can use our tools to create your custom WAR file:
-
You must have an Authenticode signing key from an authorized Certificate Authority (or "CA", such as VeriSign), the temporary key distributed by Applied OLAP, or a temporary key you have created yourself. The key must be in the form of a .pfx file. If you have a key from a CA that is in the form of public key/private key file pair, you can convert it to the .pfx format using the pvkimprt.exe tool available from Microsoft. See http://www.microsoft.com/downloads/details.aspx?FamilyID=F9992C94-B129-46BC-B240-414BDFF679A7&displaylang=EN for more information.
-
You must have created a relational database for your Dodeca repository (we suggest you simply use the database name 'dodeca').
-
You must obtain the proper JDBC driver (Note: the Microsoft SQL Server JDBC driver is shipped in the base Dodeca War file).
-
You must determine the proper JDBC connection string, username, and password for Hibernate to function.
Step-by-Step Instructions to Create the War File
Once you have completed the above prerequisites, you are ready to start the creation of your WAR file for deployment. In order to create the WAR file, which is a Java archive of the \staging directory structure, follow these steps:
-
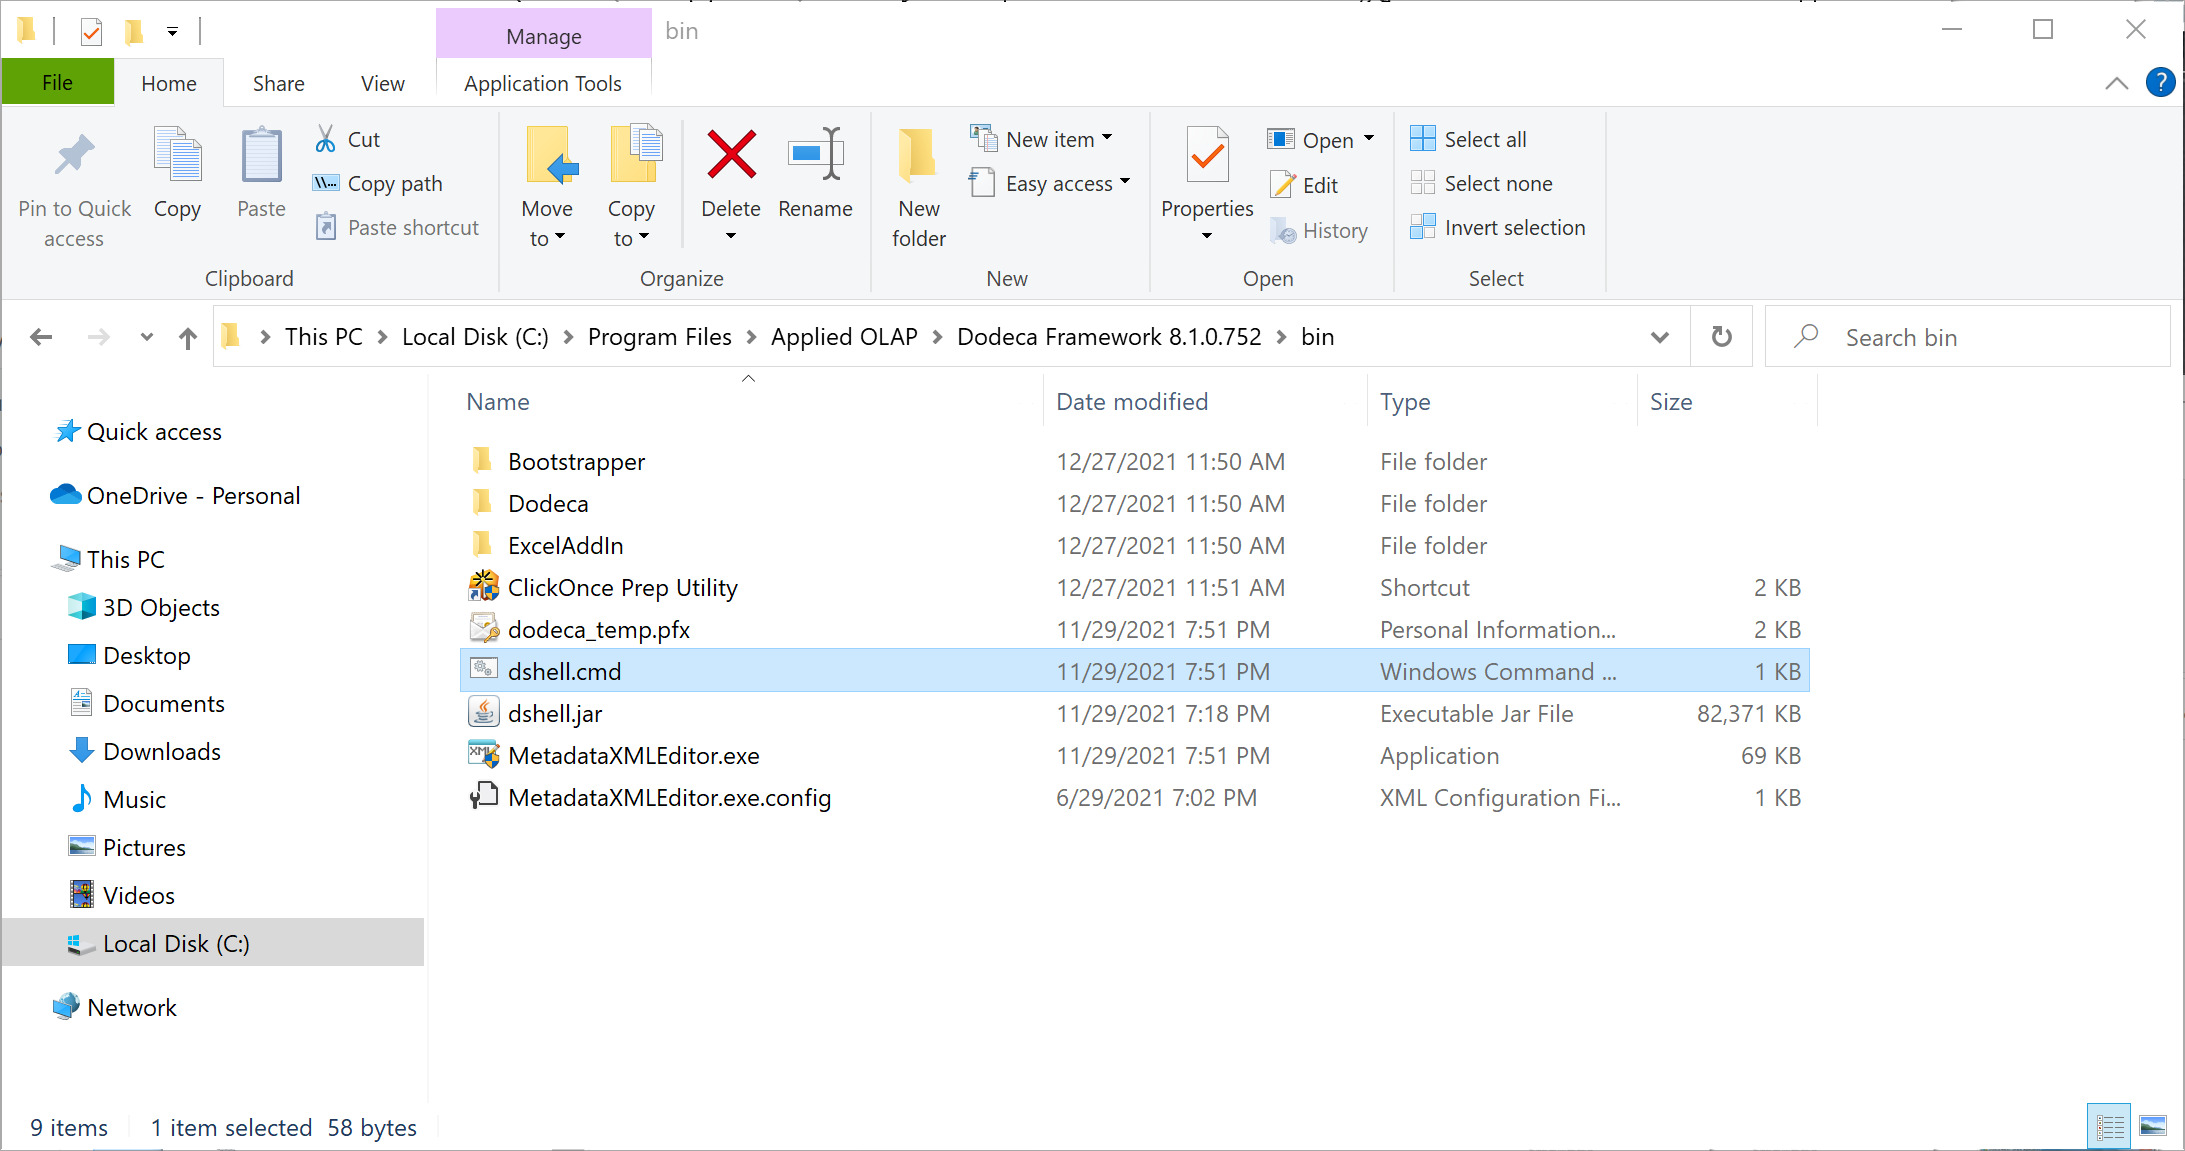
First, we need to modify the "dodeca.properties" file, located in the \staging\WEB-INF\classes subdirectory. There are two ways to modify the "dodeca.properties" file. The preferred method (a.) uses a tool shipped with the Dodeca Framework called dshell, but it requires that the Java Runtime Environment be installed on your computer. If you do not have or do not wish to install Java on your computer, or if you wish to configure some of the more advanced Hibernate properties available, you can use the alternate method (b.) below.
-
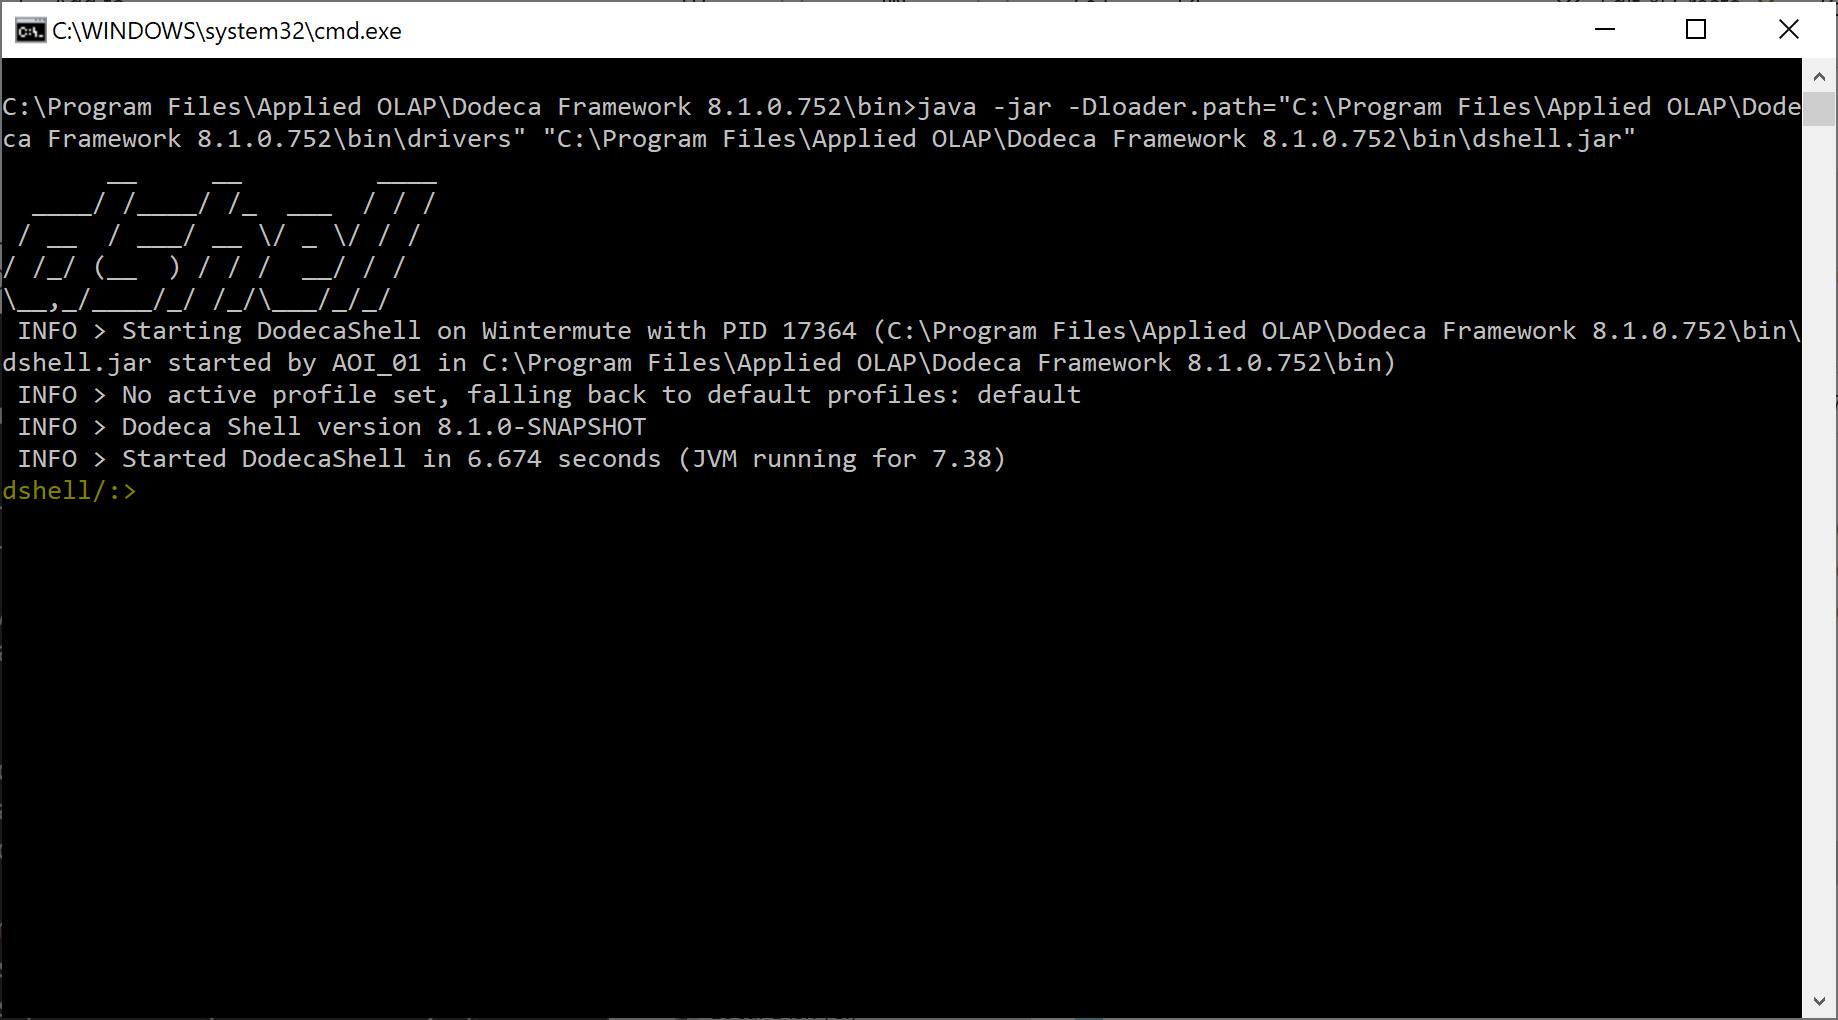
From within the \bin directory, find the file "dshell.cmd" and double-click it to launch the dshell.
Once inside the dshell, type "jdbc-test" and press enter.
jdbc-test will ask you to select your JDBC Driver class. Choose your JDBC Driver class from the list provided and hit enter.
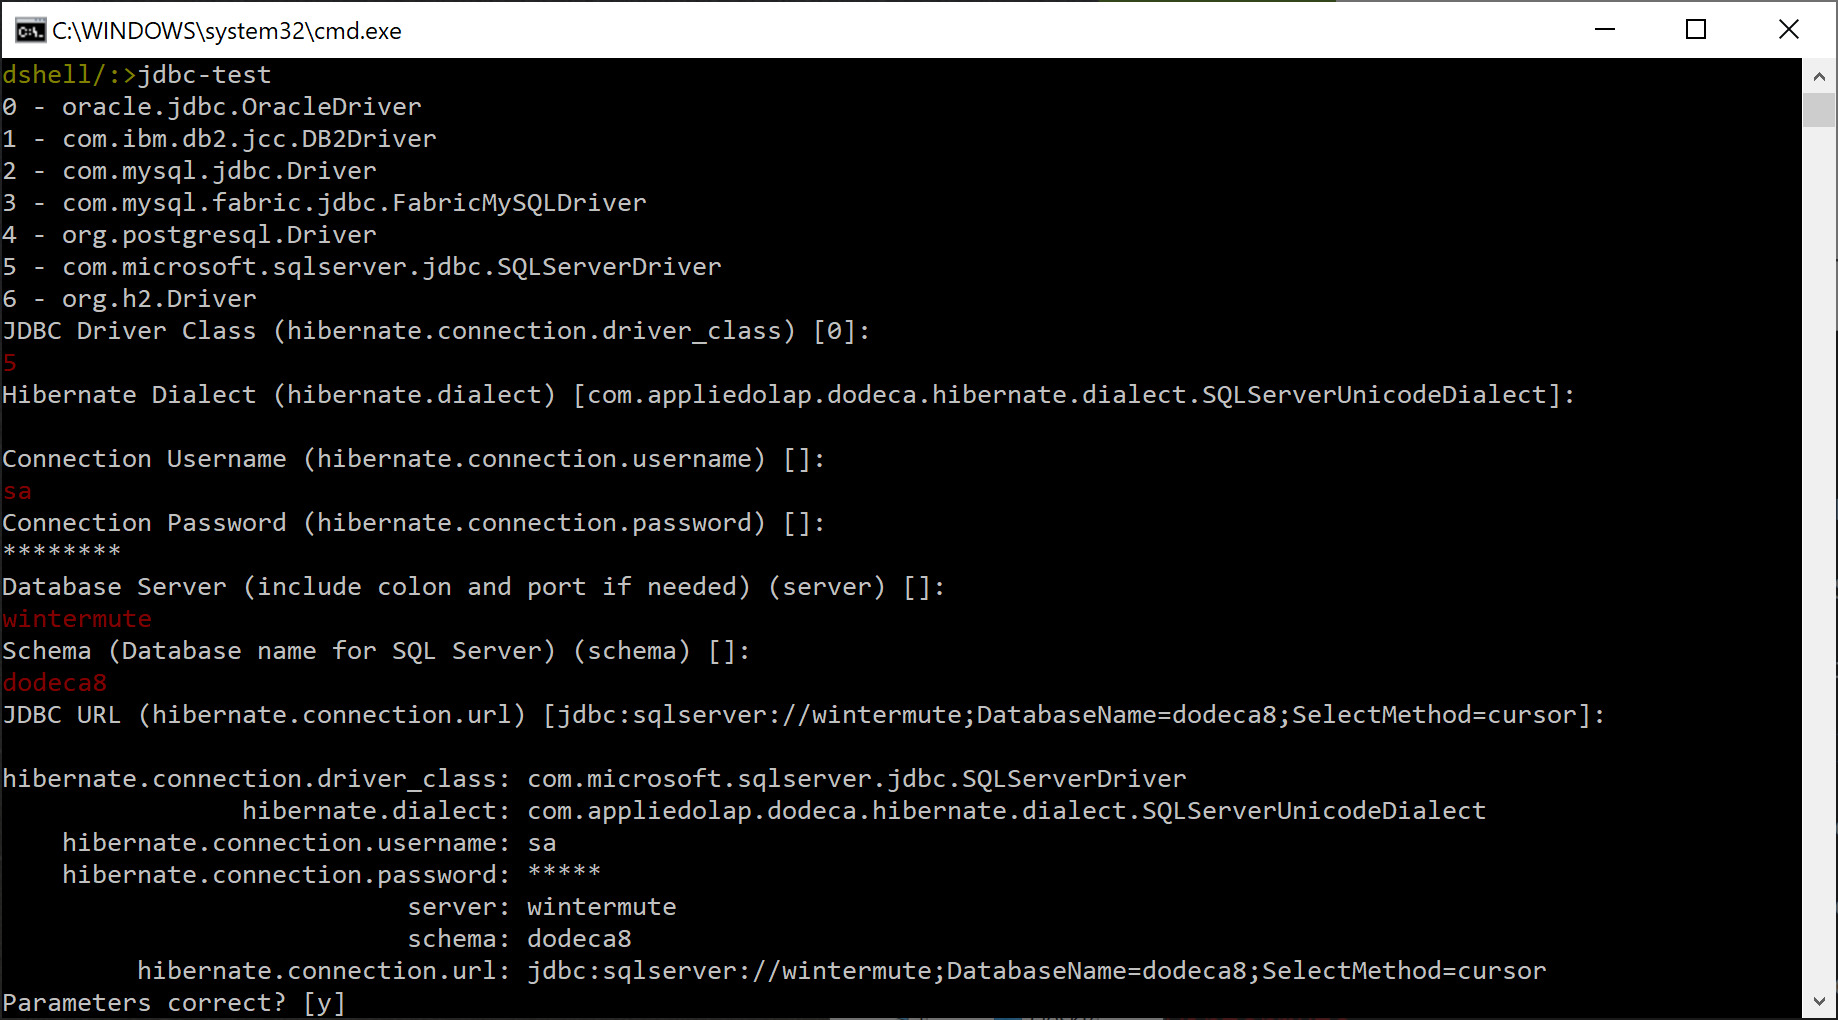
Next, you will be prompted for your Hibernate Dialect. Type in the appropriate hibernate dialect, or press enter to use the default. Jdbc-test will then prompt you for the connection username, connection password, database server, schema and JDBC URL. Once these parameters have been provided, Type "y" and enter to confirm the parameters are correct, and then press "y" and enter to test the conneciton
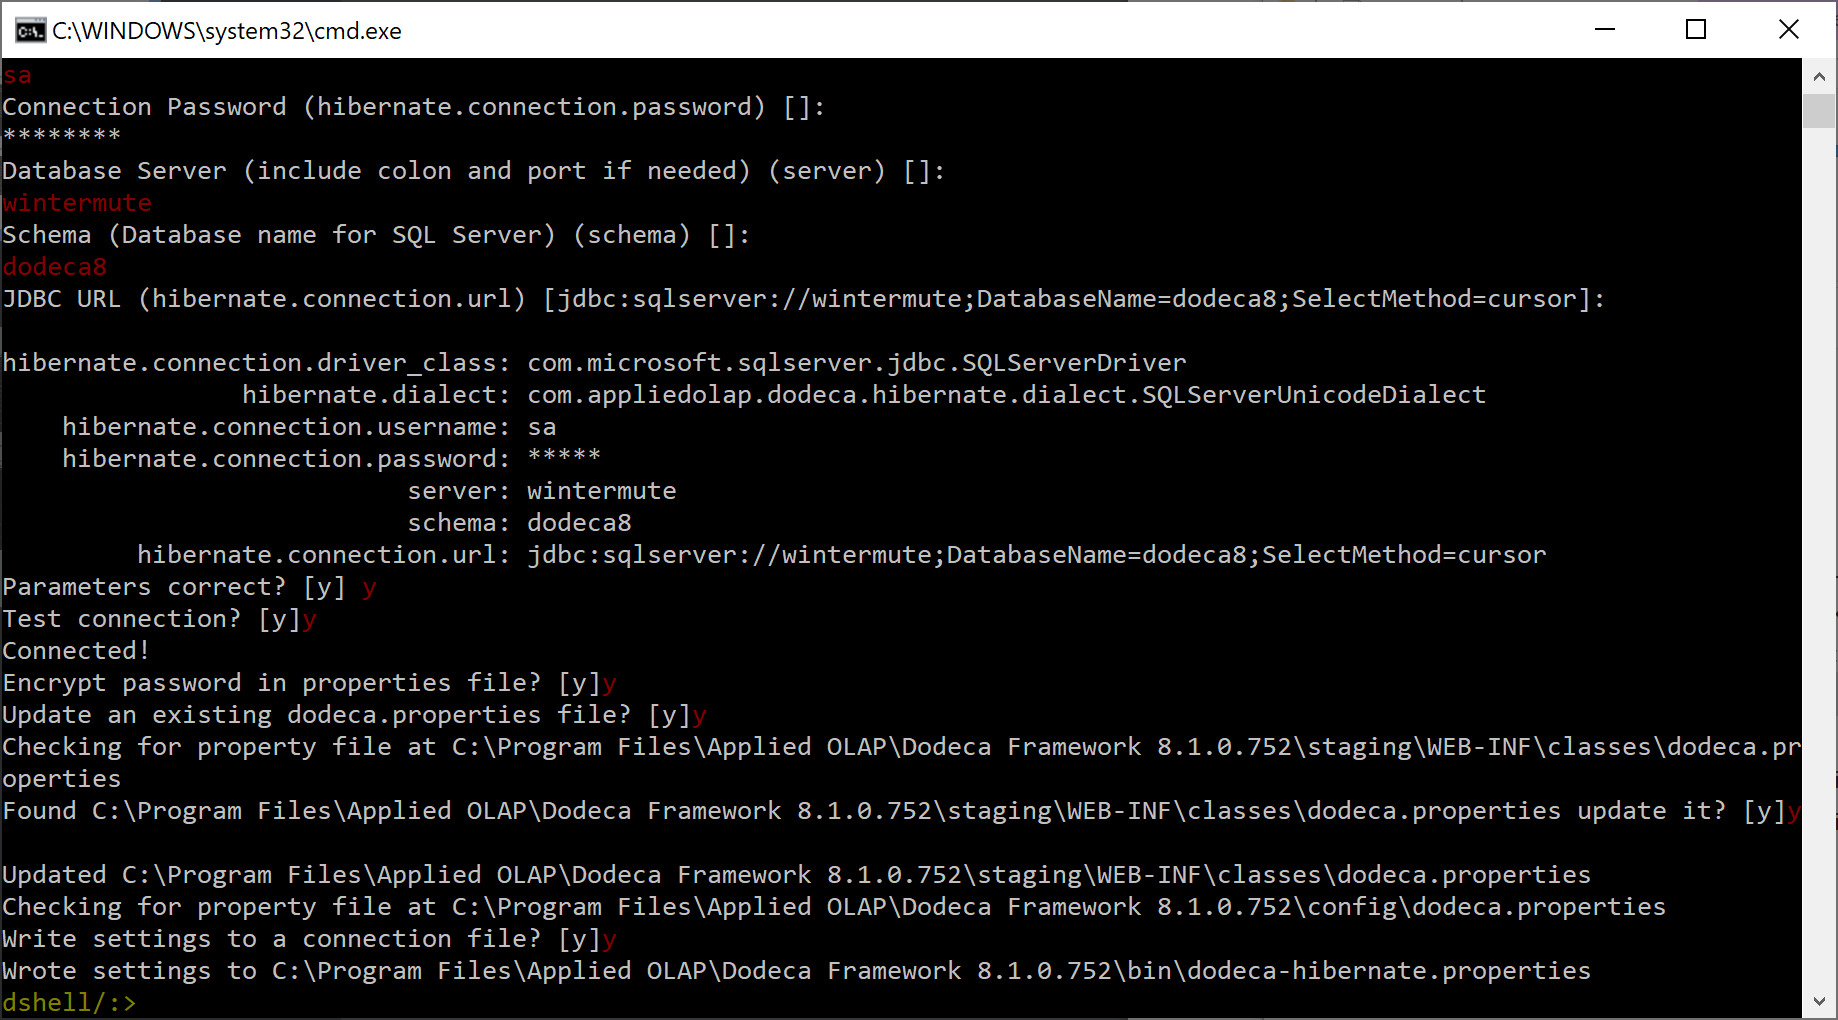
Once the connection successfully connects, type "y" and enter to encrypt the password. Next, type "y" and enter to update the existing dodeca.properties file. Lastly, type "y" and enter once more to write these settings to a connection file. The "dodeca-hibernate.properties" file has now been created to reflect the correct settings for your relational server and database.
-
-
Locate the shortcut for the "ClickOnce Prep Utility" on the Start Menu or find it in the \bin subdirectory. Double-click it to run the ClickOnce Prep Utility application. In this utility, you will modify the property settings for your Dodeca system. At a minimum, the "DeploymentUrl" property must be updated to reference the application server/port/context where the completed WAR file will be deployed.
The ClickOnce Prep Utility will look something like this:
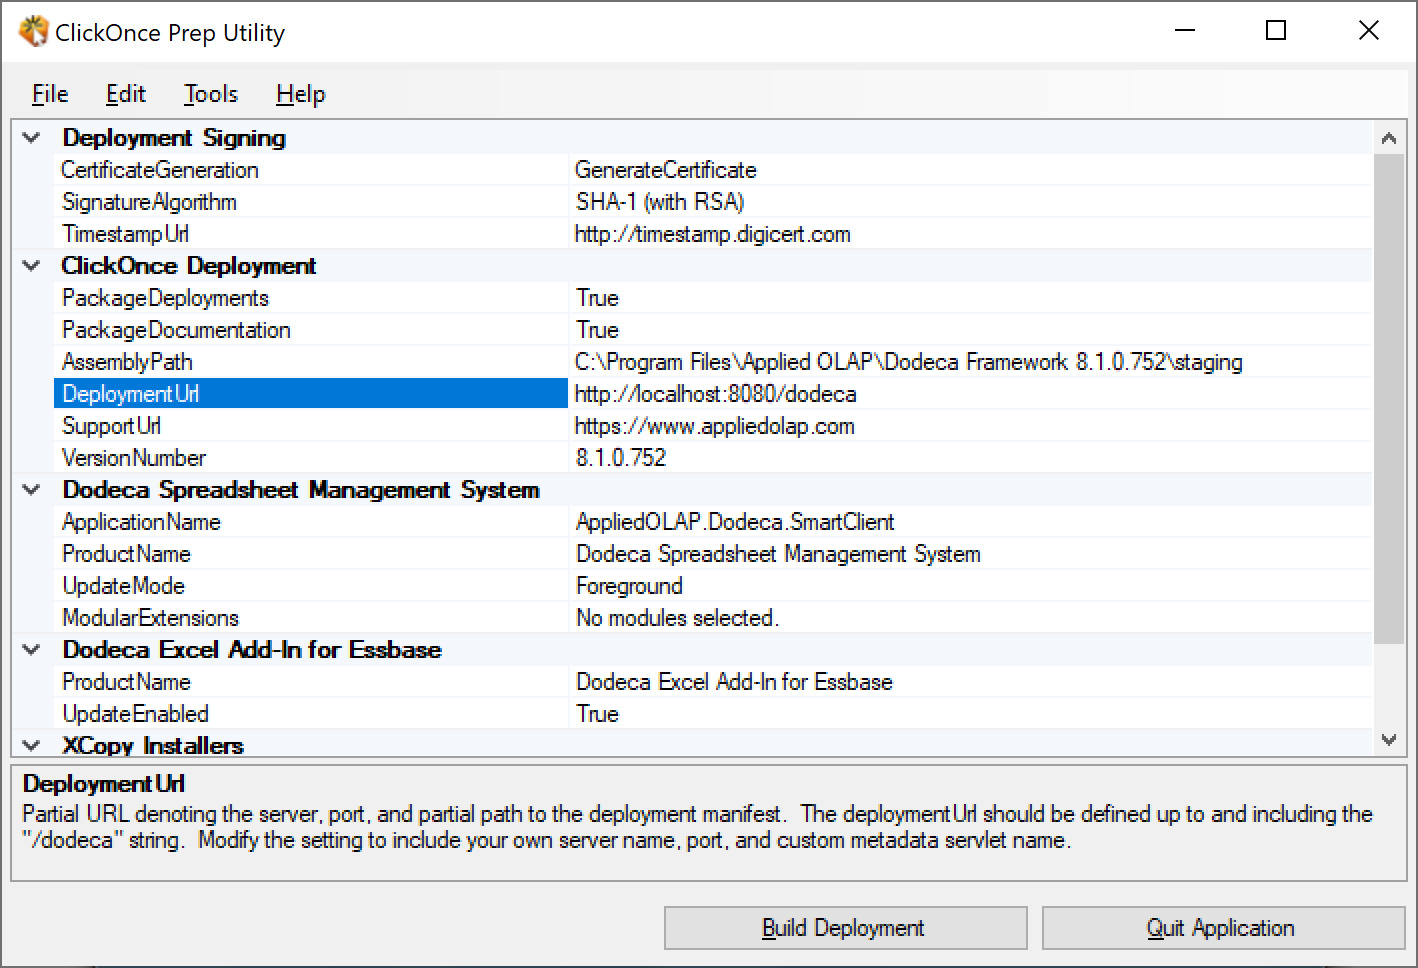
| The Deployment URL should include the application server name and port where the Dodeca servlet will be deployed. Its value will most likely vary from the value displayed in the screenshot above. |
| The Certificate Password for the "dodeca_temp.pfx" key provided by Applied OLAP is "password". |
| Once the property grid entries have been modified to suit your needs, you can use the ClickOnce Prep Utility to save the modified settings. To do this choose "Save Setting As" from the "File" menu. Enter the name under which you want to save your settings and press OK. |
-
When you are satisfied with your settings, compile the "dodeca.war" file by pressing the "Build Deployment" button at the bottom of the dialog. While the servlet is being compiled, its progress will be reported in the bottom panel:
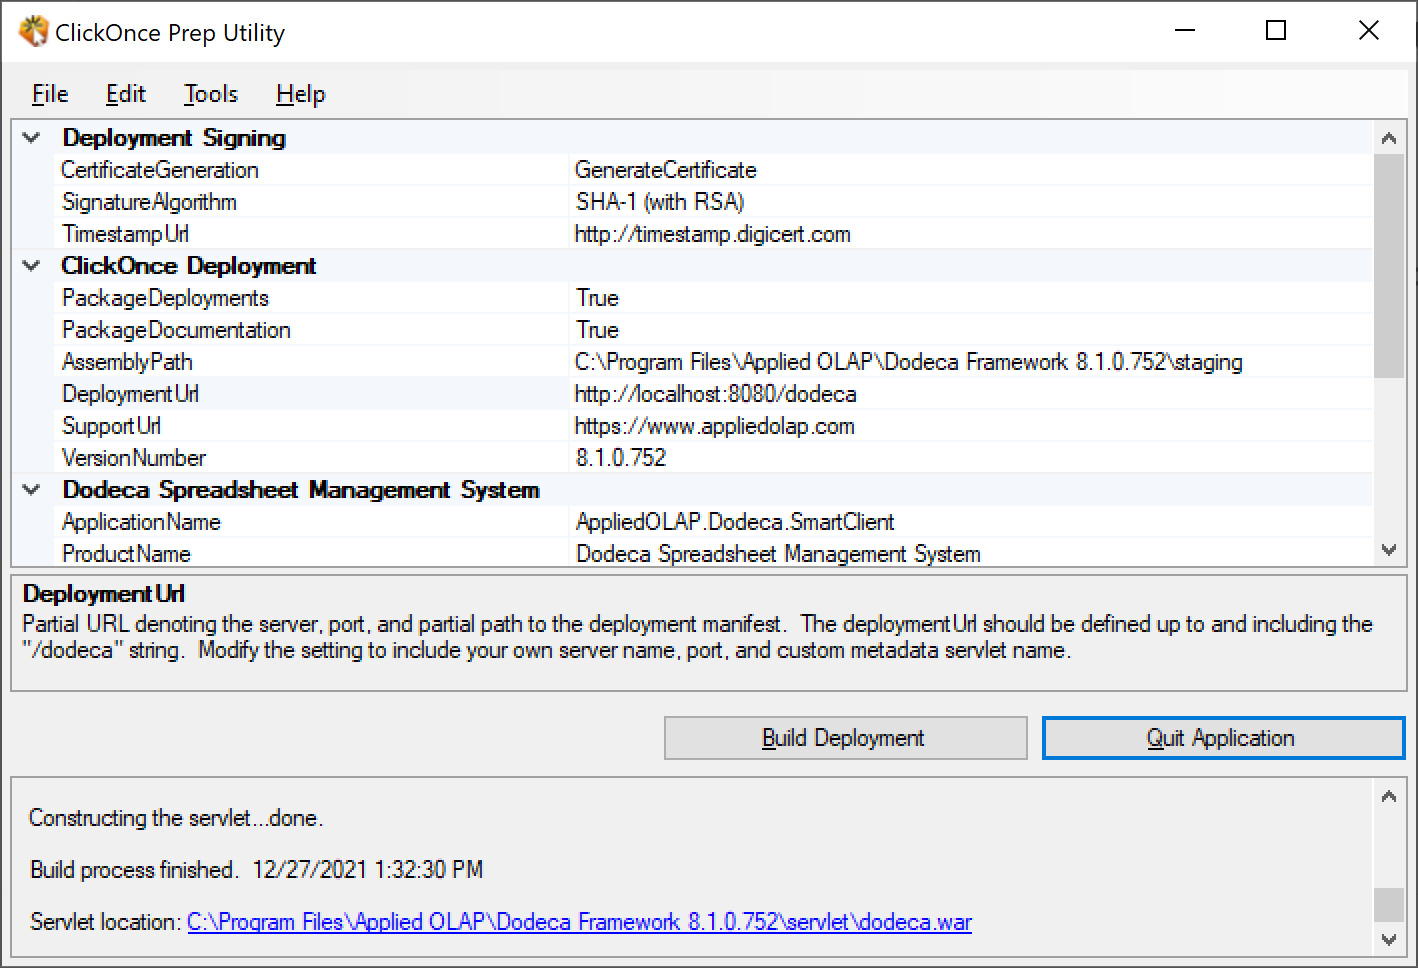
Once the servlet is finished being compiled, the finished "dodeca.war" will be placed in the \servlet directory.
Dodeca WAR File Deployment
Once you have compiled the WAR file, you have to deploy it to your application server. The WAR file deployment procedure varies by application server manufacturer. This section of the guide includes detailed instructions for a variety of commonly-used servers.
Deployment to Apache Tomcat
Apache Tomcat is a popular, open-source application server created by the Apache Foundation. Many companies, including Hyperion, ship Apache Tomcat as a default application server for their applications.
Deployment to Oracle WebLogic
Oracle WebLogic application server is available for several different operating systems. The instructions below were created for Oracle WebLogic Server 11g.
WAR File Deployment
To deploy the WAR file in Oracle WebLogic, follow these steps:
-
Open the Oracle WebLogic Server Administration Console.
-
In the 'Change Center' panel at the top left, click the Lock & Edit button.
-
Click 'Deployments' in the left-hand 'Domain Structure' panel.
-
In the 'Summary of Deployments' panel that opens, click the Install button.
-
Navigate to and select the dodeca.war file on your file system.
-
Click Next.
-
Select 'Install this deployment as an application' and click Next.
-
Click Next.
-
For versions of WebLogic provided with Essbase 11.1.2 and higher, if you are installing the Dodeca servlet to the EPMSystem domain (recommended), you will be given the option to 'Select deployment targets' for the installation. Under the 'Clusters' section of the form, for 'AnalyticProviderServices', select 'Part of the cluster' and 'AnalyticProviderServices0'.
-
Review the information and click Finish.
-
When the installation has completed, click the Activate Changes button in the 'Change Center' panel at the top left.
To start the application in Oracle WebLogic, follow these steps:
-
From the 'Deployments' panel, select check box next to the Dodeca application.
-
Click the Start button and choose to start servicing all requests to the web application.
-
Click Yes to confirm that you want to start the web application.
Deployment to IBM WebSphere
The IBM WebSphere application server is available for several different operating systems. The instructions below were created for IBM WebSphere 6.1.0.0.
WAR File Deployment
To deploy the WAR file in IBM WebSphere, follow these steps:
-
Select and expand 'Applications' located on the left hand side of the admin console.
-
Select Install New Application.
-
Click Browse and navigate to the dodeca.war file on your file system.
-
Select the dodeca.war file and press Open.
-
Enter "/dodeca" for the context root.
-
Leave the radio button for 'Prompt me only when additional information is required' selected.
-
Click Next.
-
Click Next under the section entitled 'Select installation options'.
-
At 'Map modules to servers', check the 'Select' box next to dodeca.war Module, then click Next.
-
At 'Map virtual hosts for Web modules', check the 'Select' box next to the dodeca.war Web module, then adjust the 'Virtual Host' drop down box to meet your needs.
-
Click Next.
-
Review the information and click Finish.
-
When the application has completed the installation, click Save.
To start the application in IBM WebSphere, follow these steps:
-
Select and expand 'Applications' located on the left hand side of the admin console.
-
Click 'Enterprise Applications'.
-
Check the 'Select' box next to the Dodeca application and then click Start.
Completing the Setup - Importing an Application with dshell
If you are an administrator performing an initial installation of Dodeca at your company, you will need to prepare the relational database store used by Dodeca. The easiest way to assure Dodeca is configured properly is to create and use the sample application that is shipped with the Dodeca Framework. To create the sample application, follow these steps:
-
Launch dshell by double-clicking "dshell.cmd" located in "C:\Program Files\Applied OLAP\Dodeca Framework 8.2.0\bin"
-
Type "connect dodeca-hibernate.properties" and hit enter to connect to your Dodeca Repository.
dshell/:>connect dodeca-hibernate.properties
-
Type "upgrade" and press enter to upgrade the Dodeca schema to the current version.
dshell/:>upgrade
-
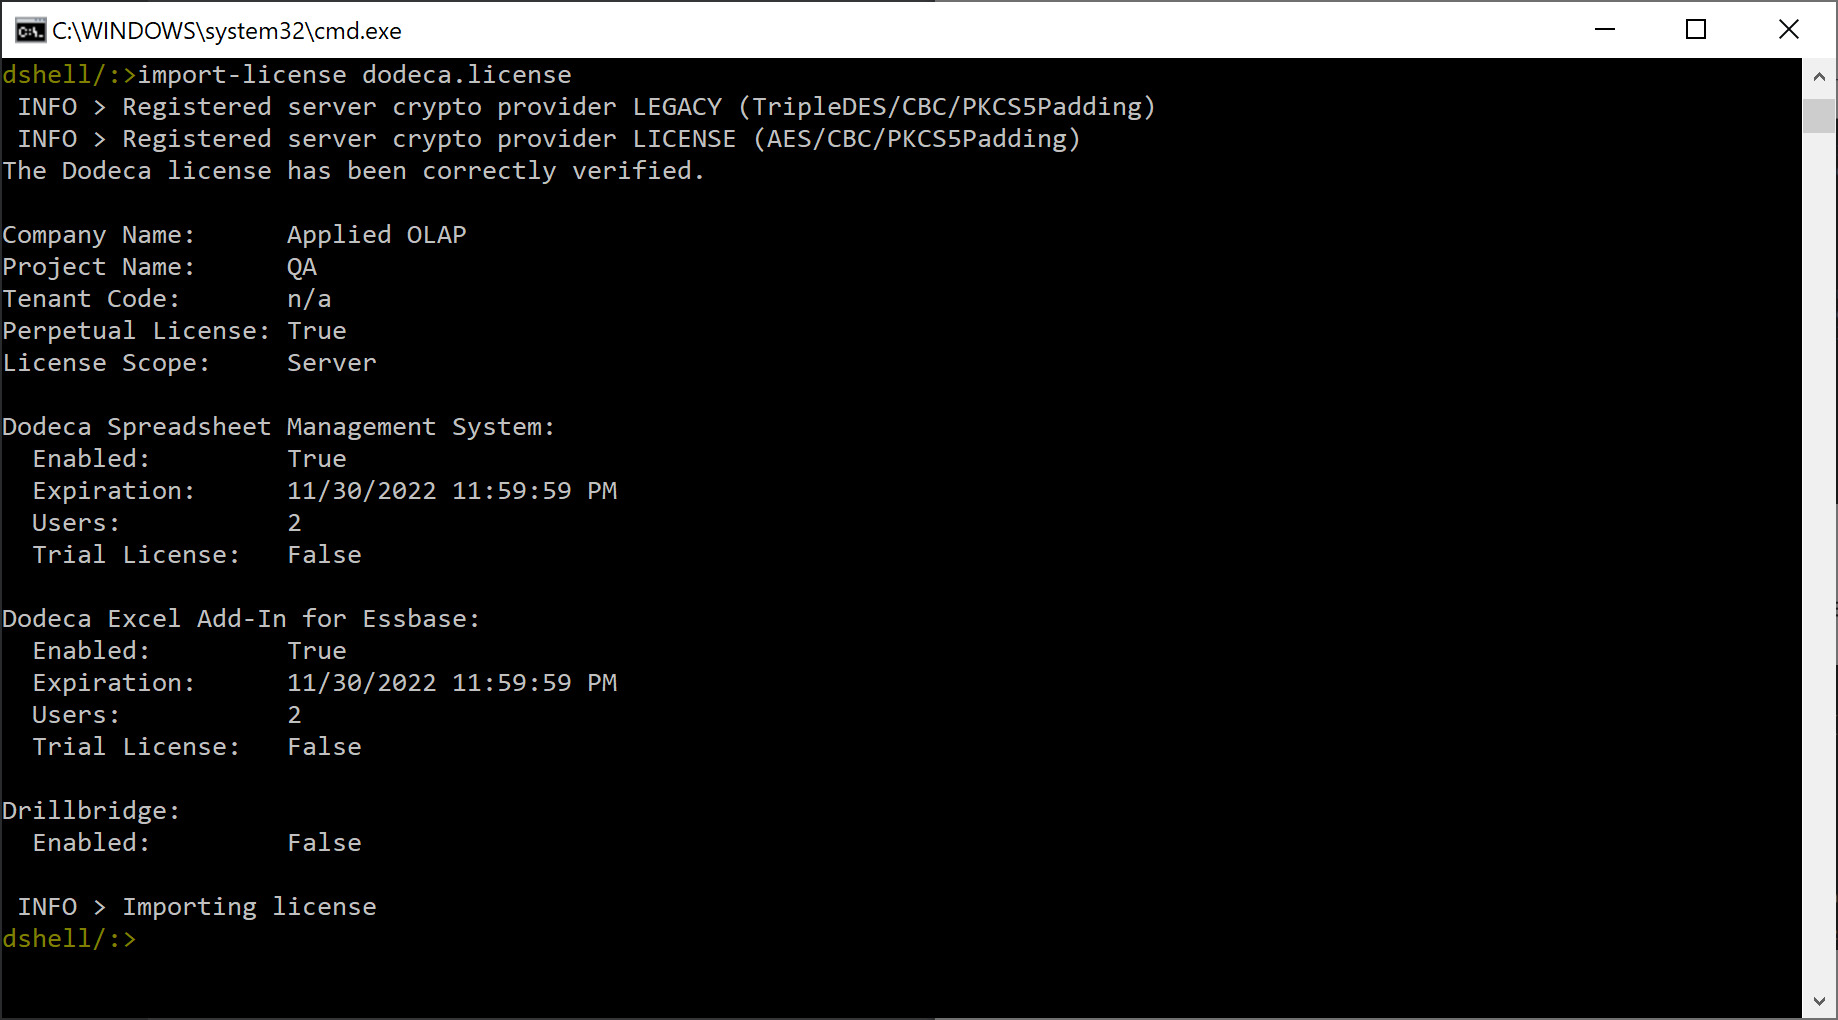
Copy your dodeca.license file to the \bin directory and then import the Dodeca license by typing "import-license dodeca.license"
-
Create the SAMPLE tenant with the SAMPLE metadata by typing this command:
dshell/:>create-tenant --tenant SAMPLE --file "C:/Program Files/Applied OLAP/Dodeca Framework {version}/metadata/Sample.zip"
| By convention, tenant keywords and application IDs are normally expressed in all capital letters with only alphanumeric characters and no spaces. |
-
After creating the tenant, set SAMPLE as the active tenant by using the command:
dshell/:>use SAMPLE
-
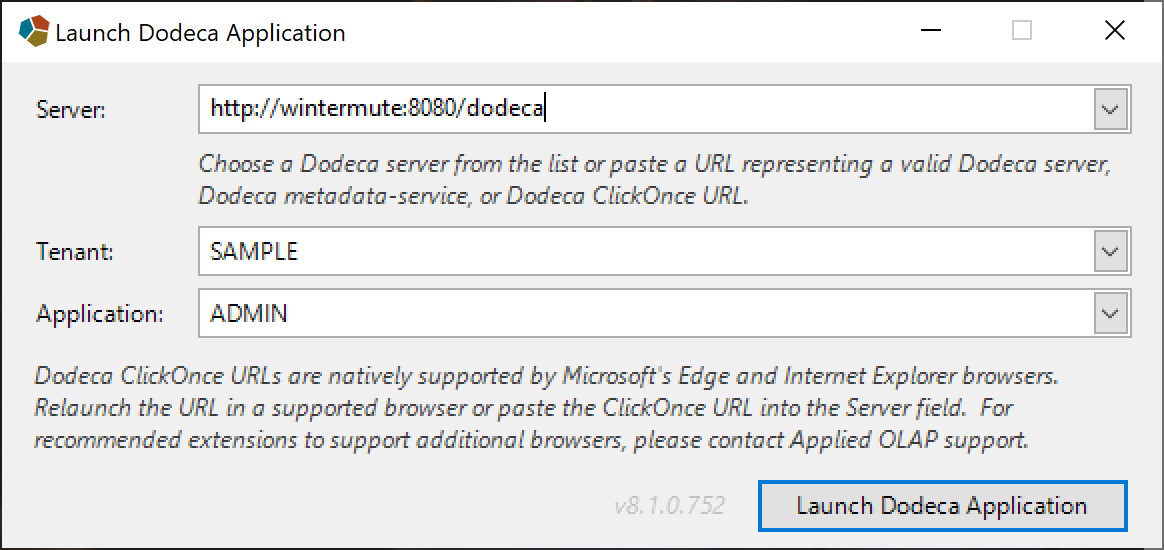
At this point, you have completed the setup of the sample application. To install the application, you will use the ClickOnce URL. List the ClickOnce URLs by typing this command:
dshell/SAMPLE:>list-application-urls --server-address http://servername:port
-
Copy the URL into Microsoft Edge and press enter to launch the Dodeca client on your computer and start the ADMIN application. Initially, the 'Launching Application' dialog will display while ClickOnce deployment determines if the Dodeca application has been installed on your desktop.
| If you wish to launch Dodeca using a browser other than Internet Explorer, you will need to install a ClickOnce extension/plugin. For Firefox, see the Microsoft .NET Framework Assistant extension. For Chrome, see the third-party ClickOnce for Google Chrome extension. |
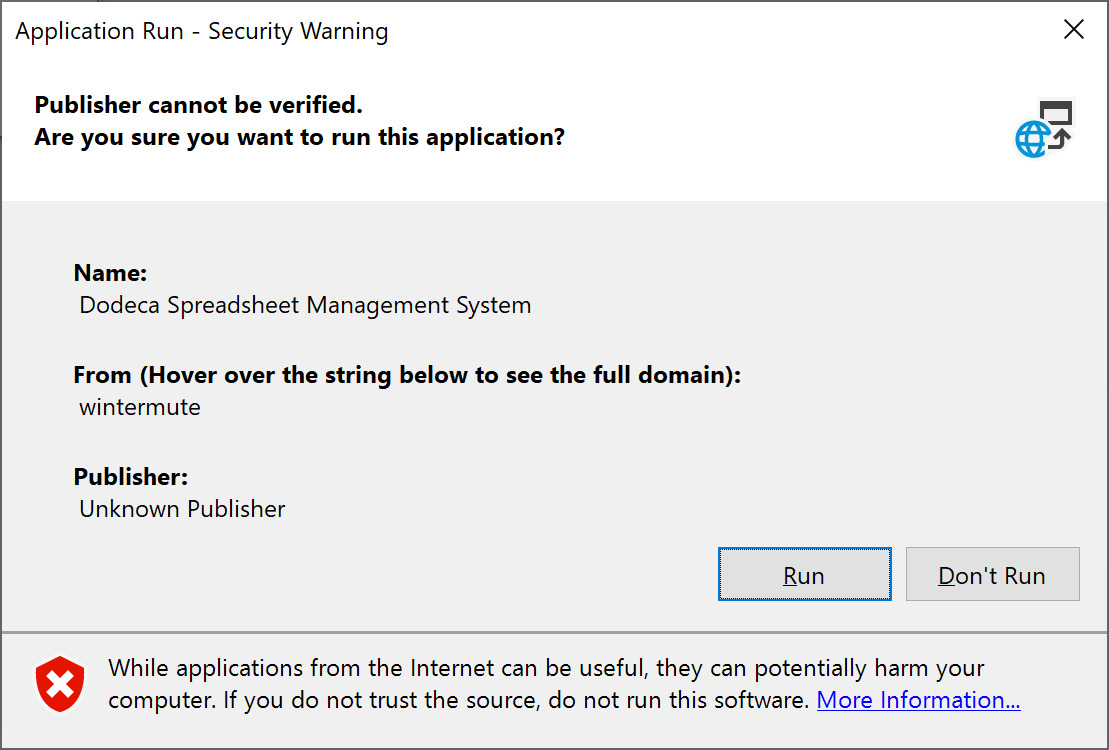
If the Dodeca application has not yet been run on your desktop, you will see the following installation dialog.
Press the 'Run' button to install and run the Dodeca client.
| The 'Publisher' field will reflect the name of the organization who owns the digital signing key. If you used the temporary key provided by Applied OLAP, the 'Publisher' value will be 'Unknown Publisher' (because it is a self-signed key). |
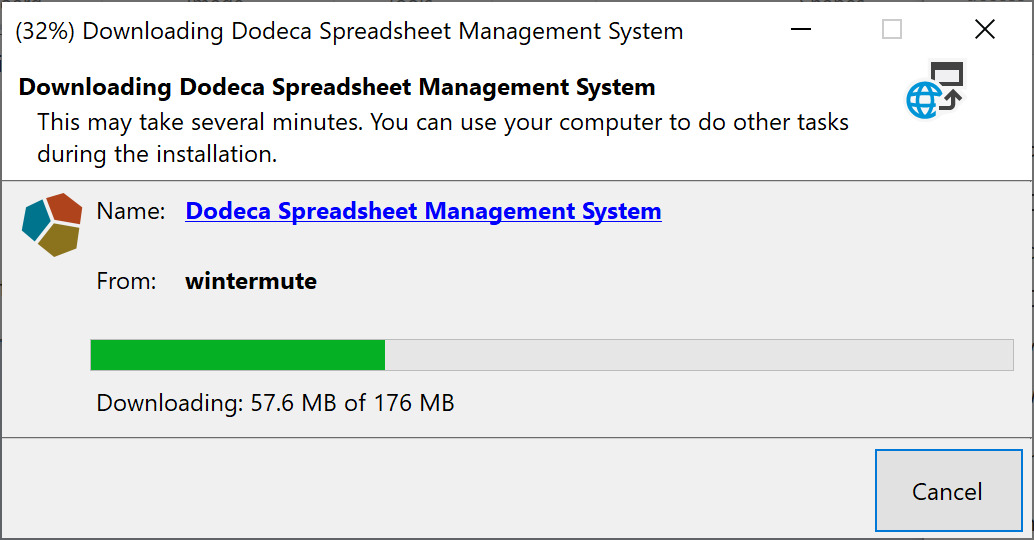
The installation will proceed and update its progress in the dialog. The amount of time required to install Dodeca on a client workstation will vary based on your network speed.
| This installation occurs only the first time the application is run. |
Upon completion of the download/installation, the Dodeca splash screen will be displayed, indicating the startup of the Dodeca Smart Client.
Congratulations! You have successfully launched the Dodeca Smart Client.
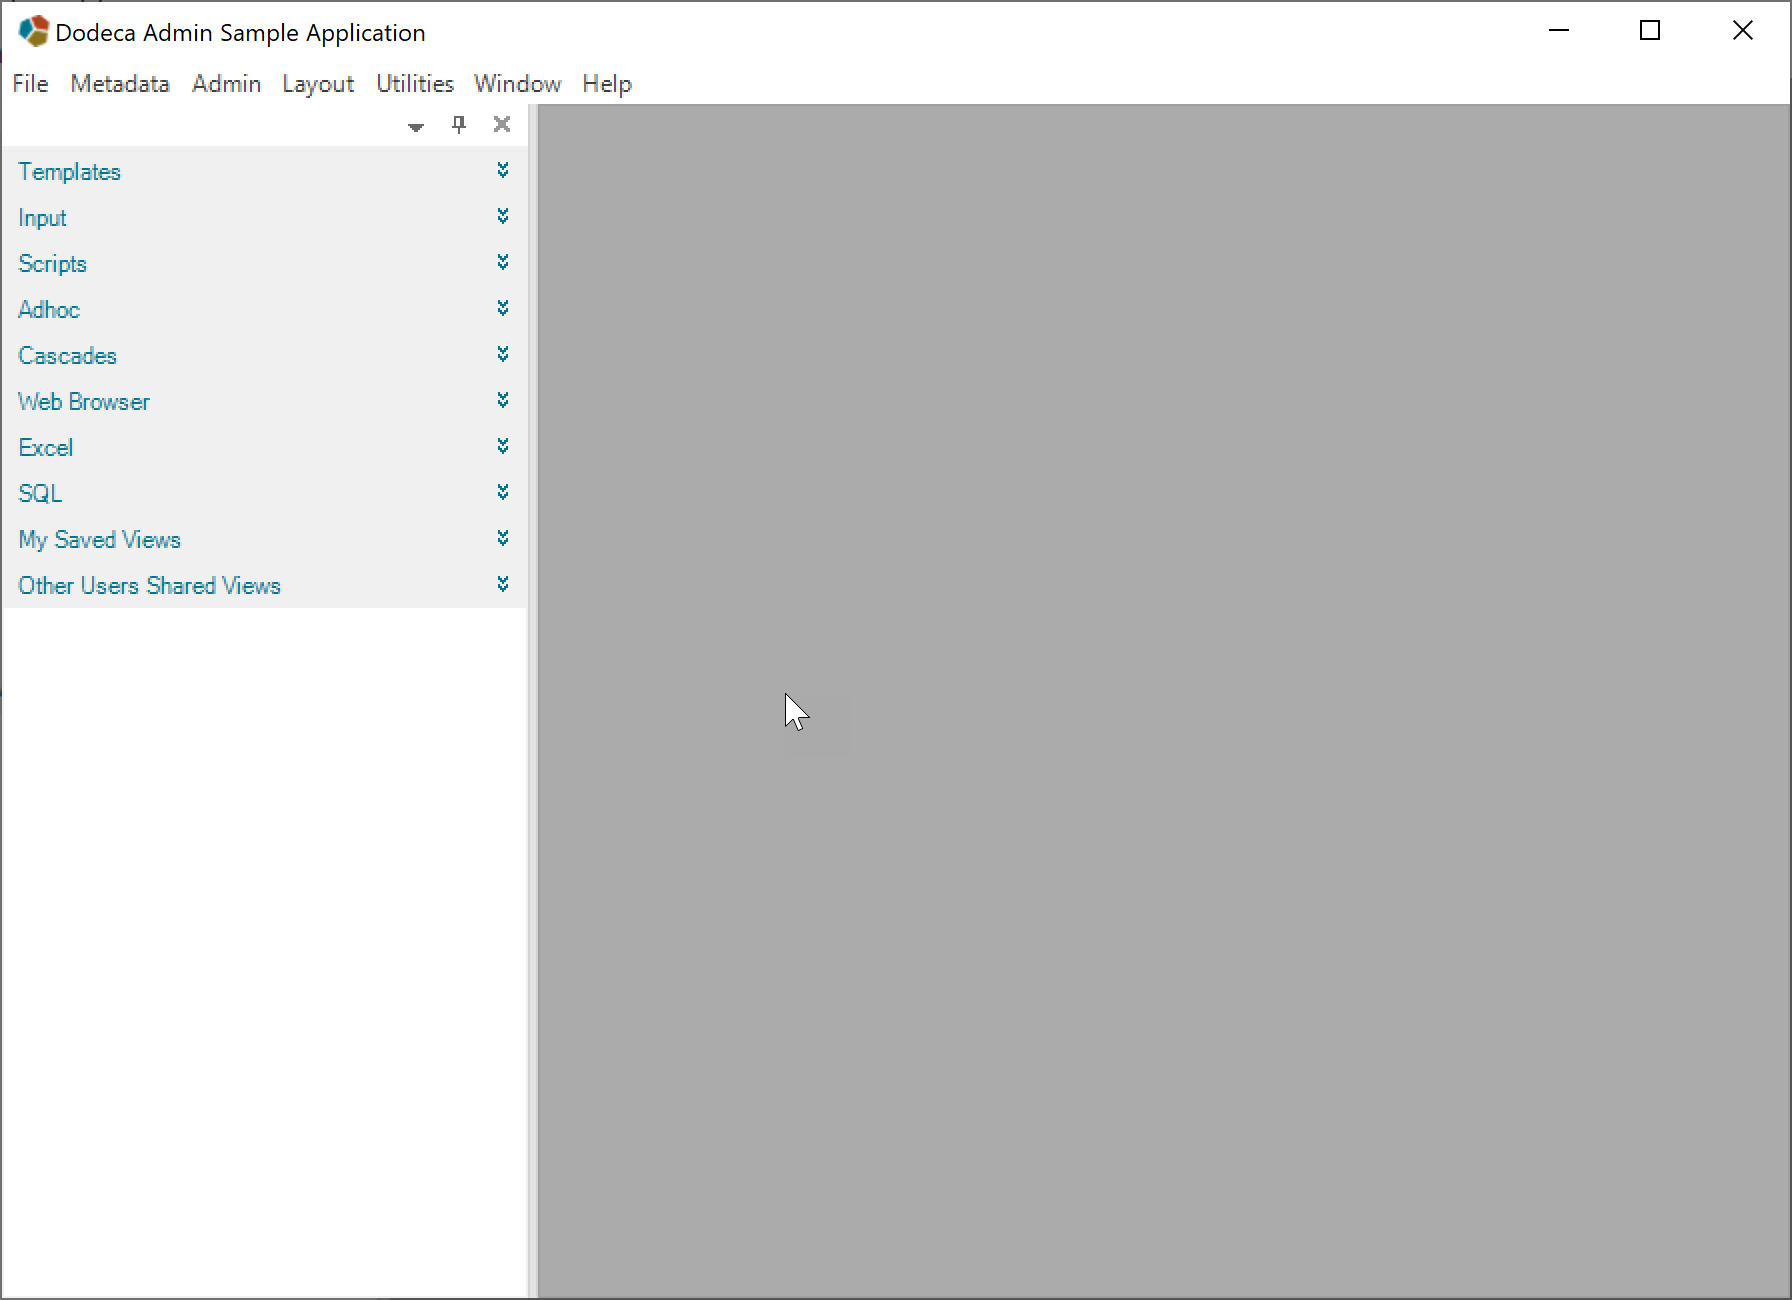
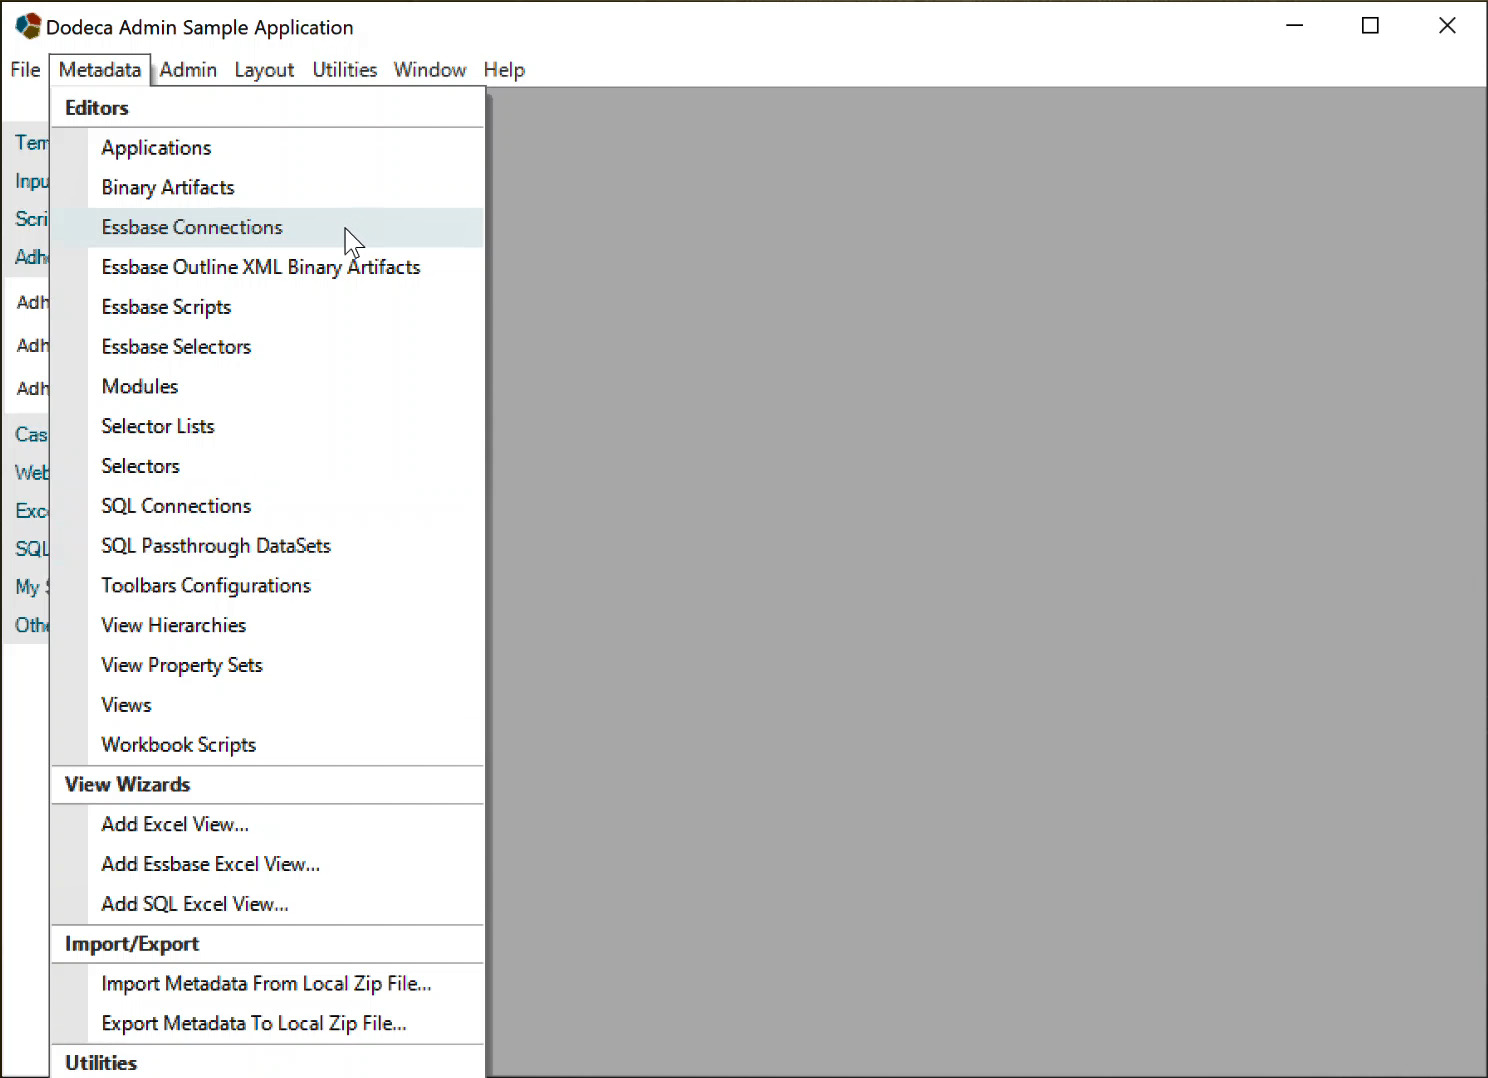
-
Once in the ADMIN application (assuming you have the Essbase Sample/Basic and Demo/Basic sample databases available), you need to configure the location of your Essbase services. To configure those services, select 'Admin' from the menu, and then select 'Essbase Connections' to open the Essbase Connections metadata editor.
-
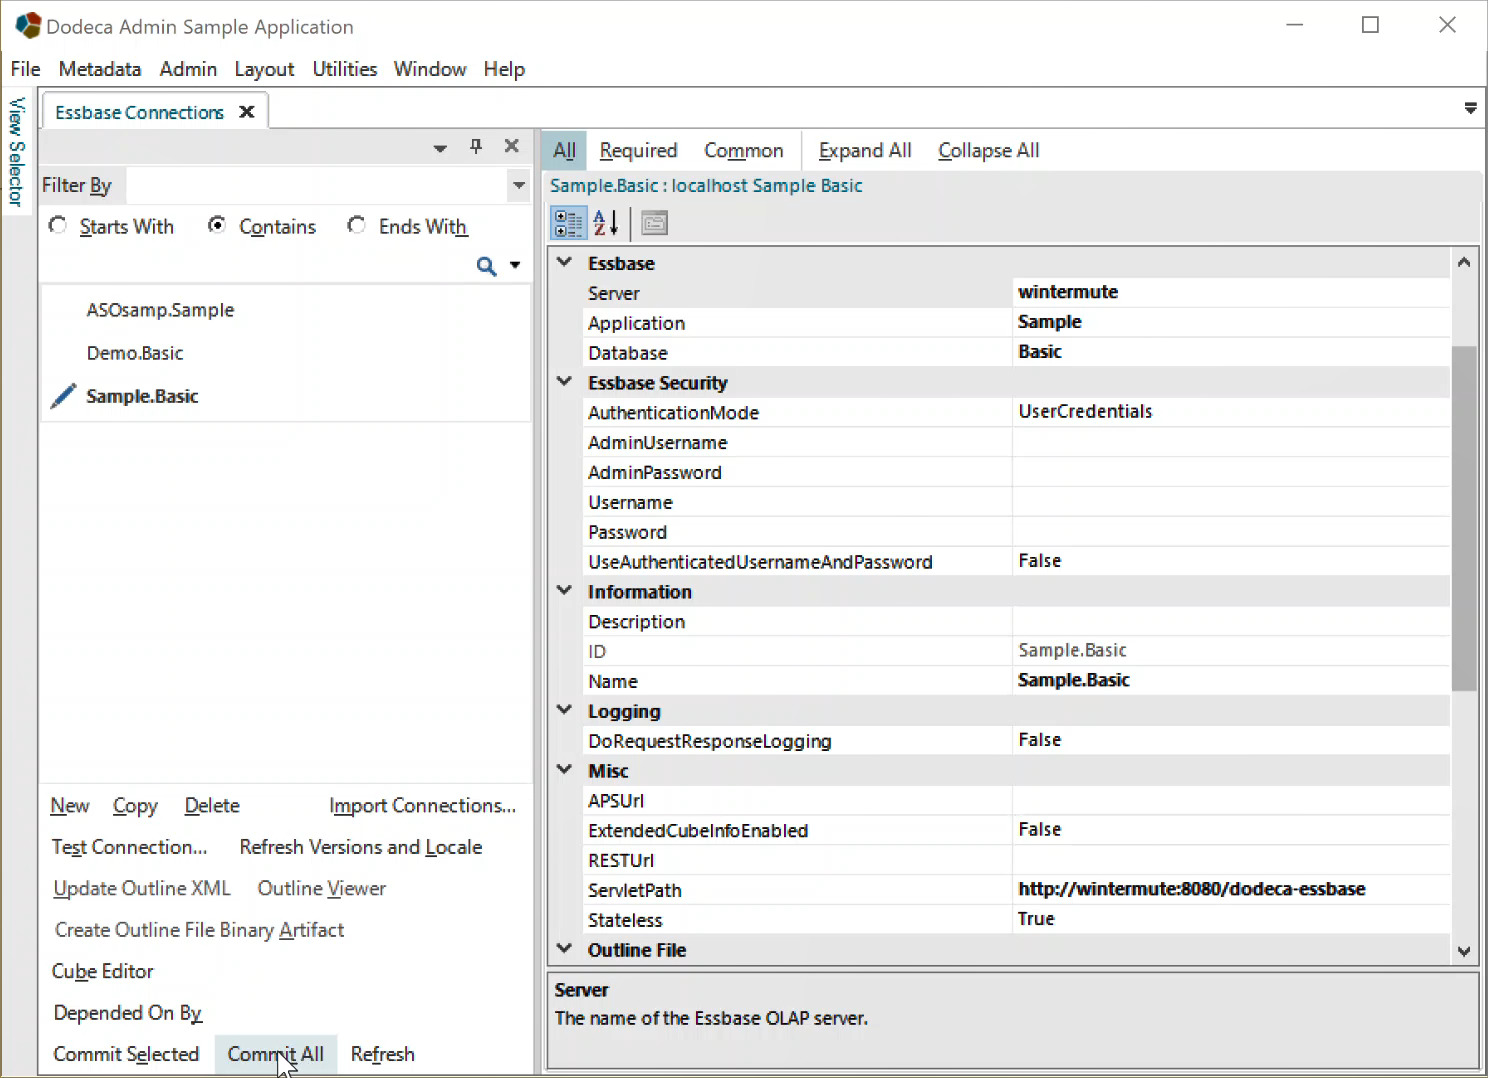
Select the 'Sample Basic' connection and modify the 'ServletPath' and (Essbase) Server properties to point to the proper location.
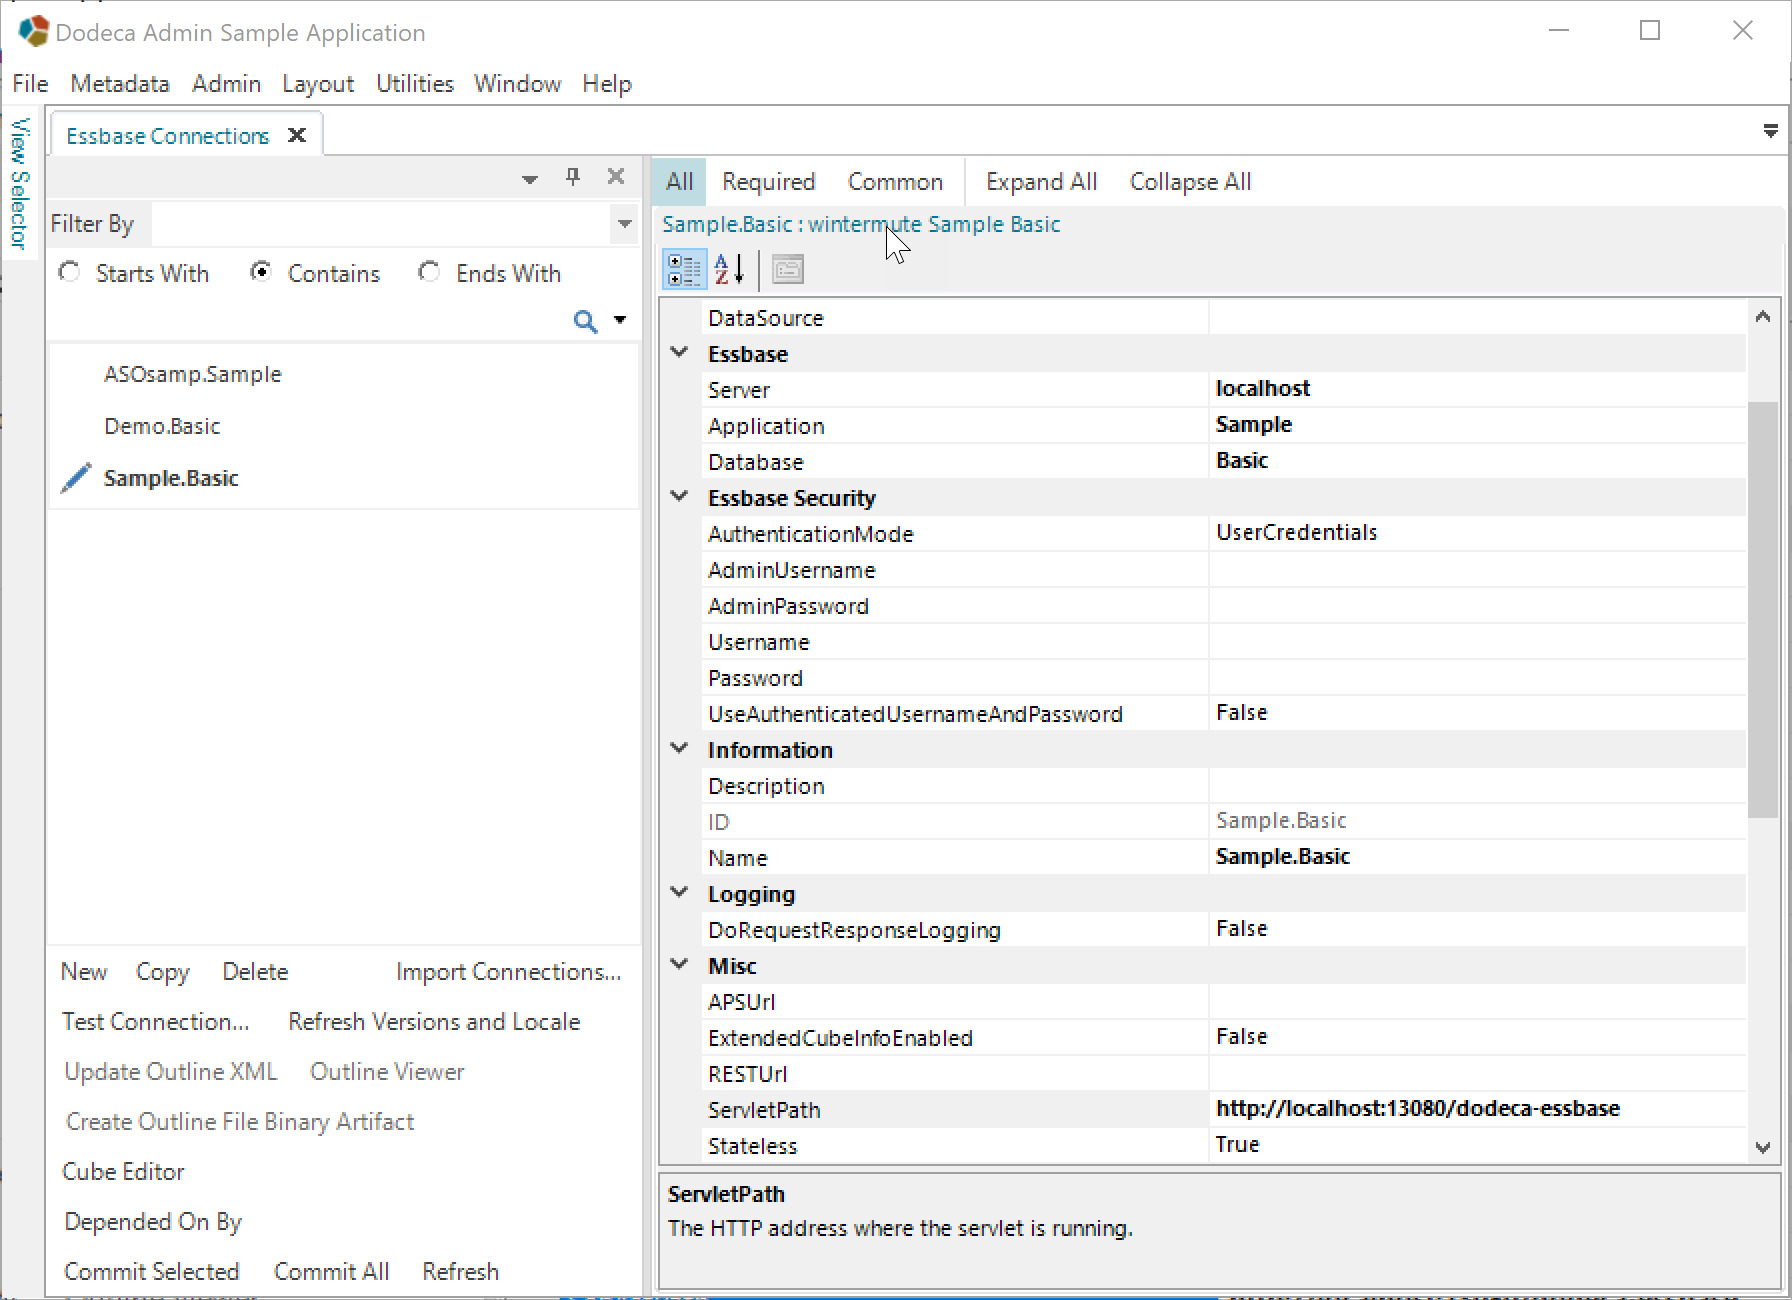
-
Once you have modified the properties, click the Commit All button to store the changes in the metadata repository on the server.
-
Next, test the functionality by opening the 'Adhoc Analysis' view which is configured to use the Sample Basic connection. To open the view, click on the 'Adhoc' category in the View Selector pane to expand open the 'Adhoc' category. Then click on the 'Adhoc Analysis' view to launch it.
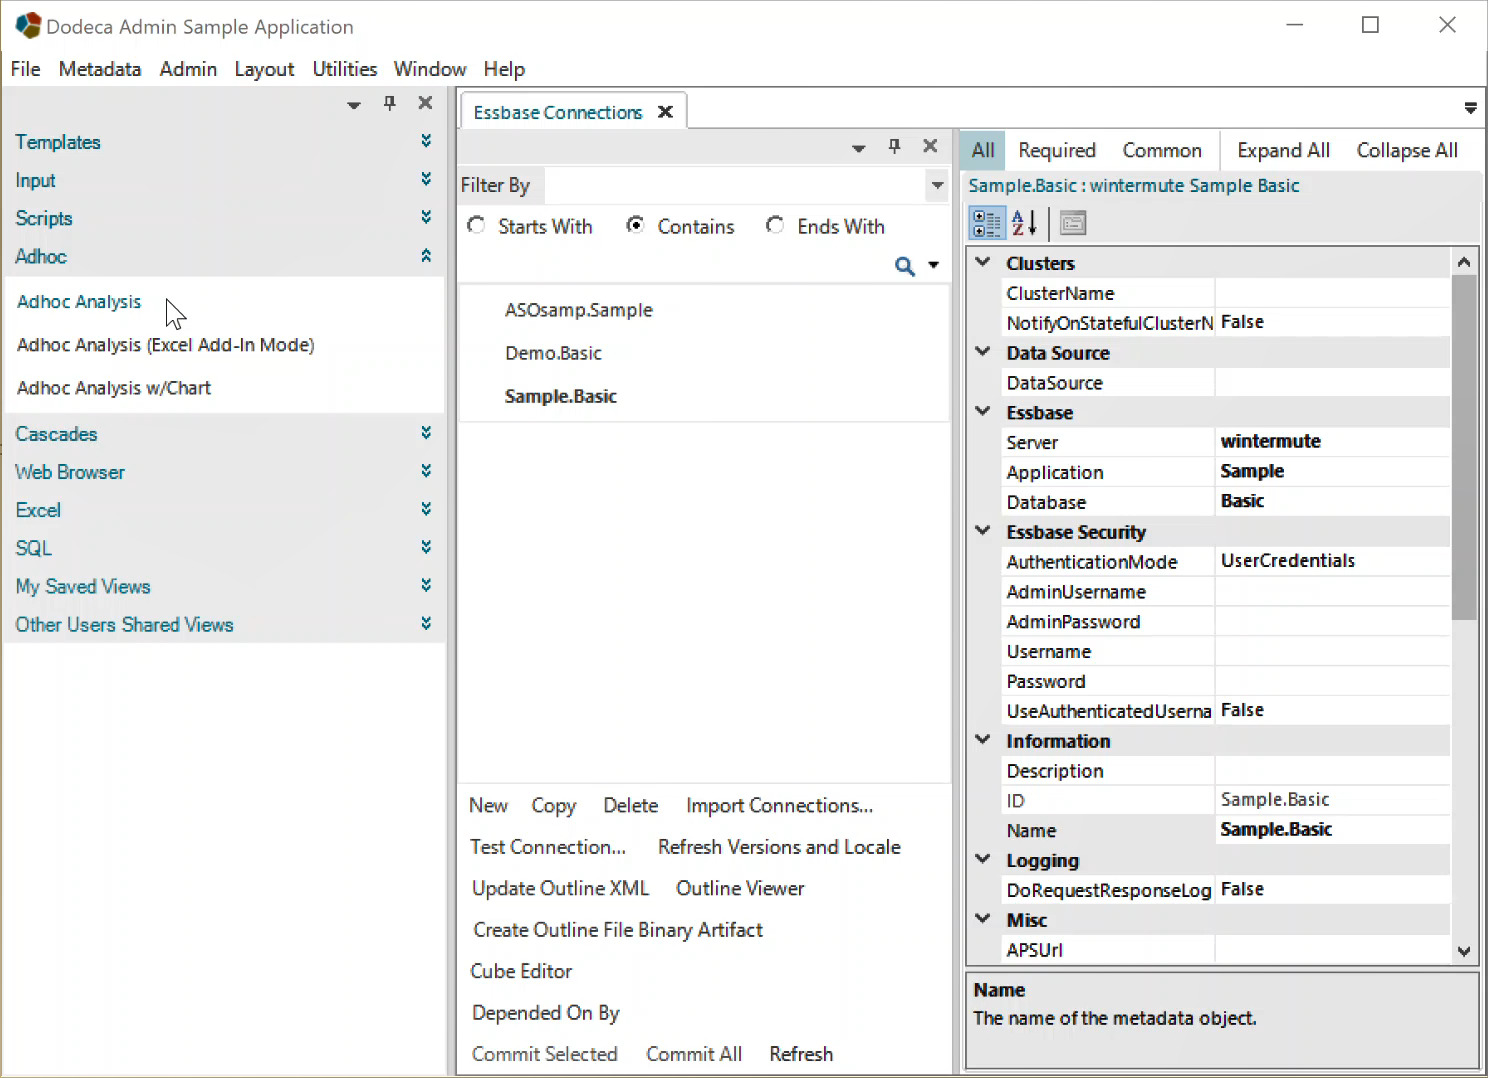
-
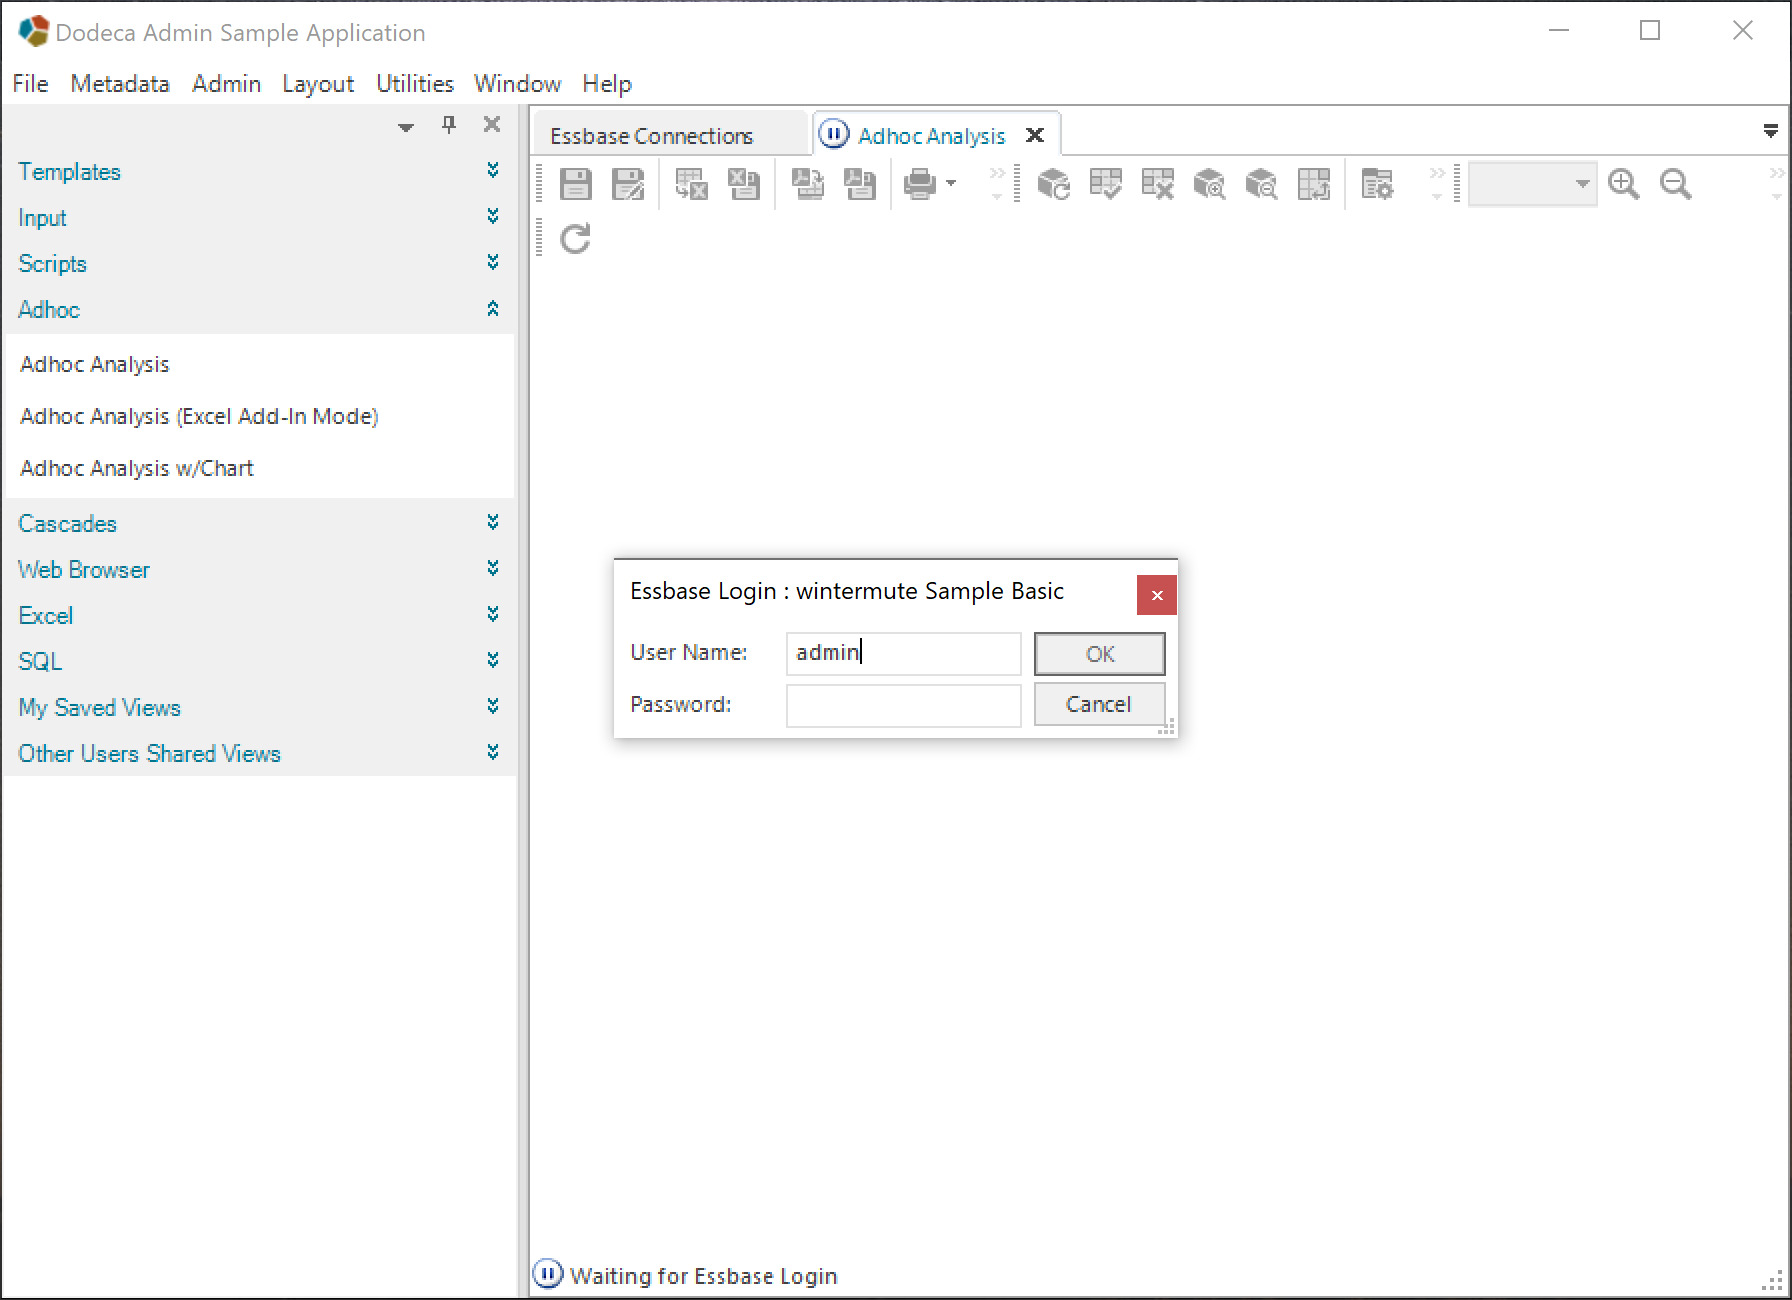
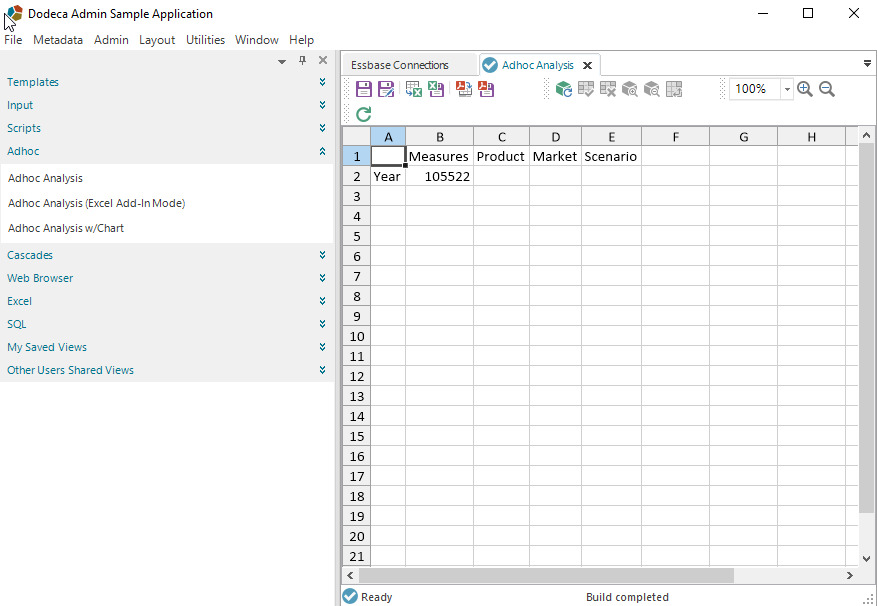
Enter your username and password and press OK. The 'Adhoc Analysis' view will connect to Essbase and bring back the initial retrieve.
Now that you have successfully tested your client and server setup, you can start authoring your own applications. The first thing you will need to do is choose a tenant keyword for use with your application. The tenant key is used to segregate sets of applications within the metadata server. For example, if you intend to implement a forecasting application and a retail merchandise planning system for your company (ABC, Inc.), you may want to use multiple tenant keys to separate the metadata for your different applications. You could, for example, decide to use ABCForecast and ABCMerchPlan for your tenant keys. When you create your applications, the metadata for the application(s) you create will be keyed in the database by each of these values. These applications are completely isolated from each other even if you create and access them using the same Dodeca metadata server.
ClickOnce Deployment from an HTML Link
After you have built your application, you must deploy the application to users. Most customers will want to deploy Dodeca to their end users using an HTML link on a web page. An example of the complete launch is below:
| The above URL must be typed on a single line. |
You would use your tenant key in place of the 'SAMPLE' tenant in the above example. You will also use an application key you create in place of the sample application ID 'ADMIN'.
Local Client Installation and Configuration
The full Dodeca client is also installed on the desktop of the machine that installs the Dodeca Framework using the executable installer. The client installation, consisting of AppliedOLAP.Dodeca.SmartClient.exe and all of its dependencies, is installed with the Dodeca Framework in the \bin\Dodeca subdirectory. The client installation is normally used only by customer developers who wish to extend the Dodeca framework using Visual Studio. Before you can use the client to start in this way, you must configure command-line arguments that the client needs to communicate with the metadata server.
The following command-line arguments are used by Dodeca:
| Argument | Usage | Mandatory |
|---|---|---|
/a (or /app) |
Defines the application to run (which defines, among other things, the toolbars present in the application). |
Y |
/p (or /path) |
Defines the URL where the metadata servlet is available. |
Y |
/t (or /tenant) |
Defines the Tenant key, which maintains metadata separation between different internal (or external) customers. |
Y |
/u (or /user) |
Defines the username to be used for metadata update logging (default=Windows Login name). |
N |
You must create or modify a shortcut to the Dodeca launch executable in order to include the command line arguments. An example of a complete command-line string is below:
C:\Program Files\Applied OLAP\Dodeca Framework {version}\bin\Dodeca\AppliedOLAP.Dodeca.SmartClient.exe" /a 1 /t SAMPLE /path http://appserver:13080/dodeca/metadata-service| The above command must be typed on a single line. |
Repository Client Option
Dodeca 8.6 introduces an alternative strategy for managing and updating the Dodeca client files for users. Historically, the only way to deploy Dodeca is to include the Dodeca client (ClickOnce) files with the server itself, such as in the dodeca WAR file. This means that when client updates need to be deployed, all Dodeca servers must be redeployed along with updated client files. The client deployment strategy is now managed with a new server option, dodeca.client-deployment-type, which has a default value of local (as in the client files are included locally along with the server WAR).
A new strategy has been introduced, which is a deployment type of repository. Using this deployment strategy, client files for Dodeca are imported and managed in the Dodeca repository itself, and excluded from the WAR/server deployment.
Multiple versions of Dodeca can exist in the Dodeca repository at one time, although only one version can be active at once.
Client files are imported to the server using the import-client command in Dodeca Shell.
For example:
import-client dodeca-smartclient-8.6.0-clickonce.zipAfter successfully importing the client files, the upgrade-client command is then used to set it. It may take up to a minute for all servers to recognize the new client files. The Dodeca metadata service page should report the current version of the client, such as "Repository Client 8.6.0.26".
Additional commands for viewing and managing client files stored in the Dodeca repository can be found using the help command and reviewing available commands in the Smart Client commands section.
The Dodeca Accelerator Utility
The Dodeca Framework and Smart Client are shipped with a command line utility, Accelerator.exe, that dramatically reduces Dodeca’s startup time, as well as improving the overall responsiveness of its user interface. The Accelerator is packaged with every ClickOnce deployment of Dodeca and needs to be run one time per Dodeca version installed on the client machine. The Accelerator does not run as a service, but rather, performs a one-time series of environment-specific optimizations, which includes recompiling each Dodeca assembly specifically for the client machine. Our own internal benchmarks have consistently shown 50-75% decreases in application startup time, as well as 30-50% increases in UI operation performance.
As the Accelerator modifies the client machine beyond .NET Isolated Storage, it does require administrative privileges in order to run. To run the Accelerator on a development machine where you have administrative privileges, follow these steps:
-
Open a command prompt and navigate to the \bin\Dodeca subdirectory of your Dodeca Framework installation.
-
Type the following command and then press enter:
Accelerator.exe -ign
| Depending on the processor speed/cores and the amount of RAM installed on your system, this process may take up to 20 minutes to complete. The relatively long completion time of this installation process is due to the fact that the Accelerator recompiles each Dodeca Assembly. |
-
Once the process is complete, restart Dodeca.
From this point forward, whenever you launch an instance of the Dodeca Smart Client, your system will preferentially use the natively-compiled assemblies generated by the Accelerator instead of the assemblies shipped with the Dodeca Framework. The Dodeca assemblies have also been installed into the system-wide .NET assembly library, allowing the .NET CLR to bypass hash verification of each assembly at startup. This improves startup time and reduces the amount of CPU the Dodeca Smart Client consumes at launch time.
To uninstall the recompiled assemblies and reverse the system changes made by the Accelerator on a development machine where you have administrative privileges, follow these steps:
-
Open a command prompt and navigate to the \bin\Dodeca subdirectory of your Dodeca Framework installation.
-
Type the following command and then press enter:
Accelerator.exe -ugn
| This command will uninstall only the assemblies of the current Dodeca version. To uninstall all Dodeca assemblies previously installed by the Accelerator, regardless of version, use the command line argument '-ucgn'. |
For additional information about the Dodeca Accelerator, as well as some common installation strategies for production environments, refer to the section of the Dodeca Administrator’s Guide titled "The Dodeca Accelerator Utility".