Dodeca Version 8.1.0
February 14, 2022 - Build 1304
This version of the Dodeca uses the .NET Framework, version 4.7.2 and higher on the desktop. The components used in this version of Dodeca are SpreadsheetGear 2017 (8.6.7.102), NetAdvantage 2020, Volume 2 (20.2.30), Aspose.Cells 19.5.0, Syncfusion Essential Studio 19.2.0.44, GdPicture.NET 14.1.0.112, and Xceed Zip 3.6.7363.15420.
This version of Dodeca has two server-side services that run inside a Java Application Server. The Dodeca service is supported and tested on Java 1.8. The Dodeca-Essbase service for all Essbase versions prior to, and including, Essbase 11.1.1.3 are supported and tested on Java 1.5. The Dodeca-Essbase service for all Essbase versions 11.1.1.4 and higher is supported and tested on Java 1.6. Both services are known to run on Java 1.7, 1.8, 1.9, and 1.10.
The release notes for this version contain the following sections:
Application - Duplicate (View) Tool
-
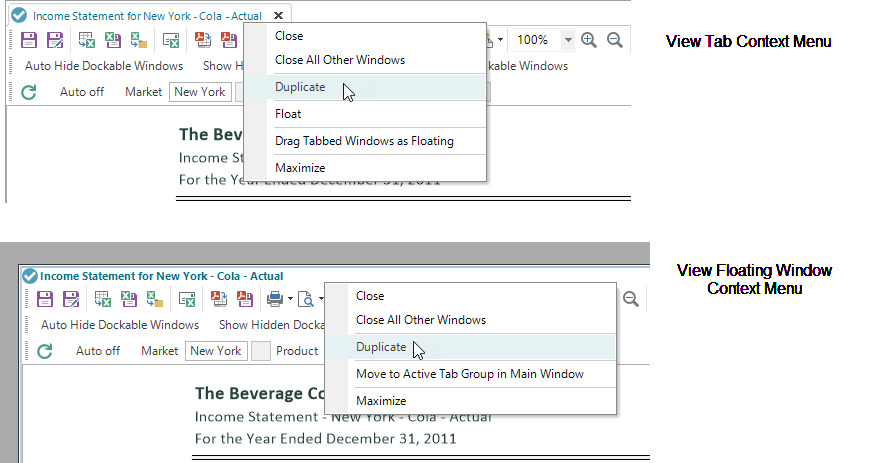
A Duplicate tool has been added to the context menu of a view window, both tabbed and floating. The tool opens a copy of the view with the same POV selections. This is useful, for example, when the user wants to do a side-by-side comparison between an existing view and a new instance of the view with the same POV selections to determine whether there have been changes in the data. #2960
Application Culture
-
Fixed Issue: When the application
CulturePolicyis set to UseSpecifiedCulture, the system’s culture settings (rather than those of the application’sSpecifiedCulture) are used by many parts of the application. This issue was introduced in 8.0.0.569. #3048
Application Metadata
-
A new application property,
MetadataFilesDeletionPolicy, controls whether the metadata files for the application’s tenant are retained in the Dodeca data directory across sessions or are deleted when an application session is closed.By default and as is recommended for optimum performance, the policy is set to Never, and the files are retained across sessions. When set to OnSessionClose, the files are deleted when an application session is closed/exited.
The first time a given metadata instance is used by the client, a file, which contains the metadata for the instance, is downloaded to the client. The files are retained in the data directory, and the location of the directory is determined by the type of deployment.
If the metadata for a given instance is changed in the metadata repository, the timing of the re-download of the instance’s metadata file to the client is determined by the
CheckForMetadataUpdatesFrequencyPolicy. Deleting the metadata files when a session is closed is NOT necessary to ensure that the client is using the most recent version of the metadata in the repository during the next session. #2632
Application Style Library
-
The
DodecaTeal_OfficeWhite_Stylestyle library has been updated for 8.1, and includes changes related to ribbons, as discussed in the Ribbons section, as well as changes to ensure that all the UI controls use the same font, which is Segoe UI. #3052 -
A new style library,
DodecaTeal_OfficeColorful_Styleis available in 8.1, which mimics the Office Colorful theme. The style library can be imported from the metadata_starter_kit.zip or style_library.zip, which installed in the Dodeca Frameworkmetadatafolder.
ClickOnce Prep Utility
-
Fixed Issue: When settings saved in Dodeca versions earlier than 8.0 are retrieved, new properties like
PackageDeploymentsandPackageDocumentationlose their default values and are set to False. #3047
Cell Attachments
In 8.1, the ability to associate attachments with a cell is supported. An attachment can be a file, a file link, or a hyperlink. The capability leverages the commentary infrastructure, which has been expanded to allow for comments and/or attachments to be associated with cells in a range. #1615
In previous versions, the term comment range is used to refer to the various settings that control the location, behavior, and appearance of related commentary in a view. The location is an actual range of cells on a worksheet. Each cell within the comment sheet range can optionally have one or more associated comments.
In 8.1, the term comment range is still used, but the new AllowComments and
AllowAttachments settings control whether cells within the defined sheet range
can have only comments, only attachments, or both comments and attachments.
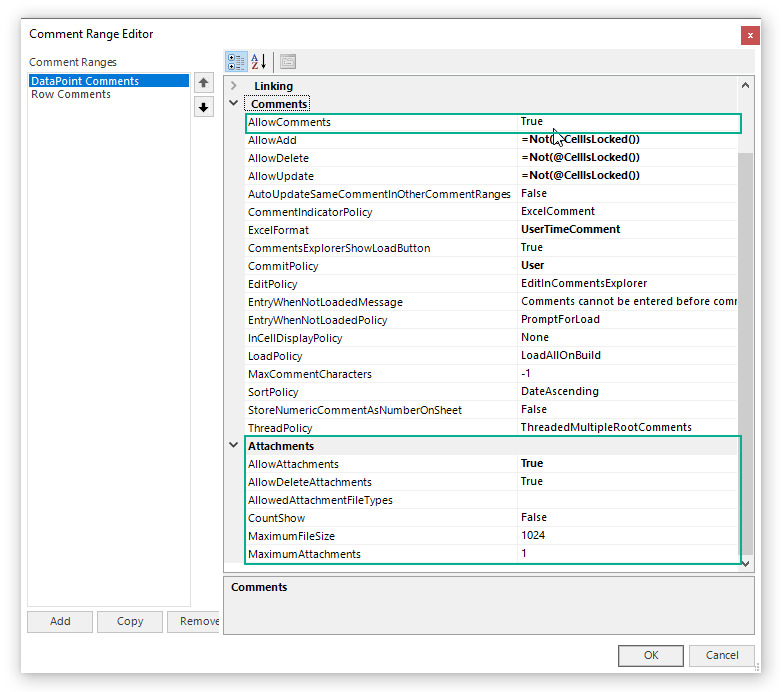
The following properties control the behavior of attachments:
-
AllowDeleteAttachments- Controls whether to allow attachments to be deleted. -
AllowedAttachmentFileTypes- A semicolon delimited string of file types, such as .xlsx;.txt;.docx. Only attachments of the file types specified are allowed to be attached. If no file types are specified, then all types are allowed, except for restricted types, which include files with any of the following extensions: exe, pif, application, gadget, msi, msp, com, scr, hta, cpl, msc, jar, bat, cmd, vb, vbs, vbe, js, jse, ws, wsf, wsc, wsh, ps1, ps1xml, ps2, ps2xml, psc1, psc2, msh, msh1, msh2, mshxml, msh1xml, msh2xml, scf, inf, reg, docm, dotm, xlsm, xltm, xlam, pptm, potm, ppam, ppsm, sldmS1 -
CountShow- Indicates whether to show the attachment count rectangle in the upper left corner of a cell, which has associated file attachments.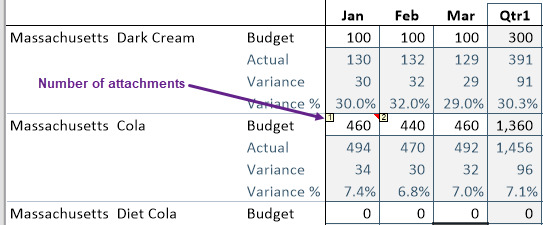
-
MaximumFileSize- The maximum allowed file size of an attachment in kilobytes. -
MaximumAttachments- The maximum number of files that can be attached to a cell.
Since enabling the ability to associate attachments to cells in a view uses the
same CommentRanges configuration as commentary, with the addition of the attachments
settings, instructions are not provided here; however, changes to the Comments Explorer
and examples of the attachment tool layouts are included below.
How to Attach a File, File Link, or Hyperlink to a Cell
A file, file link, or hyperlink can be attached to a cell in the Comments Explorer or by using the various attachment tools, which can be added to a context menu, toolbar, or ribbon.
The Comments Explorer has been revised to accommodate attachments as well as to improve the interface for viewing and editing comments. On the left is the pre-8.1 Comments Explorer, and the revised user-interface is on the right.
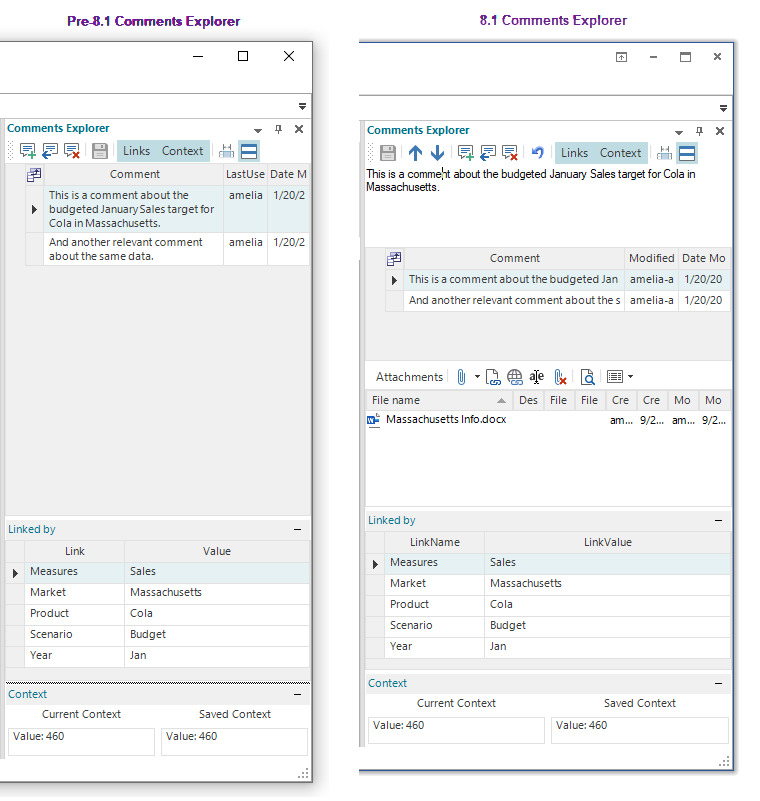
In 8.1, a comment is edited in an separate field instead of within the list of comments. The comment tools, edit field, and list of comments are only presented when the comment range associated with the selected cell allows comments.
The attachment tools and list of attachments are only presented when the comment range
associated with the selected cell allows attachments. The tools support attaching
a file, a file link, or a hyperlink. An attachment can be removed, when allowed
by the AllowDeleteAttachments setting. The Open tool opens the attachment
in the application associated with the file extension. The selected attachment
description can be edited, and the attachments can be viewed as Icons, Details,
or a List.
Attachment Tools
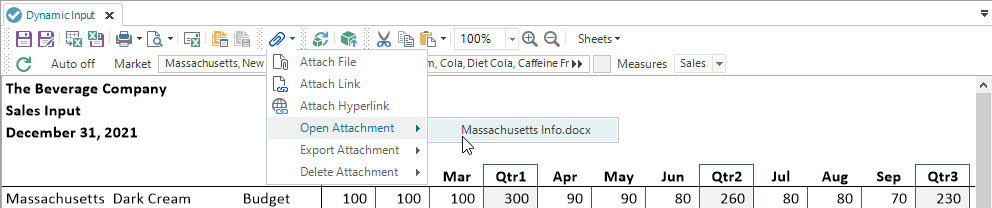
The attachment tools include the Attach File, Attach Link, and Attach Hyperlink tools, which are used to associate an attachment with a cell, along with the Open Attachment, Export Attachment, and Delete Attachment tools, which display a dropdown list from which to select an attachment for the active cell. An Attachments menu tool is also available, which contains all of the other tools. The tools can be added to a toolbar (or ribbon) and context menu, as shown in the following examples:
The Attachments menu tool in a toolbar:
All of the attachment tools in a toolbar:

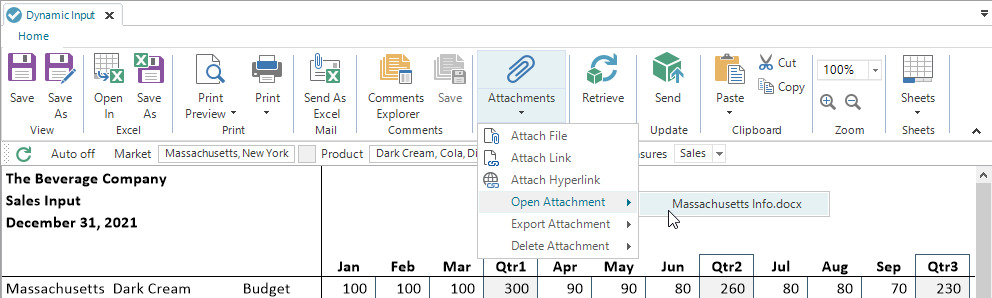
The Attachments menu tool in a ribbon:
All of the attachment tools in a ribbon:

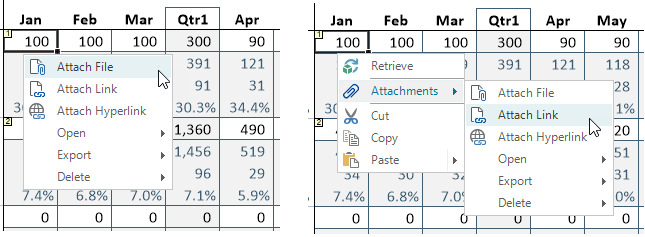
On the left, the Attachments menu tool is used as the view’s context menu. On the right, the Attachments menu tool has been added along with other tools to the view’s context menu.
How to Add the Attachment Tools to a Toolbars Configuration
The attachment tools can be imported into a toolbars configuration, which represents toolbars or represents a ribbon.
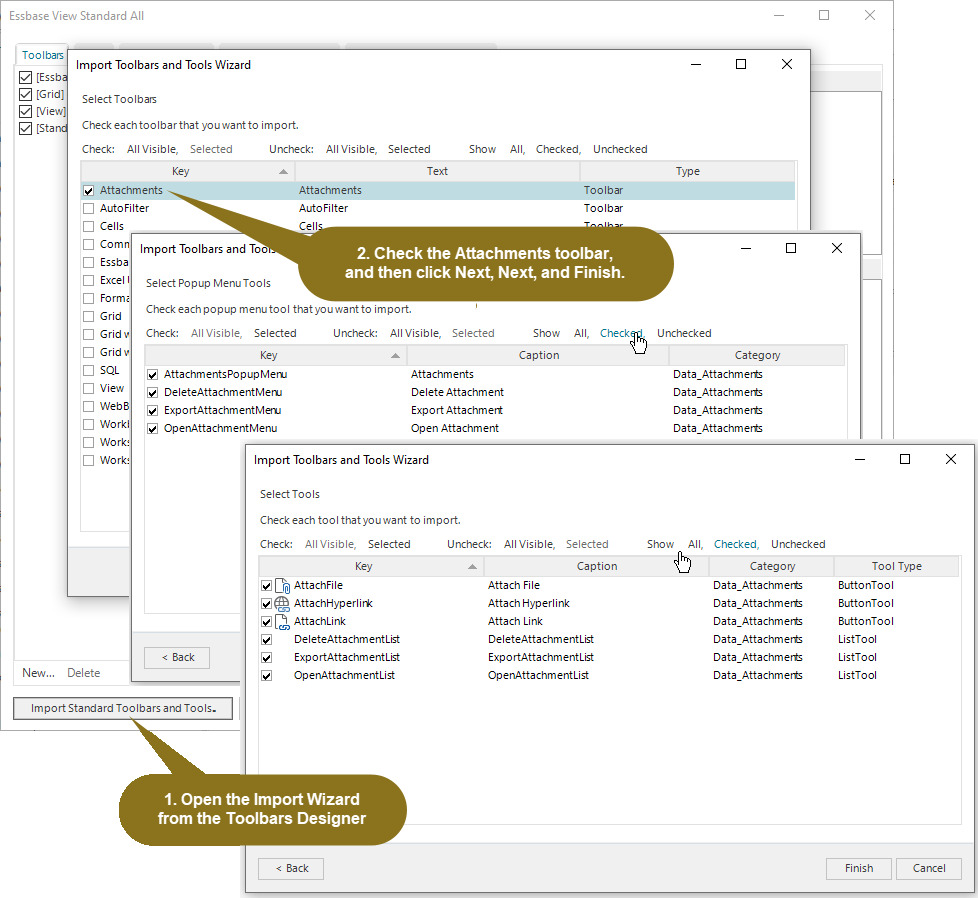
To add the Attachments toolbar:
-
From the Toolbars Configuration Editor, open the Toolbars Designer.
-
Click the Import Standard Toolbars and Tools button.
-
Check the Attachments toolbar, then click Next.
-
On the Select Popup Menu Tools page, click Next.
-
On the Select Tools page, click Finish.
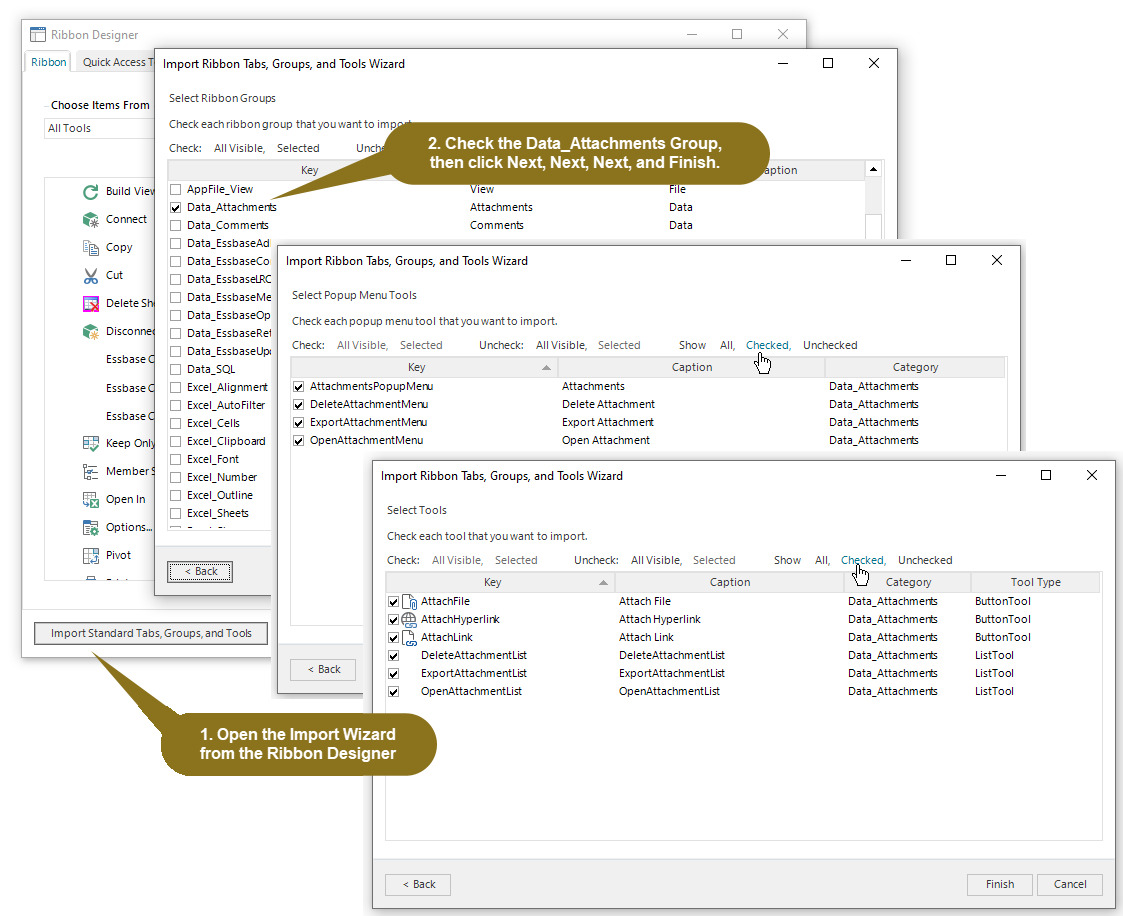
To add the Attachments group to a ribbon tab:
-
From the Toolbars Configuration Editor, open the Ribbon Designer.
-
Click the Import Standard Tabs, Groups, and Tools button.
-
On the Select Ribbon Tabs page, click Next.
-
On the Select Ribbon Groups page, check Data_Attachments, then click Next.
-
On the Select Toolbars page, click Next.
-
On the Select Popup Menu Tools page, click Next.
-
On the Select Tools page, click Finish.
Comment Range Editor
In Version 8.0.0.569, the Comment Range Editor was added to the View Template Designer
to assist with the creation of the key items formulas in the KeyItemsColumnRange
and KeyItemsRowRange. In 8.1, the default names of the Address, KeyItemsColumRange
and KeyItemsRowRange are based on the caption.
For example, if the comment range caption is DataPointComments, then instead of Comments.Range.1, Items.Column.Range.1, and Items.Row.Range.1, as the range names, the default range names are DataPointComments.Comments.Range, DataPointComments.Key.Items.Column, and DataPointComments.Key.Items.Row. #3013
Commentary
-
Fixed Issue: As noted in the 8.0.3 Release Notes, the following issue was fixed: There are cases when a comment, after being saved from the client, does not appear as a comment after the view is rebuilt, or when another view references the same comment. The issue is related to the computation of the key hash used to identify the comment, which is based on the key items, so the behavior is not encountered for all comments and appears to occur inconsistently. This issue was introduced in 8.0.0.569.
While the fix in 8.0.3 addressed the cause of some occurrences of this behavior, similar occurrences were subsequently detected, and have been addressed in 8.1. #2971
Dodeca Shell
-
jdbc-testCommand: When an existing dodeca.properties file is updated, thejdbc-testcommand will attempt to locate the file by using the default path, ../staging/WEB-INF/classes/dodeca.properties. If the file is not found, the user is prompted to enter the path to the existing properties file. Prior to 8.1, the user was always required to type in the file path. #2909 -
The ability to use the tab-based auto-completion capability for the
Connectcommand has been restored. #2785 -
In previous versions, when the
delete-commentscommand is used to delete a comment by specifying only the comment key, unless the key value is preceded by --include-key-spec in the command line, the comment is not deleted. Thedelete-commentscommand has 3 parameters:author,include-key-spec, andexclude-key-spec. In 8.1, the command treats a single parameter value that is not preceded by the parameter name as the key of the comment to delete. #3070 -
Fixed Issue: The
delete-data-audit-loganddelete-metadata-audit-log-recordscommands do not delete audit log records when the--daysparameter is used. #2981
Essbase Data Audit Log
-
In 8.1, the ID of the view from which a user changes an Essbase data value, is stored in the data audit log record, and reported in the Essbase Audit Log Viewer. #2770

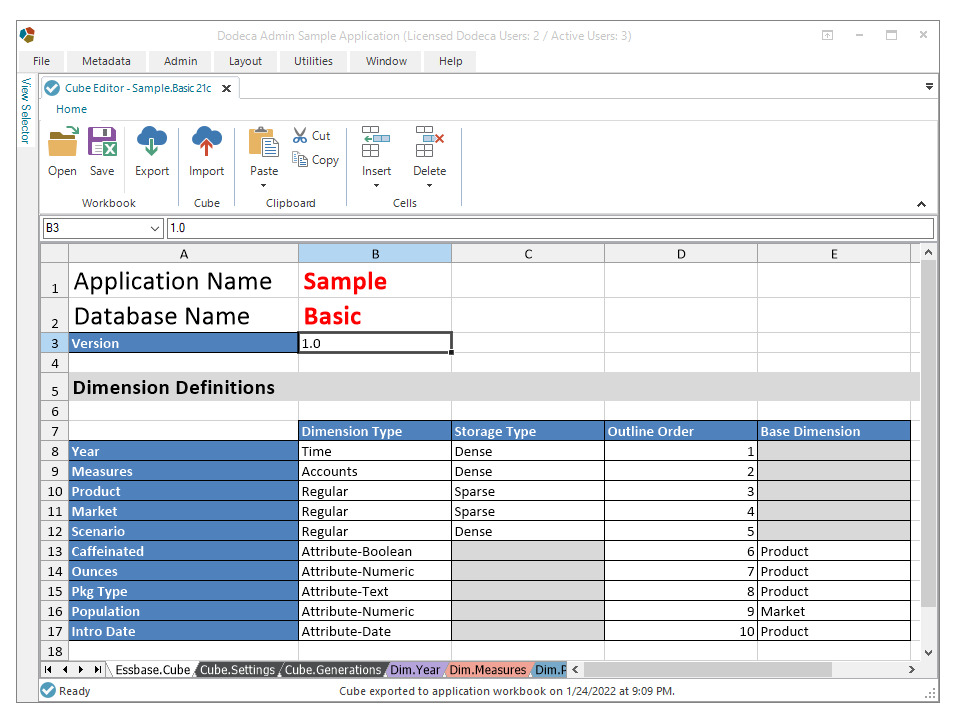
Essbase Cube Editor
The Essbase Cube Editor provides an interface for editing the outline of an Essbase 21c database, which is associated an existing Essbase Connection, by using an Application Workbook. #2532
Refer to the Oracle Application Workbooks Reference.
The following operations are supported:
-
Export an Essbase cube to an Application Workbook, and optionally include data and/or calculation scripts.
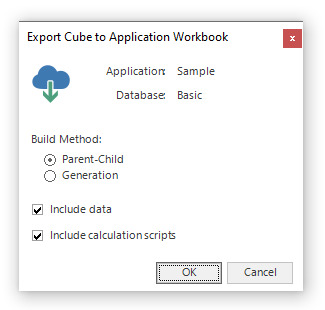
Data is exported to a data worksheet, named Data.<database name>, in the workbook for a block storage cube when the size of the data is 400 MB or less. The data for an aggregate storage cube and for a block storage cube that exceeds 400 MB, is exported to a text file, named <database name>.txt, which is included in a file named <database name>.zip. The .zip file is created under the related application a nd database folder under applications in the OAC Files catalog.
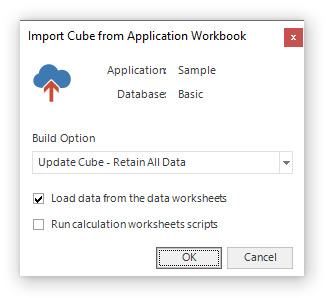
-
Import the modified outline, data, and calculation scripts from an Application Workbook into the database. The workbook may contain multiple data and calculation script worksheets.
Uploading data or changes to the data is only supported by the Cube Editor through data worksheets in the Application Workbook.
-
Open an existing Application Workbook from the local file system.
-
Save the Application Workbook to the local file system. By default, the Application Workbook is saved to the user’s C:\Users\<username>\AppData\Roaming\Applied OLAP, Inc\Dodeca\DBX folder.
-
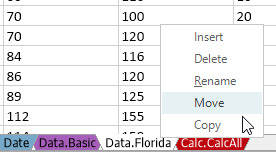
Sheets can be inserted, deleted, renamed, moved, and copied using the sheet context menu, which is displayed by clicking the right mouse button when positioned over the sheet tabs.
-
Insert cells, rows, columns, sheet, and delete cells, rows, columns, sheet tools are available from the ribbon and the context menu.
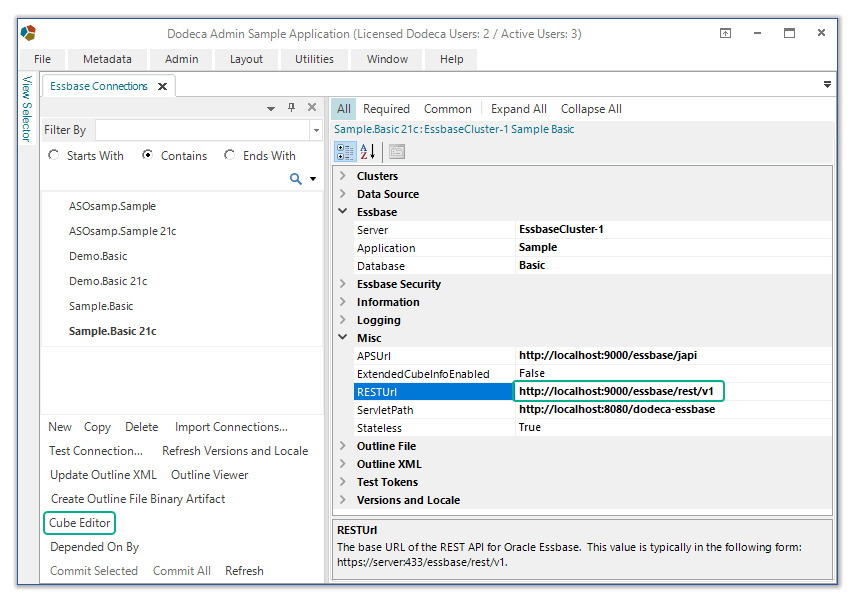
The Cube Editor is opened for a defined Essbase connection from the
Essbase Connection Editor using the Cube Editor tool. The connection must reference
an Essbase 21c database and specify the RESTUrl property.
Essbase Excel and SQL Excel Views - Cascading
-
A new property,
CascadeTemplateSheetPolicy, controls whether a cascade sheet is identified by theCascadeTemplateSheetNumberorCascadeTemplateSheetNameproperty. Prior to 8.1, a cascade sheet could only be identified by the sheet number, which required that theCascadeTemplateSheetNumberbe updated when a change to the template caused the sheet number to be adjusted.The
CascadeTemplateSheetPolicy,CascadeTemplateSheetNumber,CascadeTemplateSheetNameproperties are supported at the view-level as well as for theCascadeSheetConfigproperty. The view-level properties can be used when the view contains a single cascade template sheet. TheCascadeSheetConfigis used when the view contains one or more cascade template sheets. #2738
Essbase Scripts Editors
-
Fixed Issue: An unhandled exception in the Essbase Scripts Editor can cause the application to crash under some circumstances when the token auto-completion context prompt should be displayed. #3037
Essbase Zoom In PopupMenuTool
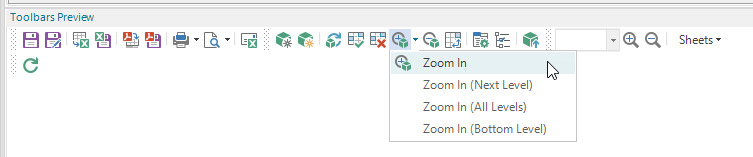
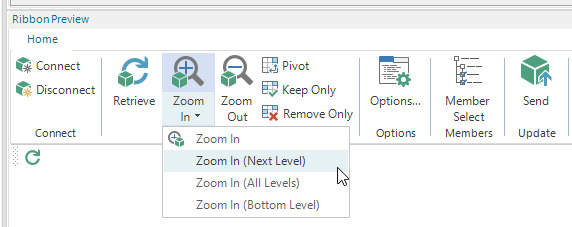
A new Essbase Zoom In tool is supported, which is a segmented PopupMenuTool. When the button is clicked, the standard zoom-in operation is executed, which uses the current Zoom Level option. The dropdown menu contains the Zoom In, Zoom In (Next Level), Zoom In (All Levels), and Zoom In (Bottom Level) tools. #2938
To add the Zoom In PopupMenuTool to a toolbar, use the following steps:
-
Open the Toolbars Configuration Editor.
-
Select the toolbars configuration.
-
Open the Toolbars Designer.
-
Click Import Standard Toolbars and Tools.
-
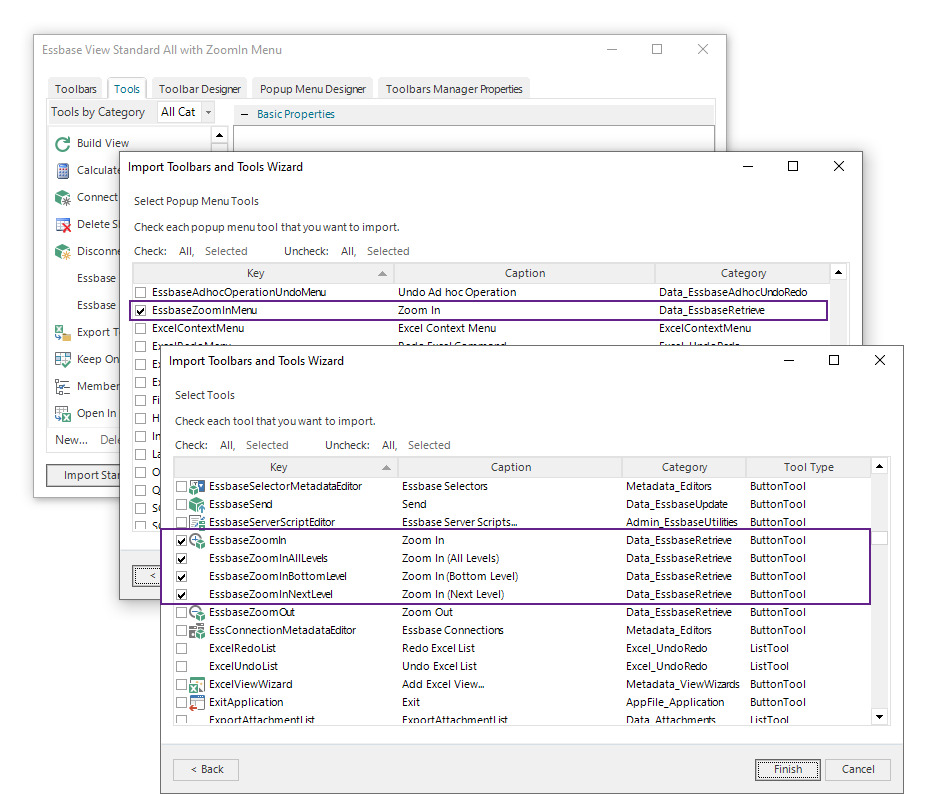
In the wizard, click Next and check the box next to EssbaseZoomInMenu, then click Next and Finish.
-
In the Toolbar Designer tab, the Zoom In popup menu tool can be added to the appropriate toolbar.
To add the Zoom In PopupMenuTool to a ribbon tab, use the following steps:
-
Open the Toolbars Configuration Editor.
-
Select the toolbars configuration.
-
Open the Ribbon Designer.
-
Click Import Standard Tabs, Groups, and Tools.
-
In the wizard, click Next (3 times) until Select Popup Menu Tools is displayed and check the box next to EssbaseZoomInMenu, then click Next and Finish.
-
In this example, the ribbon contains a Data tab, and the Retrieve group contains the standard Zoom In button, which will be replaced by the popup menu tool. First, the button is removed from the group.
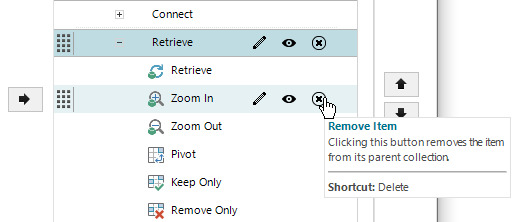
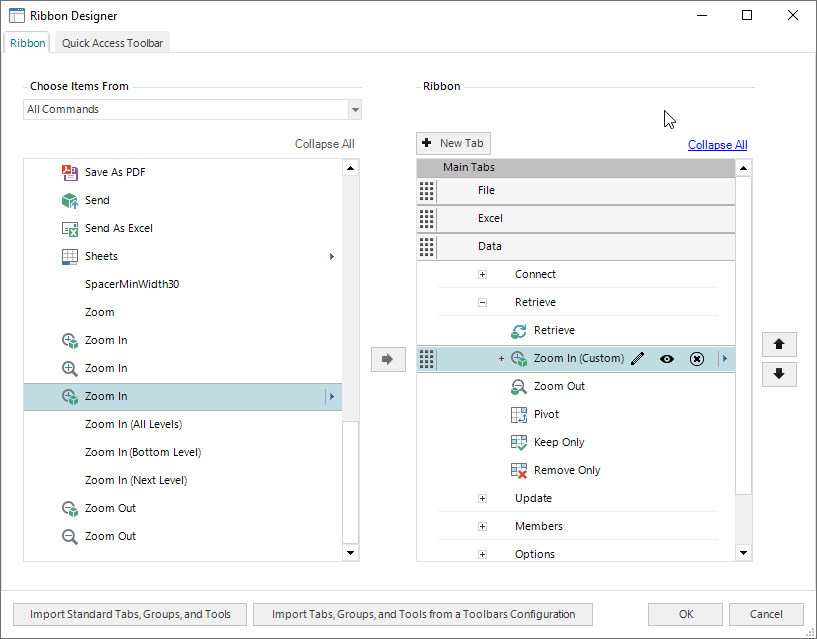
Then the menu tool is dragged from the list on the left to the appropriate position in the group.
To set the tool size, hover the mouse over the tool and click the Modify Item icon, and set the Preferred Size to Large.
Click OK to close the Ribbon Designer.
Excel Template Views
-
A new property,
AllowPaste, which is supported for Excel views, controls whether the user is allowed to paste into a sheet using the Ctrl+V or the Shift+Insert keys, or by using the Paste tool. #2357 -
Zoom Magnification Percentages: For Excel views, users often change the zoom magnification of worksheets in the view, and the percentages must be reset each time a view is built. In 8.1, to allow for the percentages to be retained and restored, the Excel, SQL Excel, and Essbase Excel view types support a new property,
WorksheetZoomPercentageRestorePolicy, which Controls whether the worksheet zoom magnification percentages are restored when a view is rebuilt, when a view is opened and built, or not at all. #3042The property supports the following options:
-
DoNotRestore - (Default) When a user changes the zoom magnification percentages for any worksheet in a view, and then rebuilds or opens a new instance of the view, the magnification of the worksheets is the same as in the Excel template.
-
RestoreOnRebuild - When a view is rebuilt, the zoom magnification of each worksheet is restored to the percentage as set by the user before rebuilding the view.
-
RestoreOnOpenAndRebuild - As with the RestoreOnRebuild option, when a view is rebuilt, the zoom magnification of each worksheet is restored to the percentage as set by the user before rebuilding the view. And, when a new instance of the view is opened and built, the zoom magnification of the worksheets is set to the percentages of the worksheets in the instance of the view for which the percentages were most recently changed.
For the RestoreOnOpenAndRebuild option, the magnification percentages are retained in the persistent cache (i.e. across sessions) for all the sheets in the view when the magnification percentage is changed for any given worksheet. A new instance of the view uses the persisted percentages when initially built, but adjustments are not reflected in other open instances of the view that have already been built, but are restored when the new instance is rebuilt.
-
Log4j Vulnerability
-
While none of Dodeca’s components were found to be vulnerable to the Log4Shell vulnerability (CVE-2021-44228), in this release, the Dodeca metadata service no longer uses log4j at all. Likewise, the Dodeca Essbase connector (the Dodeca-Essbase service) now ships with and uses the reload4j library, which is compatible with and based on log4j 1.2.17, but with all of the known log4j 1.2 CVEs fixed. #3078
For more information, see:+ https://www.appliedolap.com/blog/log4j-log4shell-vulnerability-statement
Metadata - Importing and Exporting Metadata from Local Zip File
-
Multiple Item Selection Enhancements - The techniques supported by the Import/Export from Local Zip File dialogs to select (i.e. highlight) and check/uncheck multiple items have been expanded. #2836
Select multiple items:
-
By use of the Shift and Control keys
-
By use of lasso selection, which supports a dragging selection for multiple items. The drag operation is initiated by clicking the left (primary) mouse button on an item and then moving the cursor over other items while continuing to press the mouse button.
Check or uncheck selected items:
-
Using the left mouse button, click the checkbox by one of the highlighted items, which toggles the check state for the item and also sets the check state of the other highlighted items accordingly.
-
Toggle the check state in the header row, which sets the check state of all selected items accordingly.
-
Relational Views
-
Fixed Issue - When a relational view’s
DataSetRangescontains aDataTableRangethat is configured without the InsertCells option set in theSetDataFlags(i.e. the retrieved data rows are not inserted into the range specified as theDataSheetRangeName) and the number of columns in the sheet range is less than the number of columns in the retrieved data, the following error occurs when the data set range is saved: Index was outside the bounds of the array. This issue was introduced in 7.8.8.7644. #3085
Reporting Services View Type
The Reporting Services view type is no longer supported. The view type provided a way to define and retrieve the view data through Microsoft Reporting Services. #2656
| The discontinuation of support for the Reporting Services view type is a potential breaking change. We are not aware of any customers who are using this capability. Please contact support@appliedolap.com if you are impacted by this change. |
Ribbons
The Ribbons documentation contains the following sections: #1605
-
Ribbons and the Application Style Library
-
Tool Images
-
Ribbon Screenshots
-
Application Main Menu Bar versus Ribbon
-
View Main Menu Bar versus View Tab
-
Toolbars Configuration
-
Ways to Create a Ribbon
-
Ribbon Designer
-
Import Wizard
-
Toolbars to Ribbon Converter
-
Ribbon Template
-
How to Add a View Tab to a Ribbon
-
How to Add a Custom Tool to a Ribbon
-
Ribbons and Workbook Scripting
Ribbons and the Application Style Library
| The DodecaTeal_OfficeWhite_Style and Office 2010 Style Library (Blue) style libraries have been updated with necessary changes for use with ribbons. Ribbon behavior and appearance, such as the availability of the minimize button, are dependent on these changes. Both style libraries can be imported from the metadata-starter-kit in the metadata folder of the Dodeca Framework installation. |
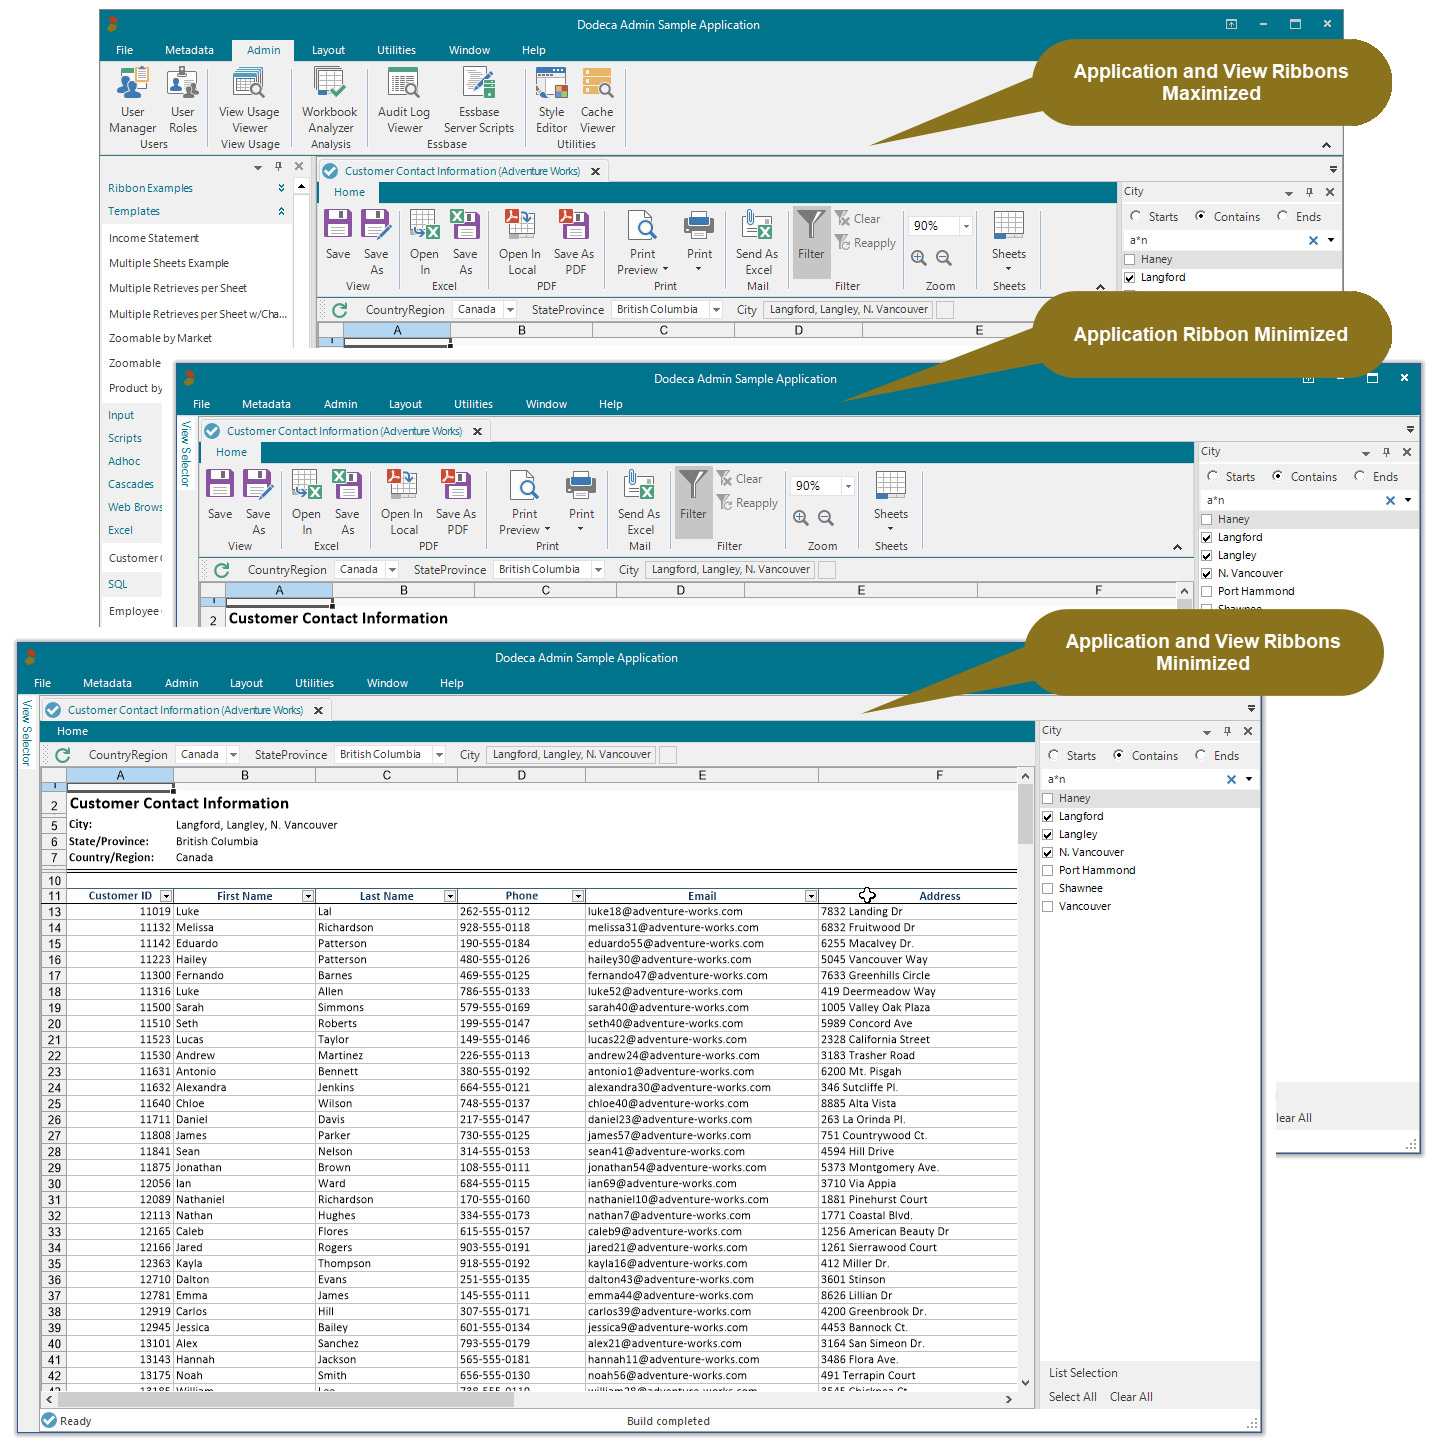
A new style library DodecaTeal_OfficeColorful_Style is available in 8.1, and shown is here with different combinations of minimized and maximized application and view ribbons.
Tool Images
Updates to the tool images, which are used by toolbars configurations, were included in 8.0, along with support for the ability to upgrade the tool images in existing toolbars configurations.
With the introduction of ribbons, new tool images and additional revisions to existing images are included in 8.1. Upgrading existing toolbars configurations to the new tool images is highly recommended. To do so, use the Upgrade Images and Upgrade All Images utilities in the Toolbars Configuration Editor.
Ribbon Screenshots
To begin the introduction to ribbons, here are a few example screenshots.
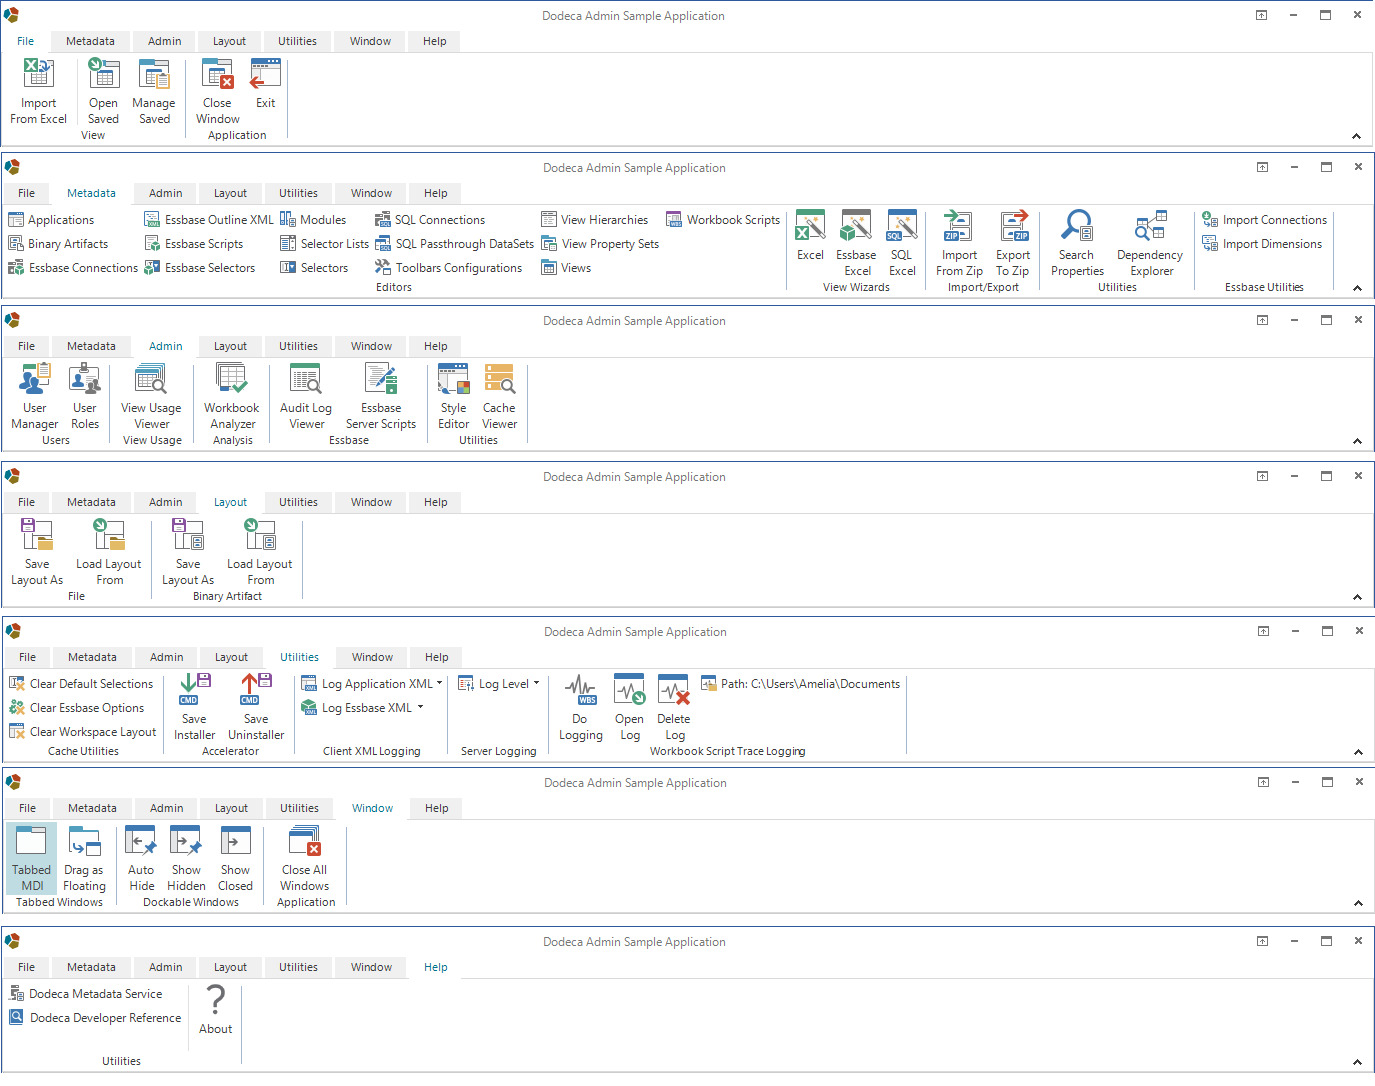
Default Administrator Ribbon
View Ribbon with a Single Home Tab and the Build/Selectors Main Menu Toolbar
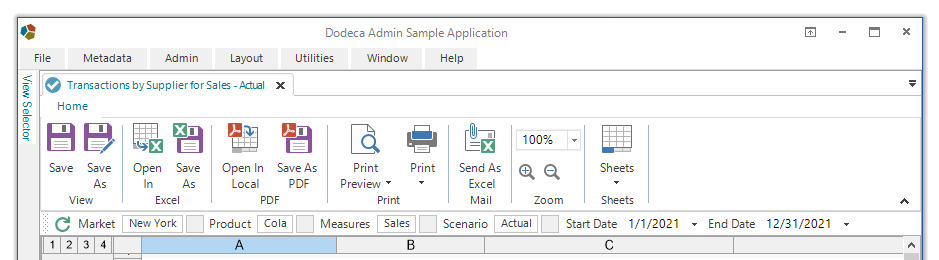
Same View Ribbon with the Ribbon Minimized
View Ribbon with Home and View (Build/Selectors) Tabs

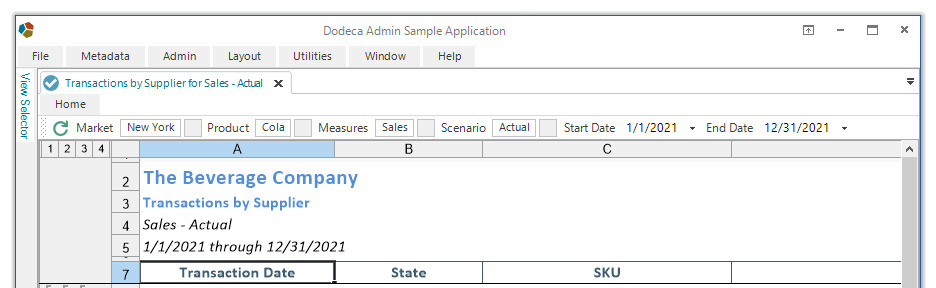
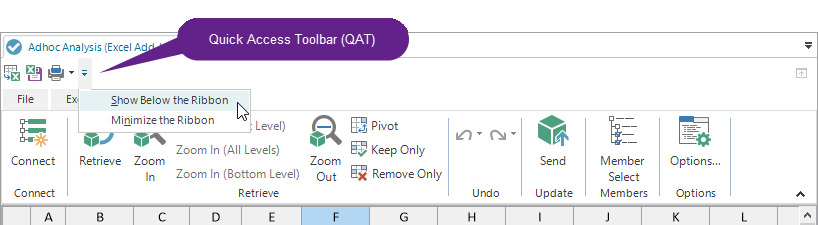
Adhoc View with File, Excel, and Data Tabs, and a QAT (Quick Access Toolbar)
Application Main Menu Bar versus Ribbon
A Dodeca application can use either the default administrator toolbars or use a
toolbars configuration, which is specified as the ToolbarsConfigurationID.
-
When an application’s
UseDefaultAdminToolbarsConfigurationproperty is True, theDefaultAdminToolbarsConfigurationDisplayPolicycontrols whether the tools are presented as a main menu bar or as a ribbon.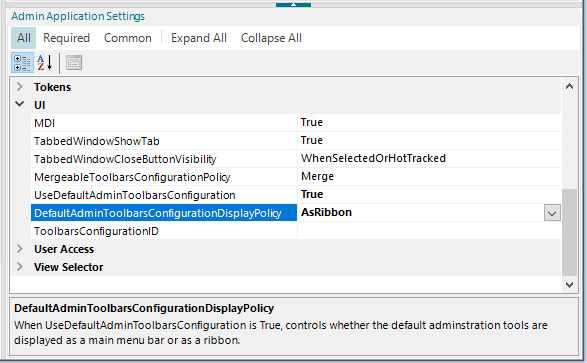
-
When the
ToolbarsConfigurationIDis specified, the referenced toolbars configuration determines whether the tools are presented as a main menu bar or as a ribbon. -
The Essbase Admin Console and Essbase Admin Console Ribbon toolbars configurations, which are included in the metadata-starter-kit, are identical to the default administrator toolbars configuration displayed as a main menu bar or as a ribbon, respectively.
-
In 8.1, the Essbase metadata utilities, Import Connections and Import Dimensions have been moved from the Admin menu/tab to the metadata menu/tab.
View Main Menu Bar versus View Tab
All of the view toolbars configurations, which are included in the metadata-starter-kit, contain a View toolbar (i.e. has "View" as the key"). The View toolbar typically contains the Build view button, and may also contain the Auto Build, Refresh and/or Auto Refresh buttons, and is the default toolbar used for selectors.
In a toolbars configuration, one toolbar can be designated as the main menu bar, which has the following characteristics:
-
It is always visible.
-
It fills the entire dock area row, such that no other toolbar will appear on the same row.
-
All of the tools are always visible, and are wrapped and displayed in multiple rows when the width of the container cannot accommodate the combined width of the tools.
-
Popup menu tools in a main menu bar are not drawn with the downward pointing arrow.
For these reasons, the View toolbar is designated as the main menu bar.
When a view uses a ribbon, the View main menu bar appears below the ribbon.
The main menu bar remains visible when the ribbon is minimized.
Alternatively, the Build (and related buttons) and the selectors can be presented in a ribbon tab.
Toolbars Configuration
The term toolbars configuration was adopted before the introduction of ribbons by Microsoft for the Office applications. The term will continue to be used, but now refers to the configuration of tools as presented in toolbars, a ribbon, or a combination of both.
When assigned as the application’s ToolbarsConfigurationID, or a view’s
ViewToolbarsConfigurationID or MergeableToolbarsConfigurationID,
it is the definition of the toolbars configuration that determines whether the tools are presented in toolbars, a main menu bar, a ribbon, or a combination.
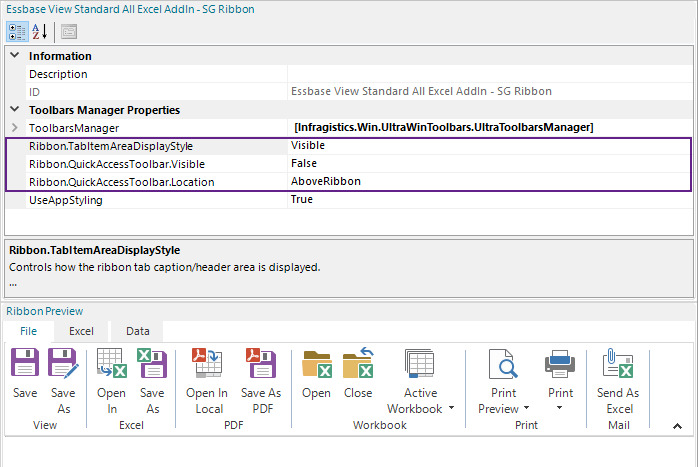
There are 3 new toolbars configuration properties that apply specifically to ribbons.
-
Ribbon.TabItemAreaDisplayStyle- Controls how the ribbon tab caption/header area is displayed.-
Visible - The tab headers are displayed.
-
Hidden - The tab headers are not displayed and the tab header area is not rendered.
-
HideTabs - The tab headers are not displayed, but the tab header area is rendered.
When the ribbon contains a single tab and the display style is set to Hidden or HideTabs, the ribbon cannot be minimized.
-
-
RibbonQuickAccessToolbarVisible- Controls whether the Quick Access Toolbar is displayed in the ribbon. At runtime, if the toolbar does not contain any tools, it is automatically hidden. Use the Ribbon Designer to add tools to the Quick Access Toolbar. -
Ribbon.QuickAccessToolbarLocation- Controls the location of the Quick Access Toolbar, if visible, as either above or below the ribbon.
Ways to Create a Ribbon
Let’s take a look at the different ways to create a ribbon.
-
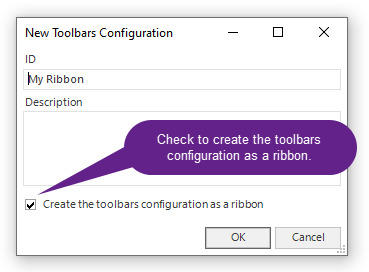
Add a new toolbars configuration as a ribbon.
Use the New tool and check the Create the toolbars configuration as a ribbon checkbox., and then use the Ribbon Designer and Import Wizard to add tabs, groups, and tools.
-
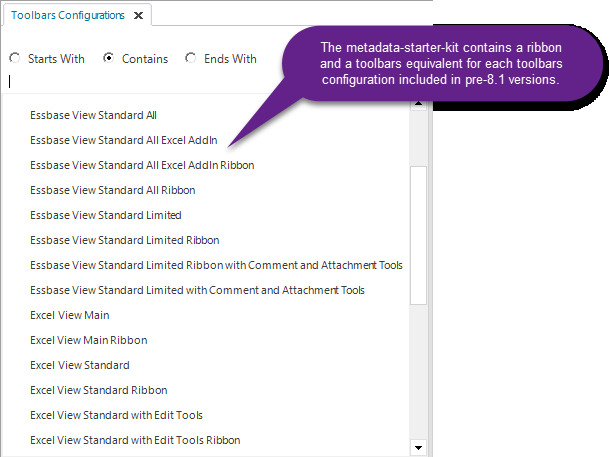
Copy an existing ribbon.
Use the Copy tool to copy an existing toolbars configuration that contains a ribbon, and then use Ribbon Designer to modify or add the tabs, groups, and/or tools. The metadata-starter-kit contains ribbons that can be copied and used as is or modified.
-
Convert a toolbars configuration, which contains only toolbars, to a ribbon.
Use the Convert To Ribbon or Convert All To Ribbon tools to convert a single or multiple toolbars configurations to a ribbon.
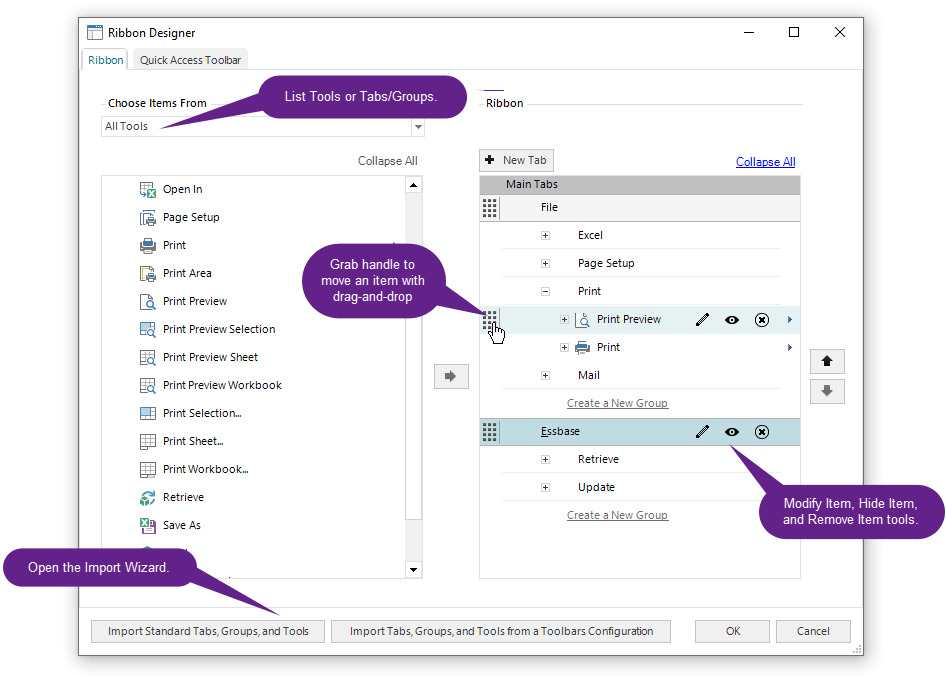
Ribbon Designer
The Ribbon Designer is the UI for editing the ribbon and the Quick Access Toolbar.
Ribbon tabs, groups, and tools can be added, imported, modified, deleted, and rearranged.
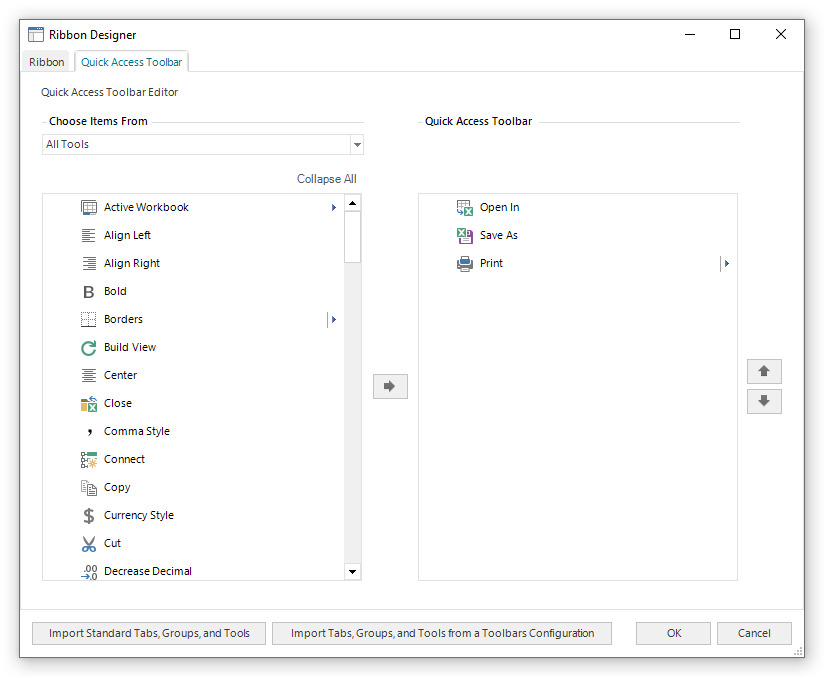
Quick Access Toolbar
A Quick Access Toolbar (QAT) can be added for a ribbon, and be displayed either above or below the ribbon.
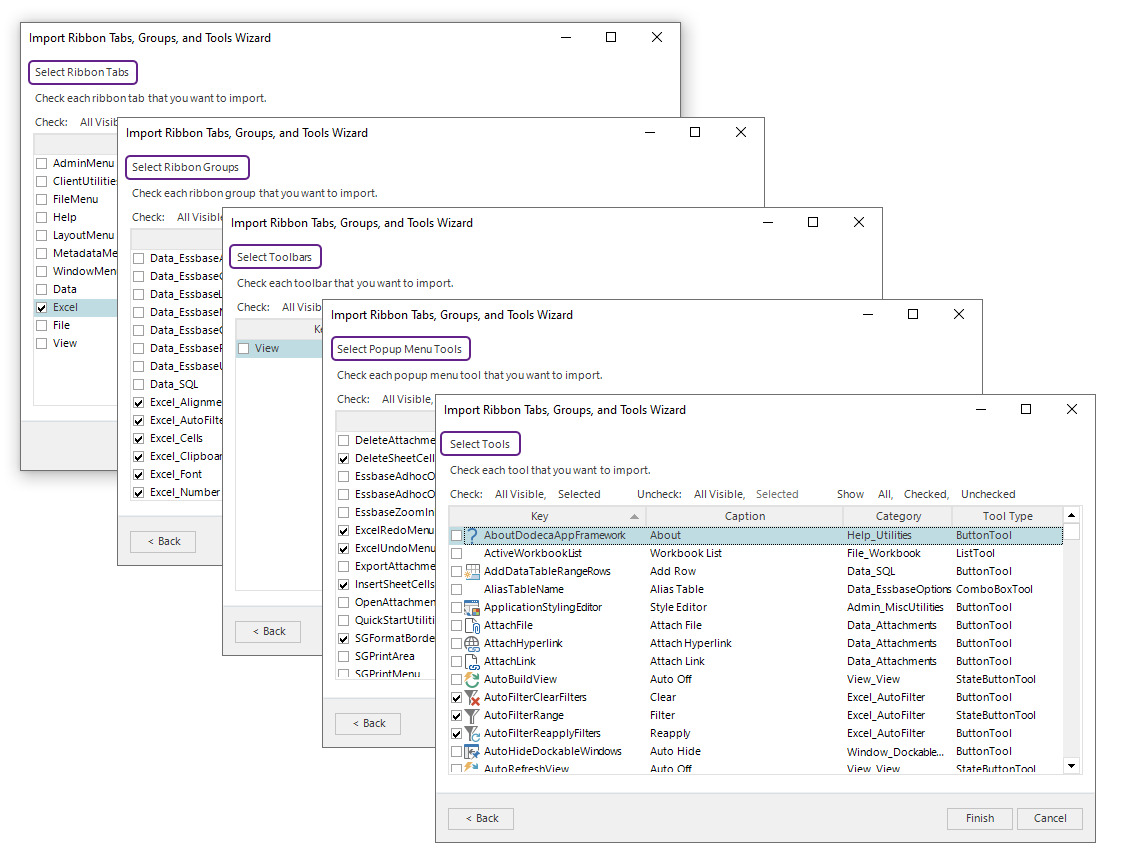
Import Wizard
The Import Wizard is opened from the Ribbon Designer.
-
The Import Standard Tabs, Groups, and Tools supports importing standard tabs (File, Excel, and Data), the associated standard groups, and all the standard tools. The standard tabs and groups are described in the Ribbon Template section below.
-
The Import Tabs, Groups, and Tools from a Toolbars Configuration supports importing tabs, groups, and tools from another toolbars configuration, which represents a ribbon.
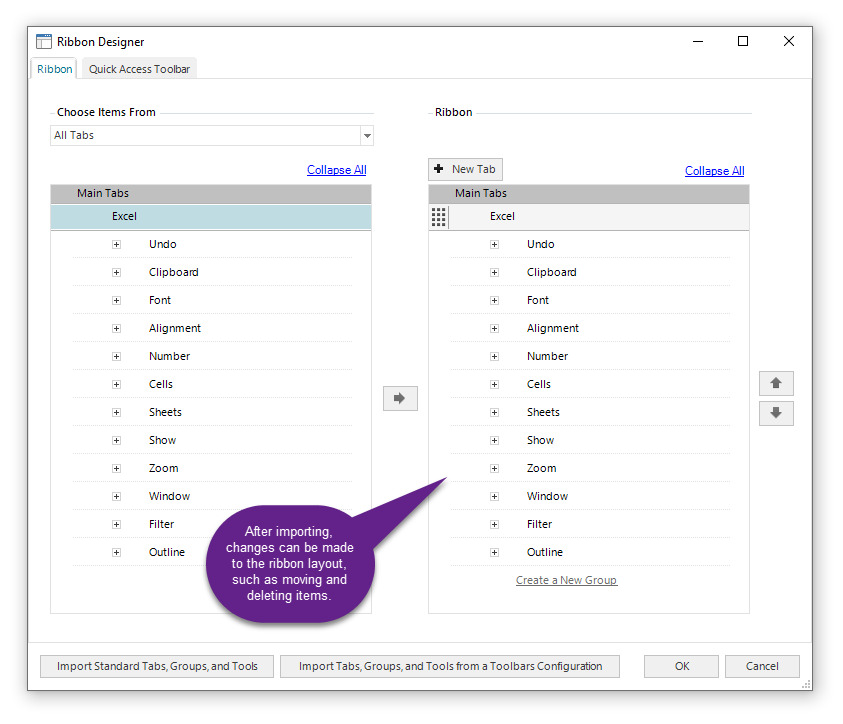
-
After importing, all of the imported tabs, groups, and tools will appear (along with any existing tabs, groups, and tools) in the list of available items on the left.
-
The imported tabs, groups, and tools will also appear in the representation of the ribbon layout on the right.
-
Changes can be made to the ribbon layout, such as moving and deleting items. The changes are automatically reflected in the Ribbon Preview in the editor.
For example, in this screenshot, after importing the standard Excel tab into an new toolbars configuration, the available items list on the left and the ribbon layout on the right are the same.
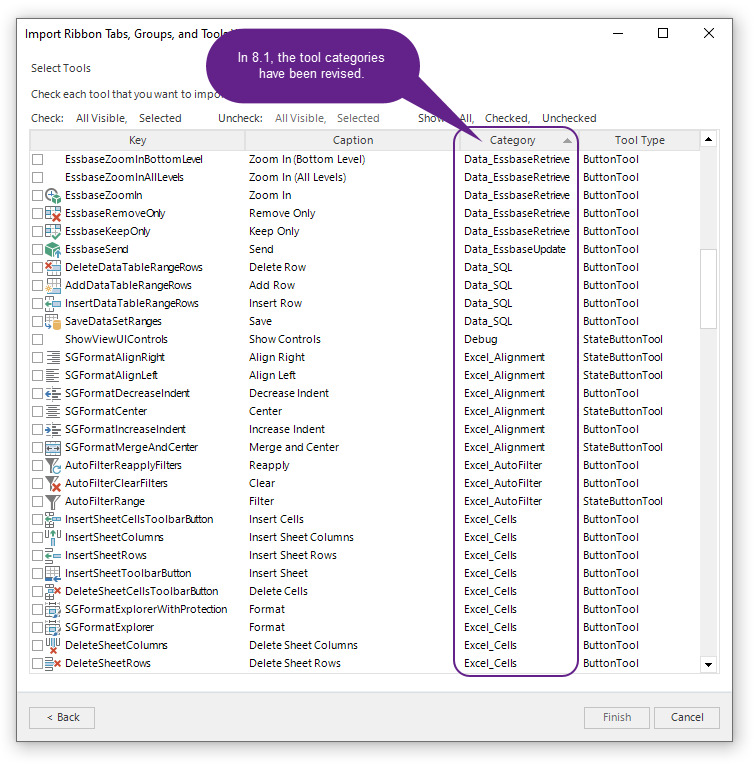
Import Wizard with Standard Tools Sorted by Category
The standard tool categories have been updated to provide an easier way to identify related tools, to represent the association between the standard tabs, groups, and for consistency between the import functionality and the converter.
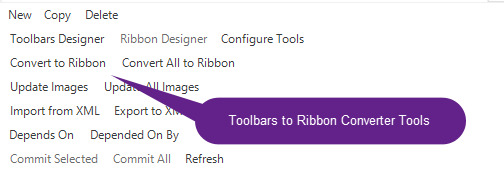
Toolbars to Ribbon Converter
Migrating from Toolbars to Ribbons
With the introduction of ribbons coming late in the evolution of Dodeca, a primary focus of the implementation was to provide a viable migration path to support converting existing toolbars configurations from a toolbars layout to a ribbon layout, with the following objectives:
-
To provide a way for a developer to explore the feasibility of adopting the use of ribbons for existing views.
-
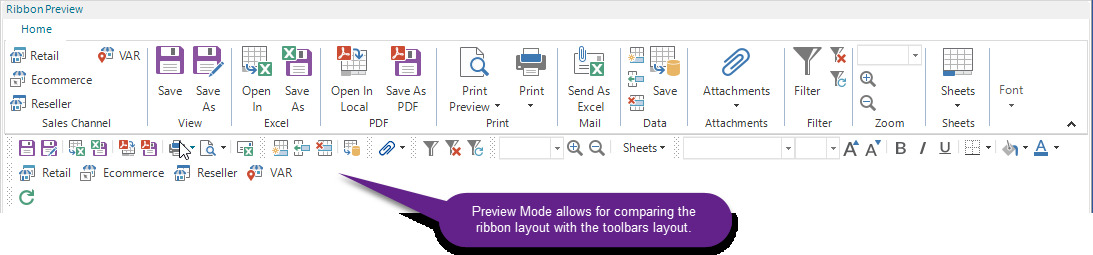
To support the ability to preview and easily compare the toolbars layout and a ribbon layout for the same toolbars configuration.
-
To provide flexibility by supporting optional ribbon tab layouts, while also ensuring consistent, predictable, and acceptable results requiring minimal or no manual editing.
Converter Tools
In the Toolbars Configuration Editor, the Convert to Ribbon and Convert All to Ribbon tools support the conversion of a selected or of the filtered toolbars configurations from toolbars to a ribbon, respectively.
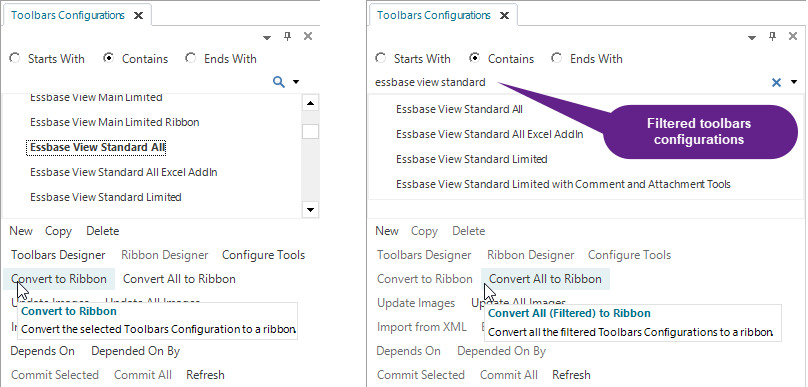
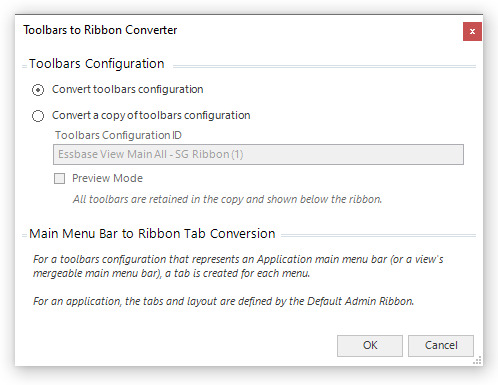
The Convert to Ribbon tool opens the Toolbars to Ribbon Converter dialog.

The Toolbars Configuration section supports the following options:
-
Convert toolbars configuration: Converts and replaces the source toolbars configuration.
-
Convert a copy toolbars configuration: Creates a copy of the source toolbars configuration and converts the copy.
-
Toolbars Configuration ID: The ID of the copy, which defaults to the source "toolbars configuration ID Ribbon".
-
Preview Mode: When a copy is converted, the Preview Mode allows for retaining all of the toolbars. In preview mode, the toolbars configuration is not intended for use with a view at runtime, but allows for a developer to easily compare the tools as presented in a ribbon alongside the existing toolbars layout.
For a view toolbars configuration, the Toolbar to Ribbon Tab Conversion section supports the following ribbon tab layout options:
-
Create a single Home tab: All of the standard and custom tools are added to a single Home tab.
-
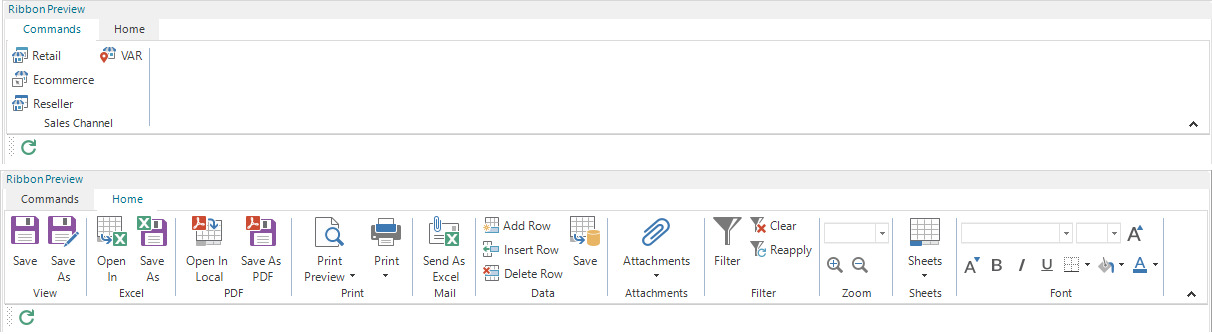
Create a single Home tab and a custom Commands tab: All of the standard tools are added to a Home tab, and custom toolbars are added to a Commands tab as groups.
-
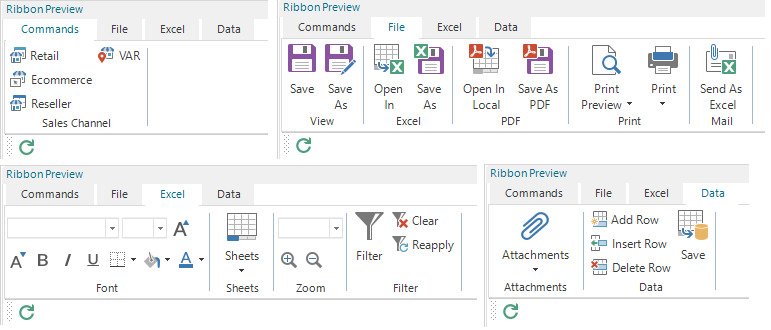
Create File, Excel, Data tabs and a custom Commands tab: Each standard tool is added to the standard File, Excel or Data tab, and custom toolbars are added to a Commands tab as groups.
The Commands tab is always positioned as the first tab.
Examples of View Ribbon Tab Layout Options
This toolbars configuration contains standard tools as well as a custom toolbar, which contains 4 custom tools.

Converted to a Single Home Tab in Preview Mode
Converted to a Home Tab and a Commands Tab
File, Excel, Data, and Commands Tabs
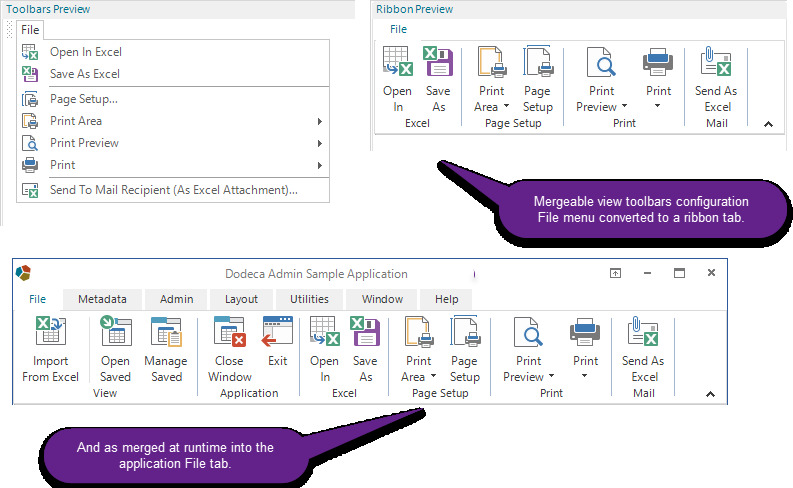
Converting an Application (or mergeable View) Main Menu Bar Toolbars Configuration
When the source toolbars configuration represents an application or mergeable view toolbars configuration, the converter dialog does not contain any conversion options.
When an application main menu bar is converted to a ribbon:
-
A tab is created for each menu.
-
The layout of the groups and tools is the same as the Default Administrator ribbon.
When an mergeable view main menu bar is converted to a ribbon:
-
A tab is created for each menu.
-
The layout of the groups and tools in the File menu is based on the standard File tab layout, as described in the Ribbon Template section below.
This is an example of the a view mergeable toolbars configuration, which contains the File menu, converted to a ribbon, and displayed as merged into the Application ribbon.
Ribbon Template
Internally, a ribbon template is used by the converter. The template defines the following:
-
Standard tabs (File, Excel, and Data)
-
Standard groups (Cells, Print, Retrieve, etc.)
-
The mapping of each standard tool to a standard group, and the layout of the tools within the group.
-
The layout of the standard groups within the standard tabs (File, Excel, and Data).
Standard groups for view-level tools:
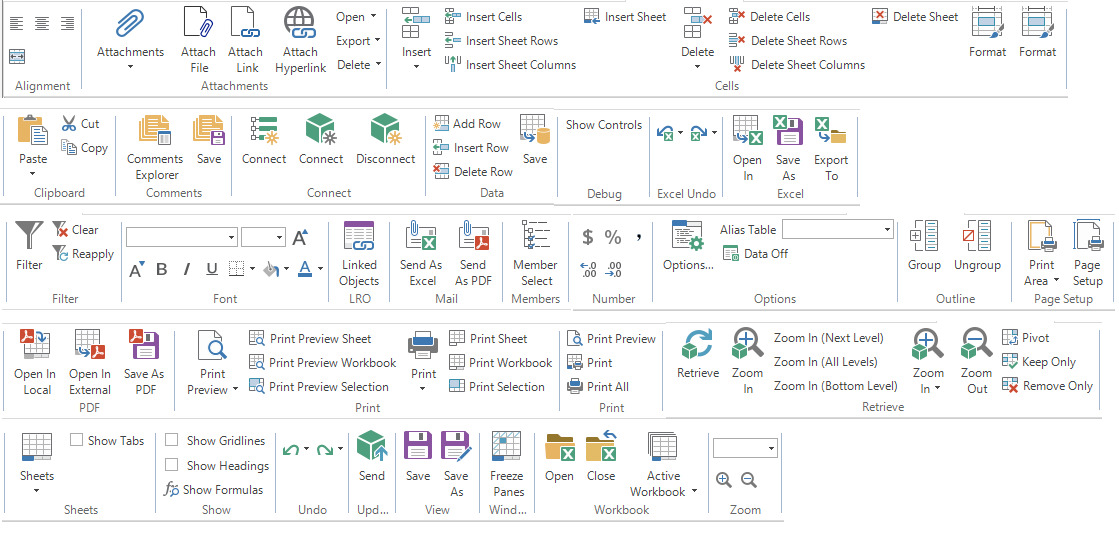
As an example, the Retrieve group contains all of the retrieve-related standard tools. The converter creates the group in the appropriate tab in the ribbon, based on the conversion option, and adds each of the retrieve-related tools in he toolbar to the group based on the layout and sizes of the tools as defined in the template.

For the File, Excel, and Data tabs, the template defines the standard groups in each tab as well as the relative placement of the groups. Each of the groups maps to a standard group as shown in the screenshot above.
File Tab Group Layout

Excel Tab Group Layout

Data Tab Group Layout

How to Add a View Tab to a Ribbon
As described in the View Main Menu Bar versus View Tab section above, the view build-related buttons and selectors can be displayed either in a toolbar or in a ribbon tab.

To add a View tab to a ribbon:
-
In the Toolbars Configuration Editor, select the toolbars configuration and open the Ribbon Designer.
-
Click the Import Standard Tabs, Groups, and Tools button to open the import wizard.
-
Check the View tab.
-
Continue to click the Next button to advance to the Select Tools page.
-
Click the Show Checked button to list only the checked tools. Uncheck any that you do not want in the View tab.

-
Click Finish.

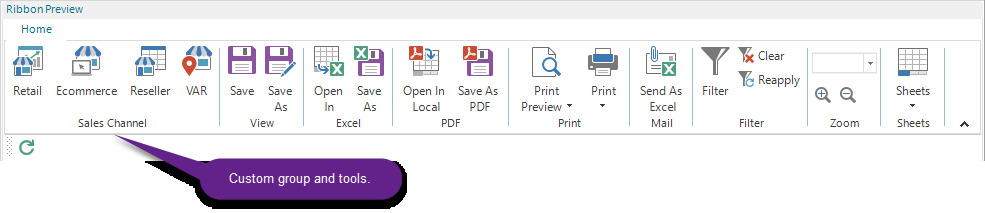
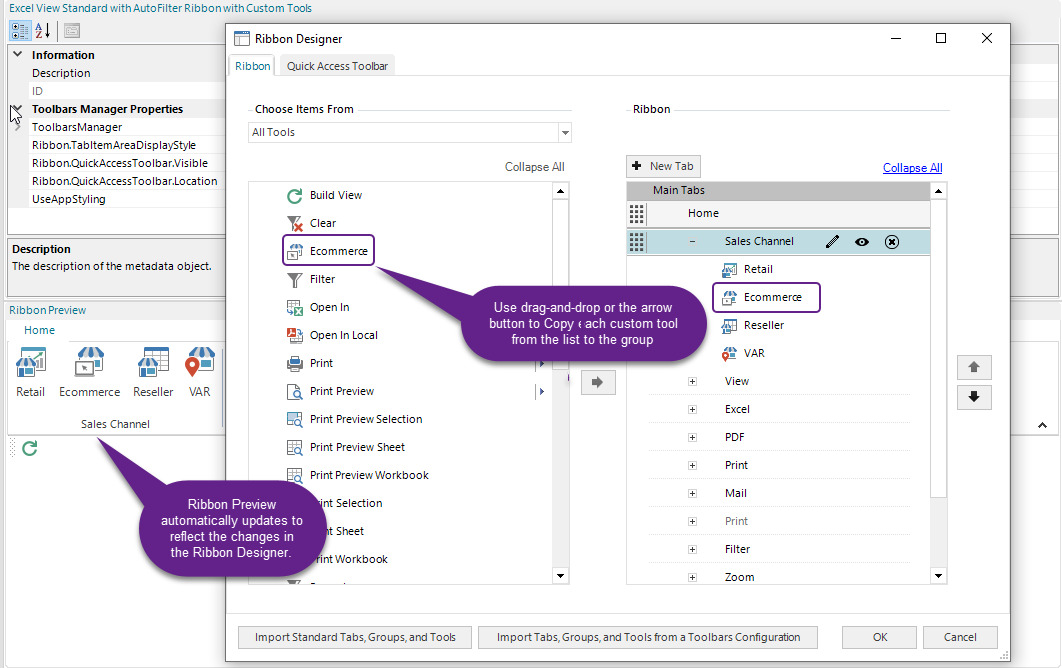
How to Add a Custom Tool to a Ribbon
As an example, this ribbon contains a custom toolbar with 4 custom tools.
The steps to add a custom tool to a ribbon:
-
Add the custom tool to the toolbars configuration using the Toolbars Designer. A consideration when adding a tool to a ribbon is the intended size of the tool in the ribbon, which determines whether a large image is required.
-
Configure the tool using the Configure Tools dialog.
-
Add the custom tool to the ribbon using the Ribbon Designer.
-
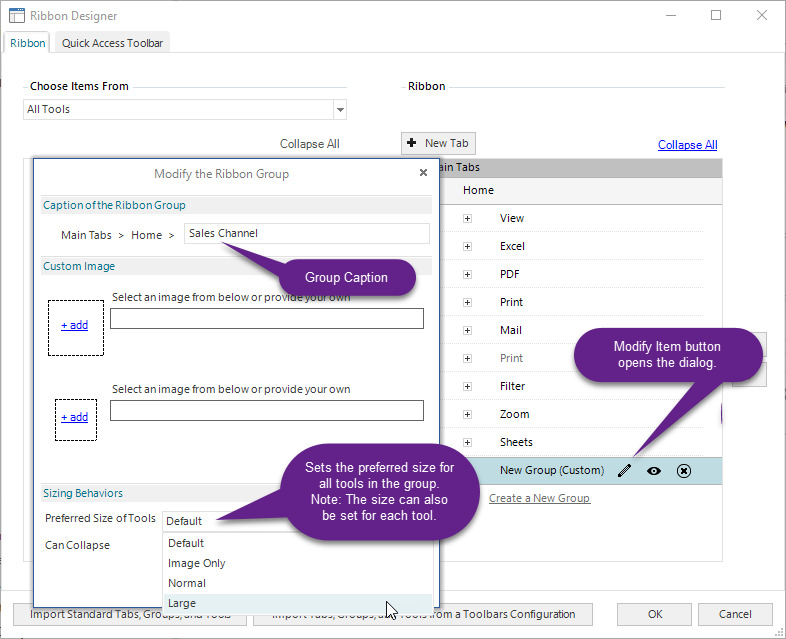
A new tab and new group can be added as needed. In this example, a Sales Channel group was added to the existing Home tab.
-
To set the caption for a new group, click the Modify Item button, which is to the right of the newly added group. The group caption defaults to New Group (Custom), although (Custom) is not actually displayed in the caption.
-
Add the custom tool(s) by dragging and dropping from the list of available tools on the left to the new group. In this example, 4 tools were added to the Sales Channel group: Retail, Ecommerce, Reseller, and VAR
-
The new group can be moved using the grab handle, the Up/Down arrows, or the context menu. The Sales Channel group was moved to be the first group in the Home tab. The Ribbon Preview is automatically updated to reflect the changes.
-
Ribbons and Workbook Scripting
SetToolbarVisible Method
The SetToolbarVisible method has been modified to accommodate ribbons.
-
The ToolbarKey argument can be used to specify the key of a ribbon group.
-
If the view’s toolbars configuration is displayed as a ribbon, the method searches the ribbon tabs to locate a group with the specified key.
-
If a group is found, the visibility of the group is set to the Visible argument value.
-
If the Visible argument value is False, and the associated ribbon tab does not contain any other visible groups, the tab is also set to hidden.
-
If the Visible argument value is True, the associated ribbon tab is also set to visible, if necessary.
-
If a group with the key is not found, and the toolbars configuration also contains toolbars, the method attempts to find a toolbar with the key and, if found, applies the Visible argument value to the toolbar.
SetTool Method
After the Visible argument value is applied to the tool:
-
If the tool is owned by a group, the method sets the group visibility based on whether any tools, which are owned by the group, are visible and then sets the visibility of the group’s tab based on whether any groups, which are contained by the tab, are visible.
Search Metadata Properties
-
Fixed Issue: When the style library associated with the application uses a font size larger than the default font size, the checkboxes in the Metadata Types to Search section of the Search Metadata Properties dialog are displayed in a single row and extend beyond the right side of the dialog. #3044
Security - SamlAuthentication
-
Added support for requesting that one or more specific authentication methods be used to authenticate a user of the application against the upstream identity provider via the
ServiceProviderRequestedAuthenticationContextproperty of theSamlAuthenticationProvider. By default, the identity provider is allowed to choose an appropriate authentication method. #3002
Selector Lists
-
In 8.1, the following selector list properties can be tokenized:
NullLastUsedItemString,NullSelectionText, andNullSelectionTokenValue. #2645
Selector Editor
-
Fixed Issue: In the Selector Editor, when the Delete key is used to delete a selector(s), the Commit button does not become enabled. If the Commit button becomes enabled as the result of another operation and the changes are committed, the selectors deleted with the Delete key are not deleted from the metadata repository. #3081
Selectors
-
In previous versions, a selected item, which contains a blank or the
SelectorList.SelectorcontrolProperties.SelectionTextDelimiter, is enclosed in double quotes as displayed in the selector tool. For example, Hex Nut 1 is displayed in double quotes, because the string contains a blank. Abbas, Syed is displayed in double quotes, becaue the string contains a blank and a comma, which is theSelectionTextDelimiter. #1579
In 8.1, only a selected item containing the delimiter is enclosed in double quotes. So, for example, Hex Nut 1 is no longer enclosed in double quotes, because the string does not contain the
SelectionTextDelimiter, but double quotes are still used for Abbas, Syed.
SQL Connections - Tokenized SQLConnectionID
In 8.1, a SQLConnectionID property can be tokenized. #2712
When a token is specified for the Query.SQLConnectionID used by the SQLPassthroughDataSet
associated with any of the following application authentication services, the
token must be defined in the application’s ApplicationTokens:
-
WindowsUserRolesFromSqlPassthroughDataSet
-
EssbaseUserRolesFromSqlPassthroughDataSet
-
LDAPUserRolesFromSqlPassthroughDataSet
If an application uses the ApplicationTokensSqlPassthroughDataSetID to populate
the application tokens, the SQLConnectionID of the query/queries can be tokenized,
but the token must be defined in the application’s ApplicationTokens.
In the SQLPassthroughDataSet Metadata Editor, the Test Data Set utility resolves
a query’s tokenized SQLConnectionID using the application tokens and the query’s
TestTokens, which allows for testing a token defined as an application token or
a token that will be defined as a view token at runtime.
The Identify Table Columns utility in the Query Editor and Column Editor
also uses the application’s ApplicationTokens and the TestTokens to resolve the
query’s SQLConnectionID.
The runtime tokens, which are the application’s ApplicationTokens, the view’s ViewTokens
as defined in the metadata and those added by the AddToken workbook script method,
can be used as the Query.SQLConnectionID for a SQLPassthroughDataSet associated
with a selector list, a DataSetRange or AutoCompleteRange in a view, or a DataSetID
in a workbook script AddDataCache or BuildDataSetFromRange method.
SQL Passthrough DataSet Editor
-
In 8.1, the Load Test Tokens tool in the SQL Passthrough DataSet Editor supports the option to include tokens from the selected open view that were added by the view’s workbook script using the
AddToken.Generalmethod/overload. The tokens loaded as test tokens always include the application tokens, the view tokens, and the current point-of-view tokens. #2652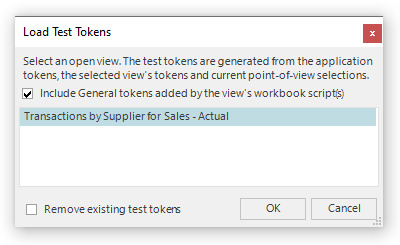
SQL Passthrough DataSets
-
The
Query.DataTableInfo.SelectSQLParametersfunctionality, which was originally added in Version 6.6.0.4194 (11/22/2013), was requested by a customer to leverage performance optimizations gained through the caching of parameterized statements in DB2, but was later determined to not improve performance due to the caching scheme used by the database. We are not aware of any customers using this functionality, and the property has been removed in 8.1. #3010The customer was able to improve performance by leveraging concurrent query execution, supported by the SQLPassthrougDataSet
ConcurrentQueryExecutionEnabledsetting, which was added in Version 6.7.1.4340 (3/11/14).
Outline Viewer
-
In the Formula dialog, which is displayed by double-clicking a cell in the Formula column, messages have been added to indicate when No match is found. and No more occurrences found. #2871
-
The
Escapekey can be used to close the Formula dialog. #2870 -
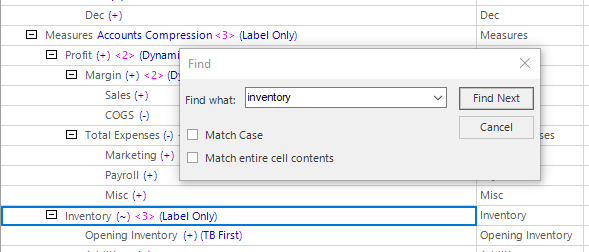
The search behavior of the Find dialog has changed to be more consistent with Excel. The Direction Up/Down options were removed. The search starts at the active cell, searches down, and loops back to the top to continue the search. When the next detected match is the first match initially detected, a No more occurrences found. message is displayed. #2703
User Manager
-
Fixed Issue: In the User Manager, after assigning a role to a user and committing the change, the role is not retained after a refresh. #3046
-
Fixed Issue: In the User Manager, the count of Enabled Dodeca Users (All Tenants), is incorrectly computed as the sum of users for each application, instead of unique users, each of whom may have access to multiple applications. #3076 This issue was introduced in 8.0.0.569.
-
Fixed Issue: The Excel version installed on a end-user’s machine, which is presented in the User Manager, displays as Excel 2016 for Excel 2016, 2019, 2021, and Office 365. #3071
Views - Miscellaneous
-
Fixed Issue: When a view is defined as a singleton, which is controlled by the
AllowOnlySingleInstanceFromViewSelectorproperty, the view cannot be opened from the view selector if the view’s template is open in the View Template Designer. Instead, the View Template Designer window is activated when the user attempts to open the view. #3079 -
A
Notesproperty has been added to all view types. #2244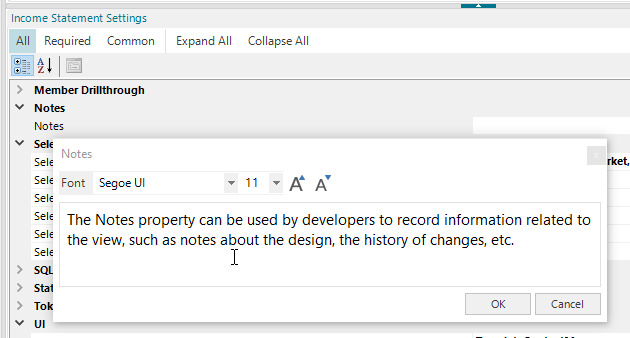
-
The Save (View) As dialog has been modified 1) to not display the minimize/maximize buttons, 2) to not show an icon in the system taskbar, 3) to maintain the position of the Share With button when the dialog is resized, 4) to adjust the location of the Name and Description labels to accommodate the
DodecaTeal_OfficeWhite_Stylelibrary, and 5) to automatically close the dialog when the user clicks the enter key after entering the Name. The Tab key (or mouse) can be used to navigate from the Name field to the Description field. #3006
View Selectors
-
When the application’s
ViewSelectorProperties.AllowEditViewMetadataproperty is True, a SQLPassthroughDataSet associated with a view through theDataSetRangesor theAutoCompleteRangesproperty, can be accessed (i.e. navigated to in the SQLPassthrough DataSet Editor) from the view selector’s context menu. #1571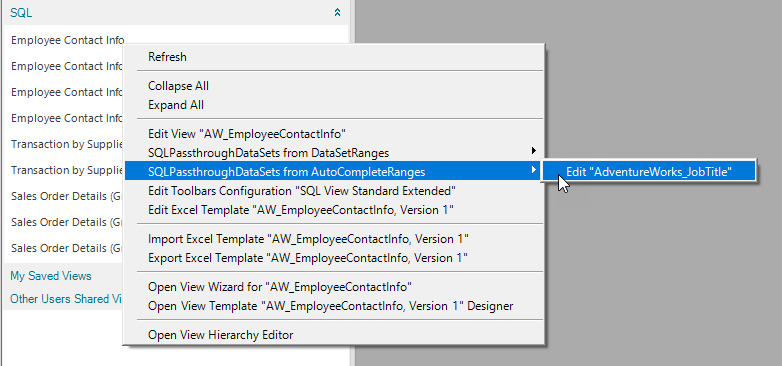
Workbook Script Debugger
-
Fixed Issue: Many functions cannot be evaluated in the Workbook Script Debugger during the
BeforeTokenTableBuildevent. #3028 -
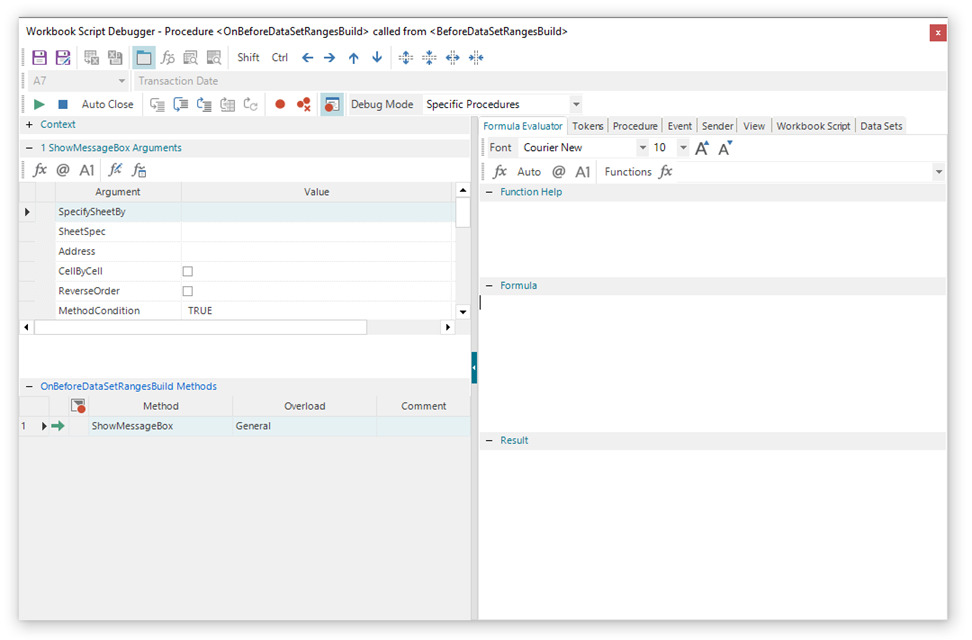
The layout of the Workbook Script Debugger has been changed so that all of the controls which were previously on the Breakpoints tab and used for stepping the workbook script, setting breakpoints, examining argument values, etc. are on the left, and all the remaining tabs are on the right. This allows a developer to be able to view and control the current context while also accessing the functionality available in the Formula Evaluator, Tokens, Procedure, Event, Sender, View, Workbook Script, and Data Set tabs. #2907
-
In 8.1, the Tokens tab in the Workbook Script Debugger supports the ability to replace tokens in a specified string with the tokens defined in the
TokenTable. #1596
Workbook Script Editor
-
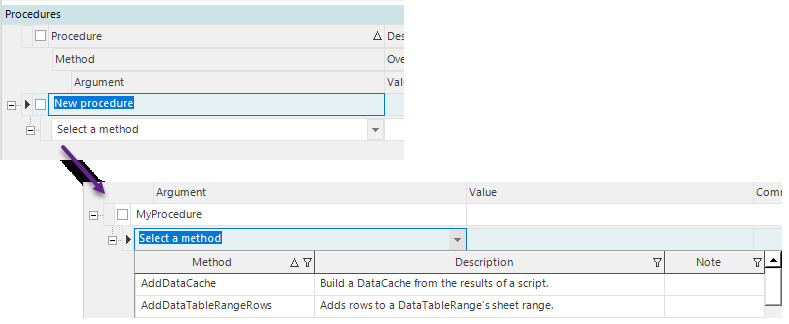
When a new procedure is added by clicking the Add a new procedure tool, a slight change to the user-interface behavior was made to allow the procedure name to be entered before the Method dropdown list is displayed. #2044
-
To improve the user-interface for entering descriptions and comments and to also allow for multiple lines to be to entered, the Workbook Script
DescriptionandComments, PropertyComment, Event LinkComment, and ProcedureDescriptioncan be edited in a new Text Editor, which is opened by clicking the button to the right of theDescriptionorCommentfield. #2943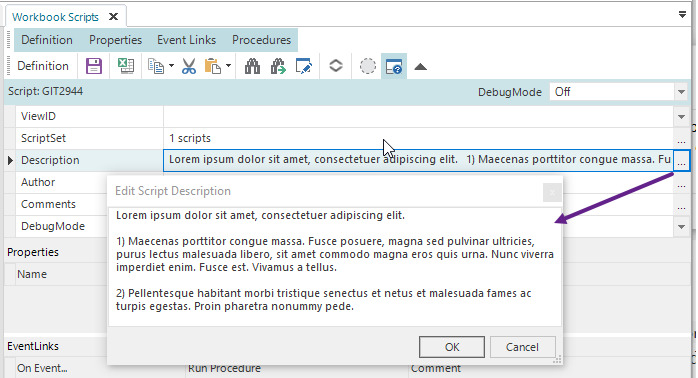
-
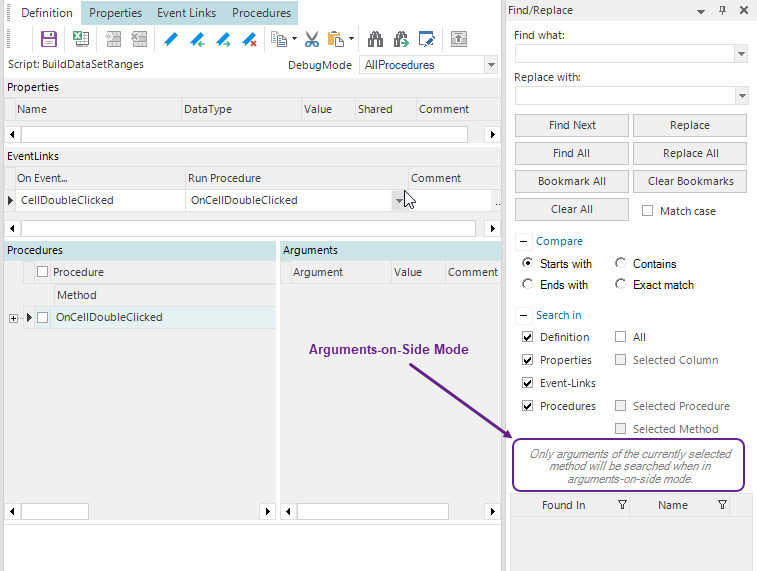
When method arguments are displayed on-the-side, the Find/Replace functionality only searchs the method arguments of the current selected method. A note has been added the Find/Replace control to serve as a visual cue of the limitation. #2882
-
A new Paste After tool has been added to support the ability to paste a copied item after the selected item. The tool is available in the tool bar and in the context menu. #2731

-
Fixed Issue: When the method arguments are displayed on the side (using the Arguments on side toggle tool), attempting to paste into a method argument value or comment field, fails with the following error: Object reference not set to an instance of an object. #3060
-
Fixed Issue: The order of
ShowScriptDebuggerandThrowExceptionmethod arguments is inconsistent with other methods. #3058
Workbook Script PseudoCode
The Workbook Script PseudoCode documentation contains the following sections:
-
What is Workbook Script PseudoCode?
-
PseudoCode Uses and Benefits
-
Notepad++
-
PseudoCode File Layout and Content
-
PseudoCode Examples
-
Workbook Script Editor PseudoCode Tools
-
PseudoCode Options Editor
What is Workbook Script PseudoCode?
Workbook Script PseudoCode is a text-based representation of the logical sequence of the events, procedures, and methods as executed by a workbook script. It slightly resembles a programming language in the use of syntax, such a curly brackets to delimit nested blocks, as well as workbook scripting constructs, such as method and method argument names, etc. #2942
PseudoCode Uses and Benefits
PseudoCode is a tool that can be used throughout all phases of workbook script development. Some of the potential uses and benefits include the following:
-
Review and verify the logic implemented by a workbook script is as intended.
-
Identify flaws or technical inaccuracies, such as incorrect argument values, formulas, etc.
-
Identify possible optimizations.
-
Facilitates peer review and mentoring.
-
Provides a level of transparency not previously possible.
-
Serves as documentation.
Notepad++
Notepad++ is the preferred text editor for viewing pseudocode. The pseudocode file extension can be either .txt or .wbs. A Notepad++ UDL (user-defined language) is defined for the .wbs extension, and is included in the metadata-starter-kit as a Binary Artifact.
To use the UDL, do the following:
-
Import the
WbsPseudoCode Notepad++ UDLbinary artifact from the metadata-starter-kit. If you do not have access to an installation of the Dodeca Framework, contact support@appliedolap.com.

-
From the Binary Artifact Editor, export the
WbsPseudoCode Notepad++ UDL.xmlfile from the artifact. -
Copy the file to the Notepad++ User Defined Language folder, such as C:\Users\<username>\AppData\Roaming\Notepad++\userDefineLangs.
-
Associate the .wbs extension with Notepad++.
PseudoCode File Layout and Content

PROPERTIES: Properties listed in alphabetical order by name, and includes the DataType, Shared status, Value, and Comment.
EVENT LINKS: Event links ordered either as listed in the workbook script, alphabetically, or in logical sequence, and includes the related procedure name, active or inactive status, and comment.
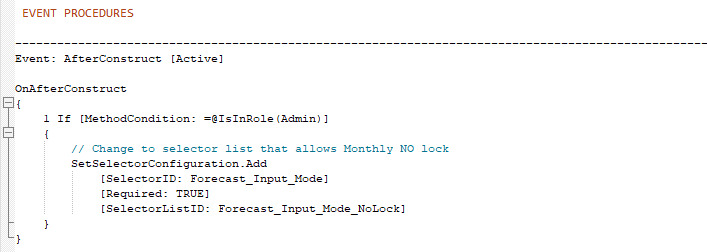
EVENT PROCEDURES: Contains the representation of the executed logic of each event-related procedure.
NON-EVENT PROCEDURES: Contains the top-level procedures that are not called within the context of an event.
WARNINGS: Contains discrepancies or indications of potential issues related
to the SpecifySheetBy, SheetSpec, Address, CellByCell, DataSetID, ScriptID,
and procedure name arguments. Each warning includes the procedure, method, warning
and a line #.
PseudoCode Examples
The logical runtime sequence of the execution of a workbook script’s procedures is based on the following structure:
-
A workbook script consists of events links with associated procedures.
-
A procedure is executed when the associated event occurs.
-
A procedure contains a list of methods, which are executed in the same order as listed.
-
Methods, such as
ExecuteProcedureandForEach, execute another procedure, which may also contain methods that execute a procedure.
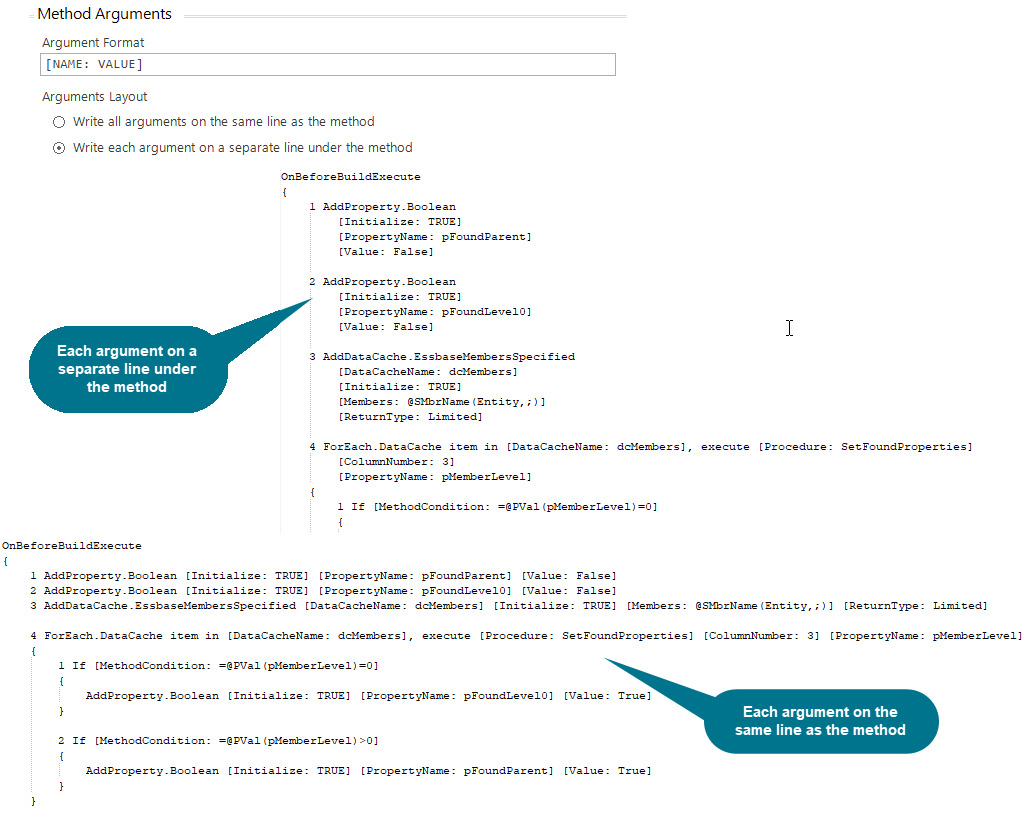
Pseudocode represents the logical sequencing as nested blocks of script. The pseudocode delimits a nested block of script with opening and closing curly brackets and indentation.
-
Each procedure is represented as a block of script.
-
A method condition, a cell-by-cell loop, and a cell condition is each represented as a nested block of script.
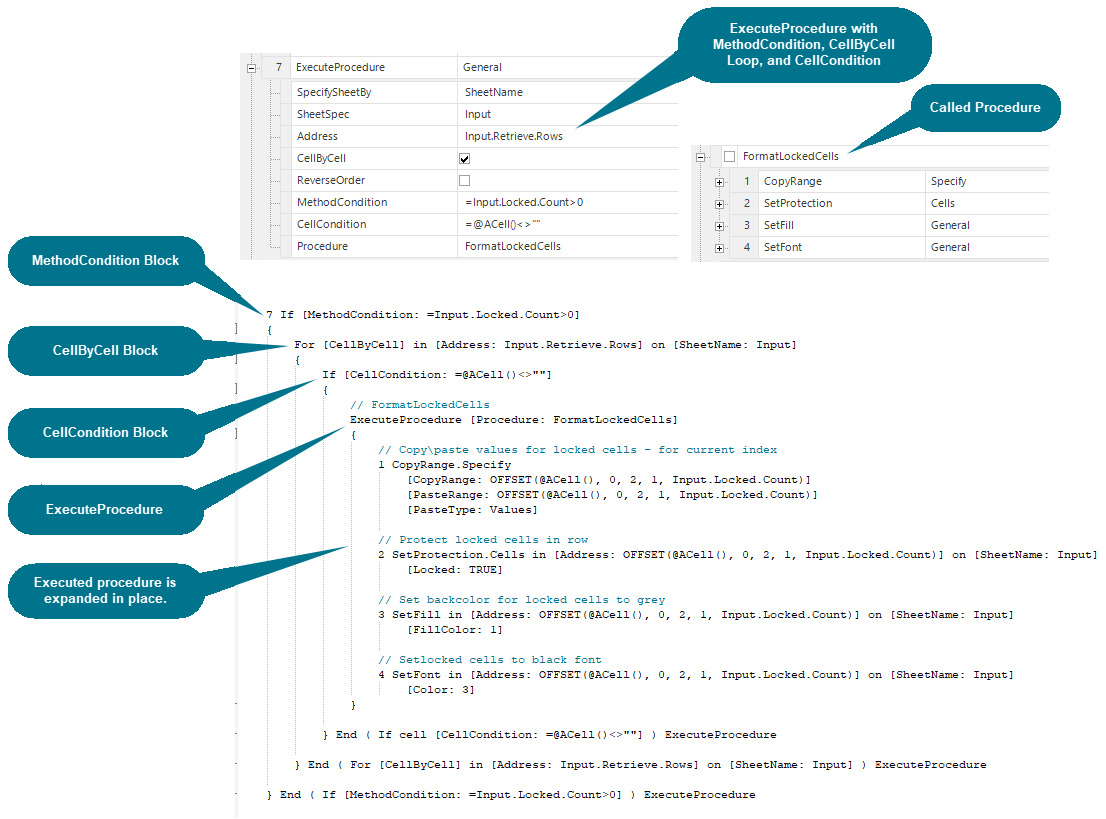
-
Methods with optional procedure arguments, such as the
CancelEventmethod’s CancelProcedure argument, and the On<Event>Procedures for methods, such asSetControl, also embed the executed procedure as a nested block.
Workbook Script Editor PseudoCode Tools
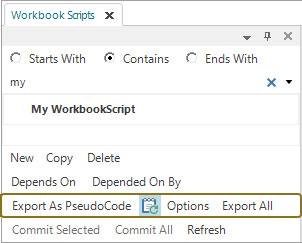
The PseudoCode tools are accessed from the Workbook Script Editor.
-
Export as PseudoCode: Exports the selected workbook script as a pseudocode text file.
-
Automatically Open PseudoCode File: When turned On, the pseudocode file is automatically opened in the default text editor when the export is complete.
-
Options: Opens the PseudoCode Options dialog, which contains the content and format options.
-
Export All: Exports all the workbook scripts as pseudocode text files to a specified folder.
PseudoCode Options Editor
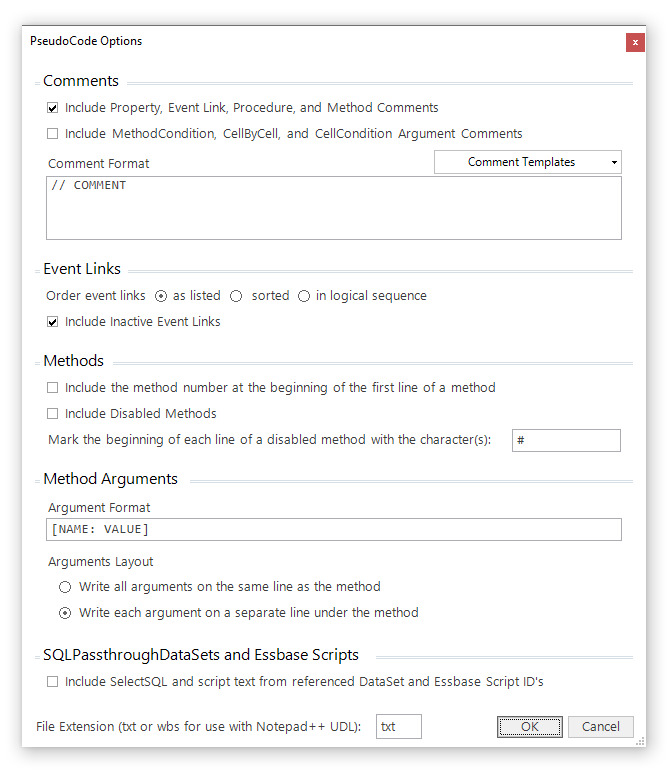
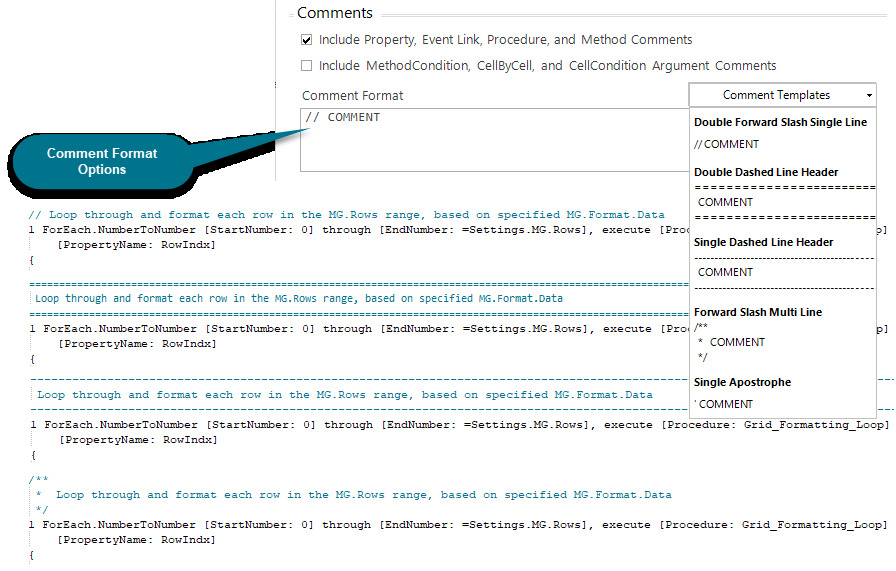
Comments Options
Event Links Options
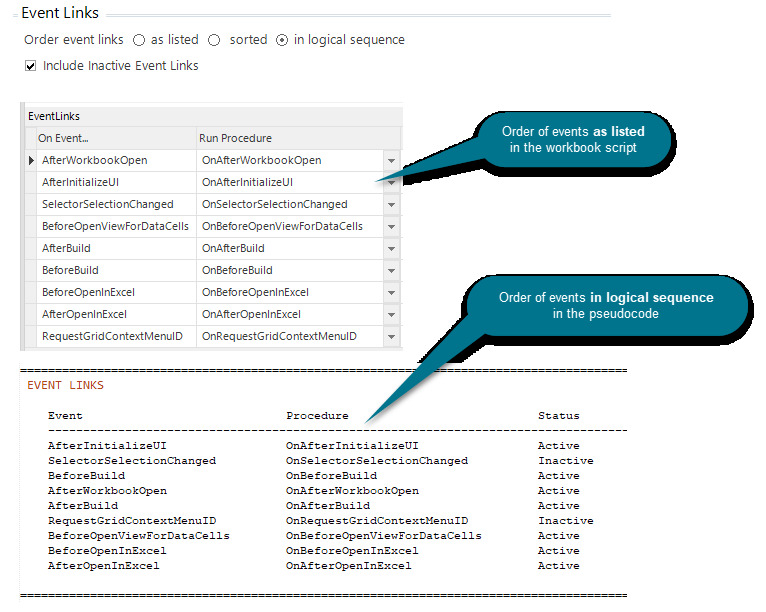
When ordered in logical sequence, the event links are listed in the most probable or predictable order, which is not necessarily the exact runtime order. For example, during a build, the ActiveSheetChanged or RangeChanged events may be raised, but that isn’t predictable.
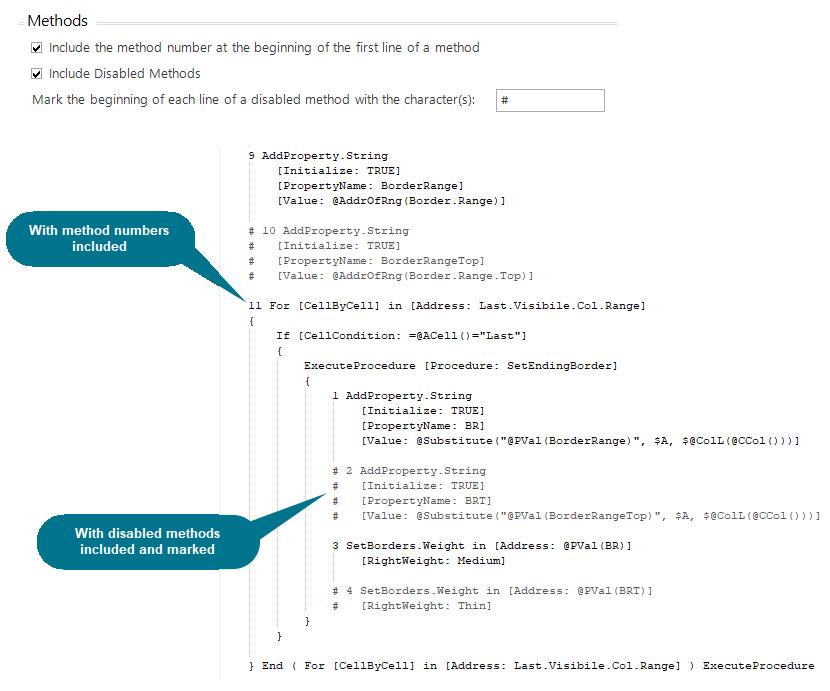
Methods Options
Method Arguments Options
SQLPassthroughDataSets and Essbase Scripts Option

Workbook Script - Utility Scripts
Workbook Script ScriptSets capability was introduced in version 8.0.0.569 to
facilitate the Dodeca no code / low code environment by making Workbook Scripts
easier to write and maintain, while also enabling Workbook Script reuse
and readability. #3061
In 8.1, a set of Utility workbook scripts is being made available to serve as an
example of how ScriptSets can be used to easily tailor view behavior without
significant Workbook Script experience.
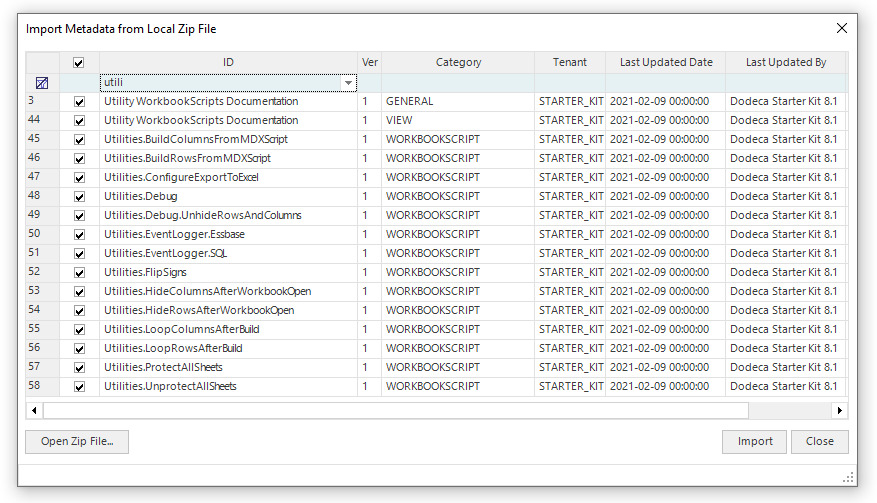
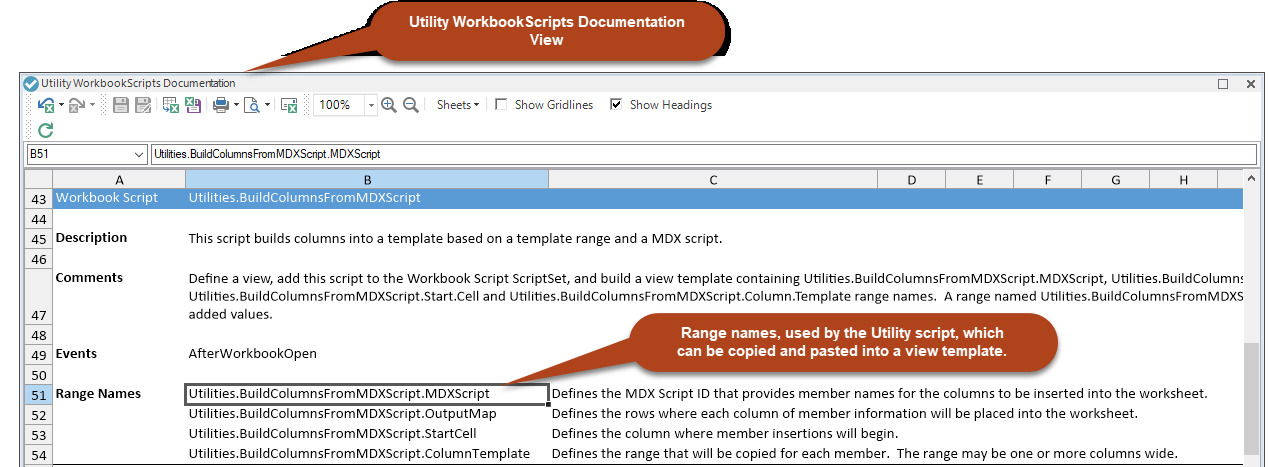
The Utility workbook scripts can be imported from the metadata_starter_kit.zip, which is in the Metadata folder of the Dodeca Framework installation. Also included is a Utility WorkbookScripts Documentation view and template, which provides a description and instructions for how to use each utility script.
The following Utility workbook scripts are included:
-
Utilities.BuildColumnsFromMDXScript– This script builds columns into a template based on a template range and a MDX script. -
Utilities.BuildRowsFromMDXScript- This script builds rows into a template based on a template range and a MDX script. -
Utilities.ConfigureExportToExcel– This script configures the tools necessary for exporting an Essbase view to Excel. This capability is used in conjunction with the Import View from Excel tool in order to update Essbase with values stored in a disconnected input workbook. -
Utilities.Debug– This script contains debug utilities, which unhide the cover to display the worksheet, and display the formula bar, Excel row and column headers, and gridlines. -
Utilities.Debug.UnhideRowsAndColumns– This script contains a debug utility to unhide all rows and columns in theAfterBuildevent. -
Utilities.EventLogger.Essbase– This script logs all events, including Essbase and SQL events, in an Essbase view type along with their event arguments. -
Utilities.EventLogger.SQL- This script logs all events in a SQL view type along with their event arguments. -
Utilities.FlipSigns– This script loops theUtilities.FlipSigns.Addressrange cell-by-cell in theAfterBuildevent and flips the signs on any cell that is not protected and that has a numeric formula. This script loops all worksheets and skips the worksheet if it does not have the required range name. -
Utilities.HideColumnsAfterWorkbookOpen– This script uses theUtilities.HideColumnsAfterWorkbookOpen.Columnsrange name to conditionally hide columns in the template in theAfterWorkbookOpenevent. -
Utilities.HideRowsAfterWorkbookOpen- This script uses theUtilities.HideRowsAfterWorkbookOpen.Rowsrange name to conditionally hide rows in the template in theAfterWorkbookOpenevent. -
Utilities.LoopColumnsAfterBuild- This script uses theUtilities.LoopColumnsOnActiveSheet.Columnsrange name to loop columns in the template in theAfterBuildevent. The columns are processed in reverse order from last column to first column in order to support deletion of a column during processing. -
Utilities.LoopRowsAfterBuild- This script uses theUtilities.LoopRowsOnActiveSheet.Rowsrange name to loop rows in the template in the AfterBuild event. The rows are processed in reverse order from last row to first row in order to support deletion of a row during processing. -
Utilities.ProtectAllSheets- This script restores protection on all worksheets in theAfterBuildevent. -
Utilities.UnprotectAllSheets- This script unprotects all worksheets in theAfterWorkbookOpenevent.
The Utility scripts use Excel range names in the view template, as needed, to pass parameter values from the view template to the workbook scripts. The Utility WorkbookScripts Documentation view, which is included in the metadata_starter_kit.zip, documents the range names and can be used as a source for copying and pasting into the view template.
To do so, open the view from the View Editor using the Preview button. Then, for easier access, double-click the Utility WorkbookScripts Documentation view tab to float the view window and move the window to a location that is convenient for copying the names, as needed, from the view and pasting into the template.
Workbook Scripting
-
New Method Argument: An
AutoAddRetrieveSubRangeshas been added to theEssbaseRetrievemethod. #1816 -
New Method Argument: The
SaveAllargument has been added to theSaveDataSetRangesmethod. To save a specific data set range, the DataSetRangeName argument should be specified to indicate the name of the data set range to save. To save all data set ranges, the SaveAll argument should be set to TRUE. When the SaveAll argument is blank or resolves to FALSE, the DataSetRangeName argument is required. #2623 -
New Method Argument: A ZipFileName argument has been added to the
SendEmailmethod. If the ZipAttachments argument is TRUE, the ZipFileName indicates the name of the attached zip file. If not specified, the view’s name is used as the file name. #2803 -
New Method Argument: A SyncTokens argument has been added to the
AddTokenandAddTokensForSubstVarsmethods. The argument allows a developer to control whether the method pushes all the existing view tokens to the runtime tokens when a View token is added, and similarly, whether the method pushes all the existing application tokens to the runtime tokens when an Application token is added.The automatic synchronizing of all of the existing view tokens with the runtime tokens when a view token is added, can be problematic in complex scenarios where the workbook script, for instance, is adding view tokens in the
RequestGridContextMenuIDevent as well as in other events that occur during the build processing.In general, if a View token is being added in the
RequestGridContextMenuIDfor the purpose of sharing with a view opened by the workbook script or a workbook script associated with aWorkbookScriptToolController, setting the SyncTokens argument to FALSE is advised.By default, the argument value is TRUE, to be consistent with the behavior in previous versions. #2831
-
New Method Overload: The
SetSelectorConfigurationmethod has a new overload,ResetAllEssbase, which allows for the following connection-related properties to be set for all Essbase selectors: ConnectionPolicy, ConnectionID, EssbaseLoginServiceObjectTypeID, UseAliases, and AliasTableName. #2710
-
New Method Overloads: In version 8.0.0.569, the
CommentOperationsmethod was added with a single overload,Load. In 8.1, overloads have been added that replicate the functionality supported by theCopy.CommentsandSetCommentmethods. Although these methods will continue to be supported, theCommentOperationsconsolidates all comment-related operations as overloads into a single method. #3084Existing Method.Overload CommentOperations Overload SetComment.Add
Add
CopyComments.General
Copy
SetComment.DeleteByCommentID
DeleteByCommentID
SetComment.DeleteByKeyHash
DeleteByKeyHash
SetComment.Save
Save
N/A
Load
-
Modified Method: The format of the timestamp written to the log file for each log entry by the
WriteLogMessagemethod has been changed to, for example, 2022-02-02T11:53:05.631. #3059 -
Fixed Issue: When the
BinaryArtifactOperations.CreateFromWorkbookmethod/overload is used and the Filename argument is not specified, or the specified value does not include an extension, the Excel file in the binary artifact will also not contain an extension, which can result is various issues depending on how the binary artifact is subsequently used. This issue was introduced in 8.0.0.569. #3068 -
Fixed Issue: When the
SendEmail.ServletSMTPmethod/overload is used with IsHtmlMessage = TRUE and ImageBaseURL is not specified, the method will fail with the following error: Unable to send mail. no protocol. #3049 -
Fixed Issue: The
SQLExceptionOccurredevent link cannot be used by a workbook script to detect when a SQL error occurs as a result of calling theBuildRangeFromScript.SQLPassthroughDataSetor theAddDataCache.SQLPassthroughDataSetmethod/overload. #3026 -
Fixed Issue: The
AddDataCacheDelimitedStringandCartesianListoverloads do not honor the TrimLeft and TrimRight arguments, and always trim whitespace from the left and right of each value. In 8.1, to avoid introducing changes that might break existing workbook scripts, if not specified, the default value of TrimLeft and TrimRight for theDelimitedStringandCartesianListoverloads is TRUE; whereas, for all other overloads, the default value of TrimLeft and TrimRight is FALSE. When non-blank, the specified argument value is used. #2601
-
Fixed Issue: When the
AddTokenmethod is used to add tokens in theBeforeDataSetRangeSaveevent, the newly added tokens are not replaced in theInsertSQL,UpdateSQL, andDeleteSQLstatements. While this issue has been addressed in 8.1, it should be noted that theGeneraloverload must be used for token replacement to occur. #3039 -
Fixed Issue: When using the
SQLPassthroughExecutemethod, if the last statement in the value specified as the Statements argument, ends with a semicolon, the following error occurs: SQL statement to execute cannot be empty or null. Of the databases tested, this error occurs when using Oracle, and not SQL Server. #3001 -
Fixed Issue: When using nested
CellByCellexecution in an asynchronous view, a very large collection of tasks could be produced and, because of frequent enumeration, cause degraded performance. #2999 -
When a workbook script uses secondary workbook scripts, which are the scripts included in the
ScriptSet, a secondary script is able to call a procedure defined in the primary script without qualifying the procedure name with the primary script ID. This allows for a script to be used as a secondary script in different workbook scripts as long as the primary script contains the referenced procedure. #3082
WorkbookScriptToolController
In previous versions, the WorkbookScriptToolController can be assigned to a
Button, StateButton, ComboBox, TextBox, or PopupColorPicker tool. In 8.1, the
WorkbookScriptToolController can also be assigned to a PopupMenuTool, which
has a DropDownArrowStyle of Segmented or SegmentedStateButton. When segmented,
the PopupMenuTool contains a button and a dropdown menu, and is treated as a Button
tool by the tool controller when the user clicks the button. #2938