Introducing Dodeca
Dodeca is a user interface for Oracle Essbase, relational systems, and many other corporate data sources. It is also an application development and deployment platform that can be used to create robust desktop applications that are deployed as quickly and easily as web applications. This guide provides the Administrator with detailed information on how to create and direct the content which will be accessible to users within the Dodeca interface.
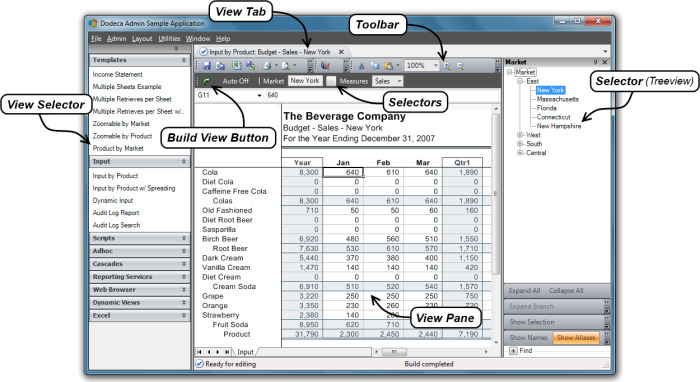
Below is a graphic showing a typical Essbase view in Dodeca. A View is launched by selecting a view name from the View Selector panel on the left. Upon selection, a view is launched into its own View Pane, which displays the content of the view selected. In the case below, the selected view shows an Excel template that has been filled with Essbase data. After selecting the view, the user filtered the information retrieved from the database by choosing a ‘Market’ in the Selector panel on the right. This view features a Selector configured to display selection criteria in a treeview of members read directly from the Essbase outline. After selecting the appropriate filter(s) from the selectors, the user clicked the Build View button, which automatically retrieves the appropriate Excel template from the Dodeca server and fills it with data from Essbase. The Toolbar allows the user to perform the appropriate actions on the view as determined by the administrator. When the user has multiple views open simultaneously, he or she can navigate between the open views by clicking on the View Tab.
Although the user only sees the Dodeca interface as in the example above, a Dodeca system is actually comprised of three tiers:
-
The Client Tier, which contains the user interface layer.
-
The Middle Tier, which contains the Dodeca Services for storage and retrieval of metadata related to Dodeca’s appearance and behavior. This tier also contains the Essbase and Analytical Provider Services for access to and transfer of Essbase data and metadata.
-
The Data Tier, where the Essbase and relational database servers reside.
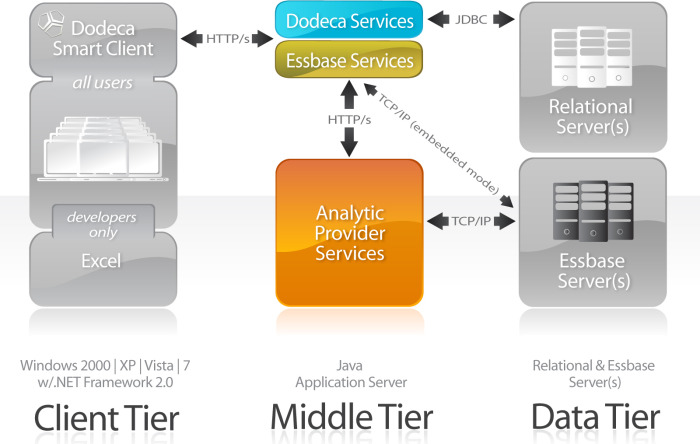
The above graphic illustrates a typical configuration of the tiers.
The Dodeca Client Tier user interface, also known as the Dodeca Smart Client, is completely controlled by metadata stored in a relational database on the Data Tier in the Dodeca Metadata Store. This relational database, created during the installation, becomes part of the overall Dodeca system and contains multiple tables that house the metadata information. When a user requests a Dodeca view, the Client Tier via web services requests the pieces of metadata necessary for that view, which communicate with the Dodeca Services in the Middle Tier. The requested metadata is then queried from the Dodeca Metadata Store on the Data Tier via Java Database Connectivity ("JDBC"), converted to web-services XML format, and passed back to the Client Tier. The metadata is intelligently cached on the Client Tier in an as-requested manner to minimize network traffic. Similarly, Dodeca Smart Client "talks" to the Essbase Services on the Middle Tier to facilitate access to and transfer of Essbase data and metadata from the Essbase server on the Data Tier.
The Role of Metadata
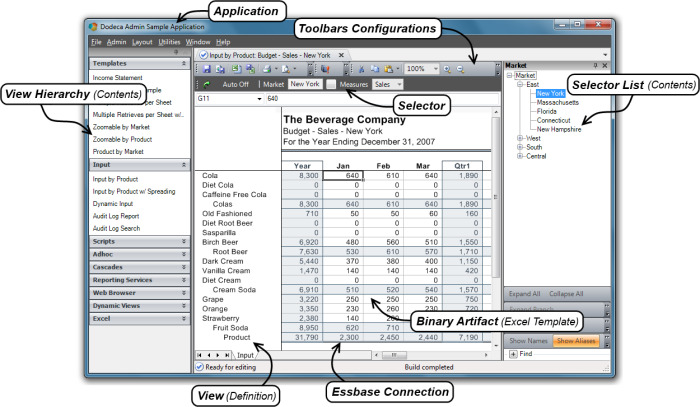
There are several types of metadata at work in a Dodeca system. The graphic below shows several different types of metadata configurable by administrators, as well as the areas affected by configuration in a typical view.
The different types of metadata Dodeca administrators can configure include:
- Application
-
The Application controls the general look and feel of the Dodeca Smart Client. This includes the color scheme, splash screen, toolbars, menu, view selector type, and view hierarchy (or hierarchies) available to the end user.
- View Property Sets
-
The View Property Sets are optional metadata settings that can be used to control the configuration and behavior of multiple views as a group.
- View Hierarchies
-
The View Hierarchies provide the lists of views available to a user, as well as the organization of those views in the list.
- Selectors
-
The Selectors are the objects that define the dimensions or sources from which users may make selections to filter their views. Selectors also define the tokens that may be used to substitute into worksheets, Essbase report scripts, Essbase calc scripts, and SQL scripts.
- Selector Lists
-
The Selector Lists define the contents of the list from which a user may choose a selector, as well as the configuration of the user interface, which may be a treeview, listbox, or combobox.
- Toolbar Configurations
-
The Toolbars Configurations are the toolbars and menus available to Dodeca users. All toolbars in Dodeca are configured as metadata and, as such, are completely controllable by the Dodeca administrator.
- Binary Artifacts
-
The Binary Artifacts are miscellaneous files that may be used in a Dodeca application. Typical types of binary artifacts include Excel templates and Dodeca-style libraries.
- Workbook Scripts
-
Workbook Scripts allow administrators to customize the generation and behavior of views using an event-driven paradigm.
- Essbase Connections
-
Essbase Connections define a single Essbase server, application and database, and specify the web service used by Dodeca to talk to the Essbase database.
- Modules
-
Modules are extensions of the Dodeca Framework, written in C# or VB.NET, and are comprised of DLLs, XML configuration files, and optionally, other files.
- SQL Passthrough DataSets
-
SQL Passthrough DataSets are defined queries that are executed on the server with the results passed back to the Dodeca client in DataSet format. They are often used for populating selector lists and displaying relational data in Dodeca.
Administrators configure and administer all of these categories of metadata within Dodeca’s metadata editors. We will discuss those topics in the next section.
Configuring and Managing Metadata
Metadata editors are forms built into Dodeca for configuring and managing the metadata that drives the functionality delivered to customers. Any and all metadata in Dodeca may be edited via one of these metadata editors. Metadata editors are available in two styles: the property grid style and the property table style. The graphic below depicts a property grid style metadata editor and shows some of the important features of this style of editor. The property table style of editor is diagrammed and labeled on page 10.
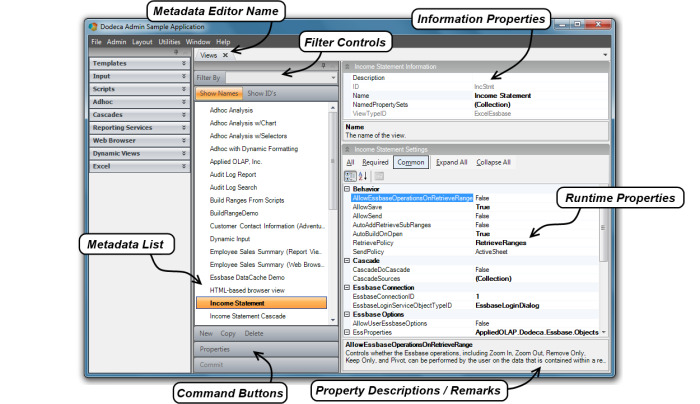
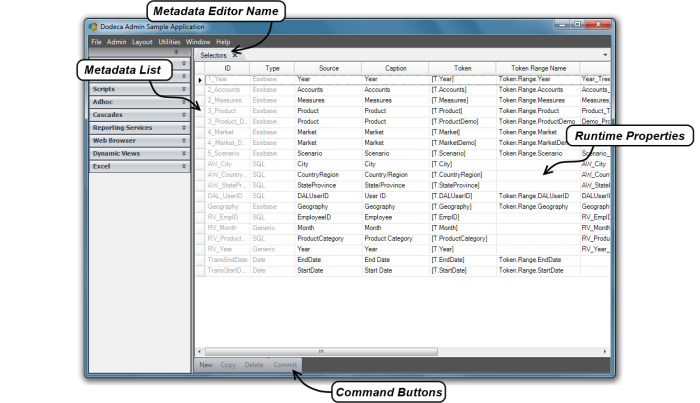
The information below gives a basic description of the identified areas of the metadata editor.
- Metadata Editor Name
-
The Metadata Editor Name identifies the current metadata editor and thus, the content of the form. It is displayed in a tab at the top of the pane containing the metadata editor currently in use.
- Metadata List
-
The Metadata List contains the object names or IDs of the metadata type which are available for editing. To edit a specific item, click on the metadata object name or ID.
- Filter Controls
-
The Filter Controls are tools that allow you to more easily locate the specific metadata object you wish to edit.
| these controls may vary from editor to editor. |
- Information Properties
-
The Information Properties provide informational data to the Dodeca runtime, such as name, description, and property set.
- Runtime Properties
-
The Runtime Properties are properties that determine the behavior of an instance of the selected metadata object type. The Runtime Properties vary greatly depending on the metadata editor.
- Property Description and Remarks
-
The Property Description documents the purpose of the selected runtime property. Some properties have extended remarks in this area. If the remarks do not fit in the given space, an ellipsis (…) displays following the description. To display the extended information, click and drag the splitter bar at the top of the Property Description panel to increase its height and display the additional information.
- Command Buttons
-
The Command Buttons allow the administrator to perform various actions on the metadata. The tools available vary from editor to editor due to the different actions necessary to manage the various types of metadata. The most important tool in this area is the Commit button, which writes changes back to the metadata store.
A few of the metadata editors are displayed in table format. The graphic below shows the Selectors metadata editor as an example this format.
Using Metadata Editors
To configure and manage Dodeca applications, it is necessary to have an understanding of many of the Dodeca metadata editors. This section discusses the basic operations of a metadata editor. Commit
The Views metadata editor is probably the most commonly used metadata editor in Dodeca and, as such, will be used in the following tutorial about using metadata editors in general. For this basic illustration, let’s consider a real-world scenario in which we need to change a property value of a View and commit it to the database.
The steps required to carry out this operation are as follows:
-
Open the Views metadata editor.
-
Locate and select the View that is to be modified.
-
Locate the property to be edited and change the value.
-
Click Commit to save the metadata change.
For the purpose of this example, assume that we wish to create a read-only version of the Input by Product view.
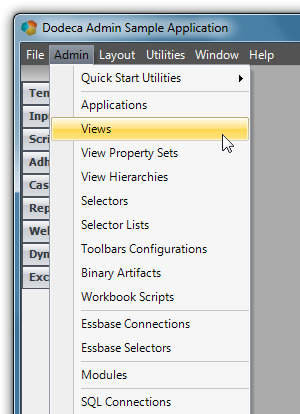
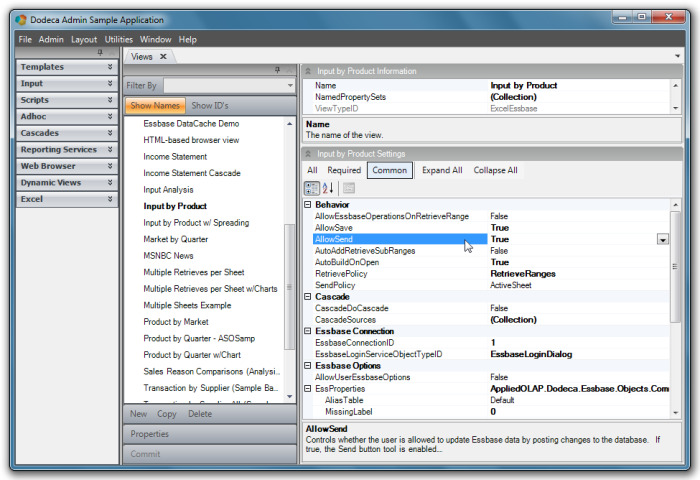
To start the process, select Admin > Views to open the Views metadata editor.
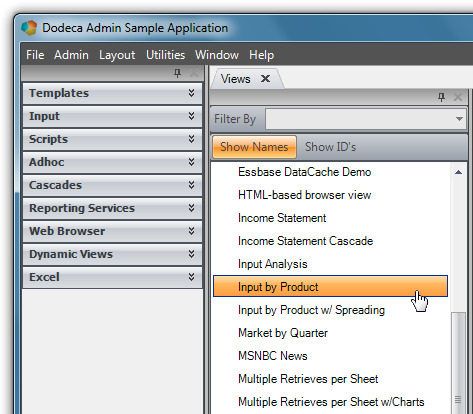
The metadata editor obtains a list of views from the metadata server and presents them in a list.
Click on the desired view (in this case, Input by Product), and Dodeca queries the metadata server for the properties of the Input by Product view definition.
A property grid type metadata editor appears for the view selected.
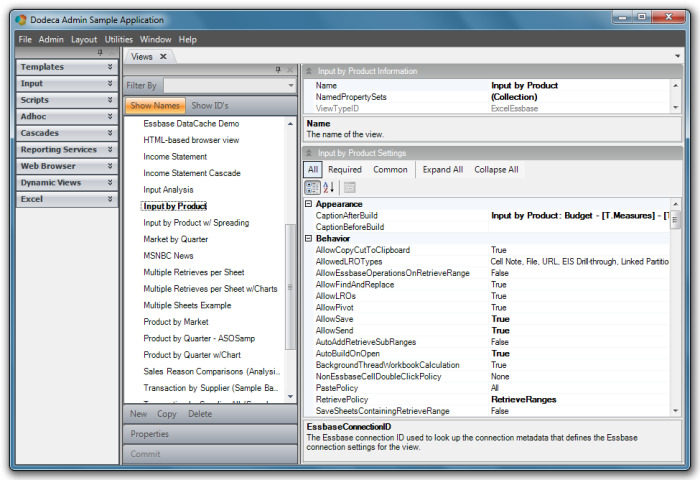
To begin, click Common at the top of the Input by Product Settings field. This limits the number of properties visible based on those most commonly used.
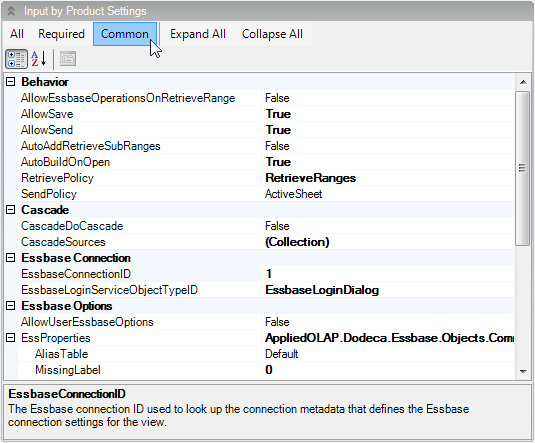
The set of properties visible now will be sufficient for the present example.
Locate and select the property to change. In this example, select the AllowSend property under the first visible category, Behavior.
When you select a property, its description displays in the Property Description panel at the bottom of your Dodeca instance.
Generally, this information describes the effect that the selected property has on a view, but it may contain other remarks as well. In some cases, such as the AllowSend property, the displayed comments are followed by an ellipsis (…).

The ellipsis indicates that there are extended remarks which do not fit in the given space. To display the extended remarks, click and drag the splitter bar at the top of the Property Description panel to increase its height and display the additional information.

To change the value of a property, click on the Value column. The AllowSend property is a Boolean value, and so the valid values, True and False, are available in a simple dropdown
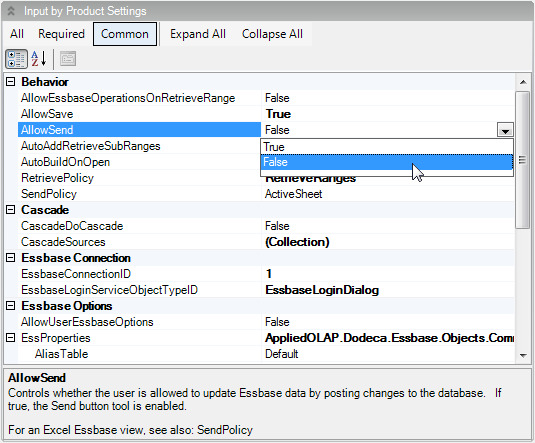
| Other properties have different data types and may have different selection controls. Other selection controls include popup forms for value selection and text boxes for the user to type in the desired value. |
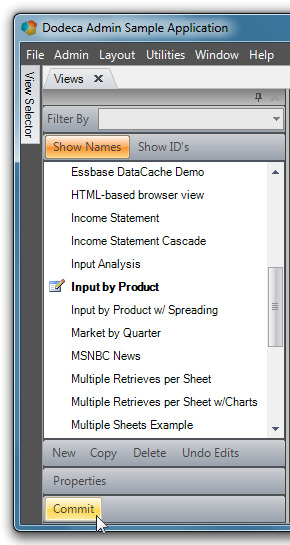
When a property value changes (in our example, the value of AllowSend), a pencil icon appears next to the view name in the Metadata to indicate that the view has been edited. Also, notice that the Commit button at the bottom becomes enabled.
Click Commit to submit the changes. All changes are written back to the relational database and the pencil icon is cleared.
| When editing a property that uses a text box for the property value, it is necessary to click on another property or select another element in the user interface for the change to be detected and become eligible for committal. |
If any additional changes are desired, select the next view to edit and repeat the process.
To review, the basic steps followed to configure Dodeca using a metadata editor are:
-
Open the appropriate metadata editor.
-
Locate and select the appropriate item (in this case, a View) to be modified.
-
Locate the property to be changed and make changes.
-
Click Commit to save the updated metadata.
The next section explains how to configure a new Dodeca application and shows how some of the metadata editors are used to build applications.